INNTERACT
Welcome to INNTERACT, Inntopia’s very own custom-designed support site. INNTERACT lets you interact with Inntopia support staff like never before, allowing you to easily submit product setup and branding as well as report system issues. All submissions are also easily trackable so you always know the status of your cases.
Click here to access INNTERACT. INNTERACT can also be accessed from the Inntopia CRS and RMS home pages.
Note: INNTERACT is currently not available for Marketing Cloud customers.
Each time you access INNTERACT, you must log in using the same username and password you use to log in to your Inntopia system.
- From the INNTERACT home page, enter your Inntopia user name and password in the login fields.
- Click Log In. The Select Your Account page appears.
- From the Select Account drop-down list, click the name of the account with which you want to work.
- Click Set Selected Account. The account name you selected appears at the top of the screen.
Branding and setup requests are reviewed daily and are prioritized into Inntopia’s overall work list. Once prioritized, you can check your case list to check the status of your request.
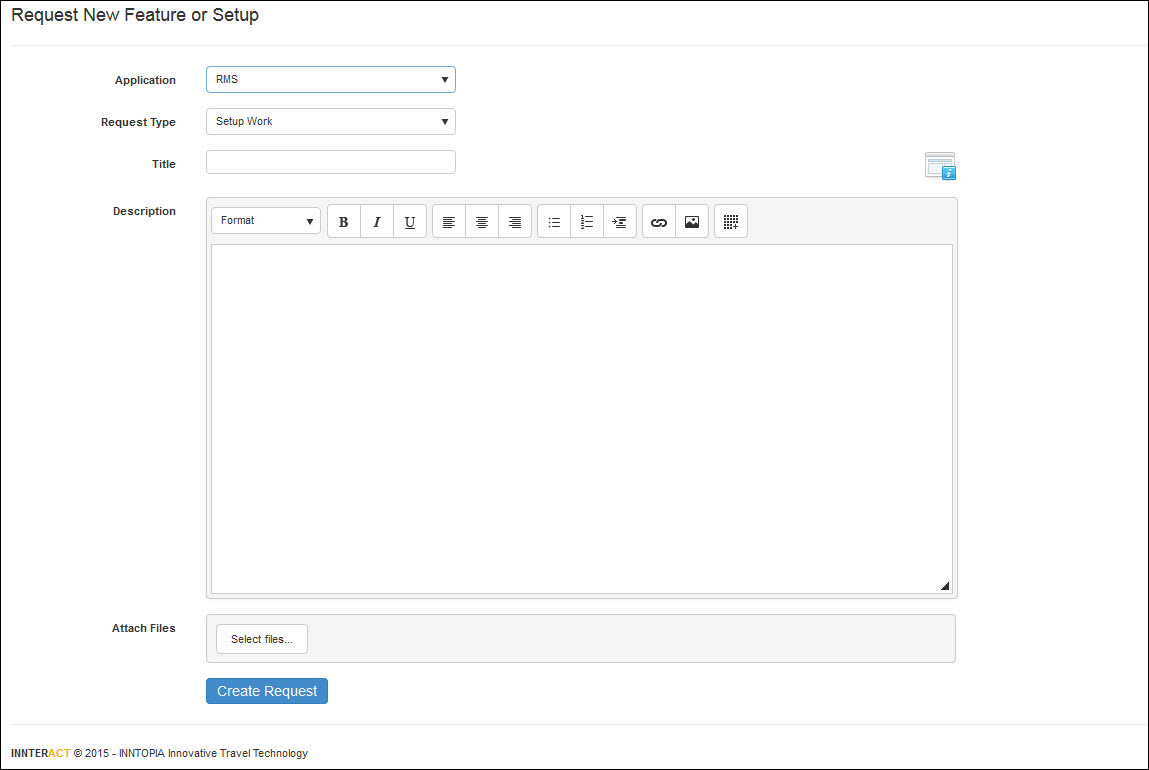
- From the INNTERACT home page, click Request New Feature/Setup. The Request New Feature or Setup screen appears.
- From the Application drop-down list, select the Inntopia application for which you want to request a new setup. The Request New Feature or Setup fields appear for you to enter details about your request with the Application field auto-populated with the application you chose.
- In the Request Type drop-down field, select either Setup Work or Branding.
- In the Title field, enter a short title that best describes the work you are requesting.
For example, to request an interface setup, include the name of the interface in the title of your request: RTP Two-Way Interface Setup Request.
- In the Description window, use the simple WYSISWYG editor to enter as much of the following information as necessary to accurately describe your request:
- Supplier or Sales ID
- Complete description of the request
- Your contact information
- Screen shots (if applicable)
- URLs/Hyperlinks (if applicable)
- To attach files to your request, in the Attach Files window, click Select Files… and from your computer’s browser, select the files you want to attach. You can attach multiple files to a request.
- To remove an attached file, click its corresponding X.
- When you have finished entering the details of your request, click Create Request. Your request is listed on the My Case List page.
In addition, your request creates a work order in Inntopia’s internal development tracking software. The work order is directed to the appropriate engineering team depending on the type of information you entered.
You can use INNTERACT to report issues for Inntopia Commerce applications.
Note: INNTERACT is not available for Marketing Cloud customers.
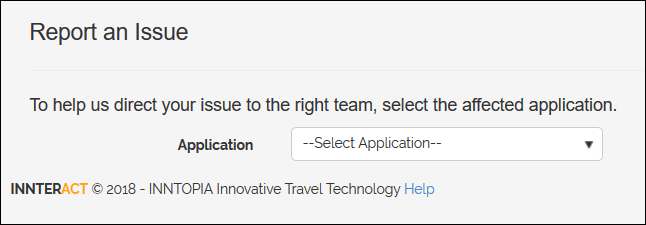
- From the INNTERACT home page, click Report an Issue. The Report an Issue page appears with the Application drop-down list.
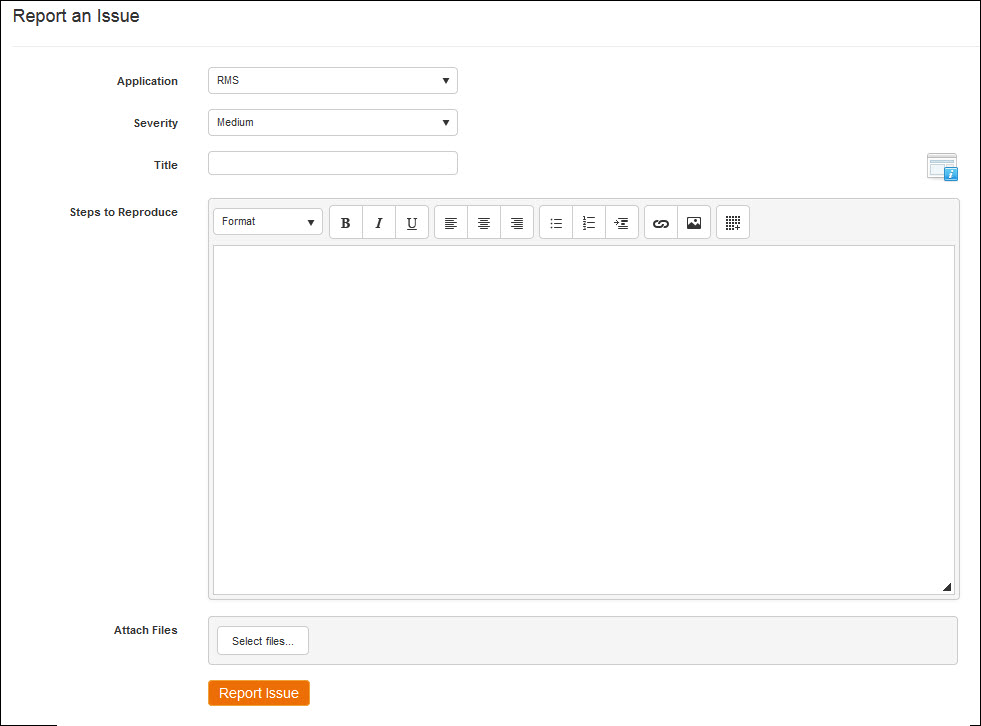
- From the Application drop-down list, select the Inntopia application for which you want to report an issue. The Report Issue fields appear for you to enter details about your request.
- In the Severity drop-down list, select the level of urgency that most closely applies to your issue:
- Critical (Severity 1) – Unable to complete reservations and/or update rates and availability. No known workaround. Needs immediate attention.
- High (Severity 2) – Serious issue causing significant business impact. No known workaround. Needs prompt attention.
- Medium (Severity 3) – Important issue with minimal business impact. There may be a workaround. Needs attention.
- Low (Severity 4) – Issue with little business impact such as typos, minor display issues, etc.
- In the Title field, enter a short title that best describes the issue you are reporting.
For example, to report an issue that is preventing bookings, include that in the title: Cannot book reservation. - In the Steps to Reproduce window, use the simple WYSIWYG editor to enter the following required information:
- Your email address and name
- Detailed title of the case
- Step-by-step detailed description of the issue.
- Screen captures of all important information. Inntopia recommends the following screen capture tools:
- Related URLs
- Itinerary Number (if applicable)
- Any background information or results from troubleshooting
- Time sensitivity
- To attach files to your request, in the Attach Files window, click Select Files… and from your computer’s browser, select the files you want to attach. You can attach multiple files to an issue report.
- To remove an attached file, click its corresponding X.
- When you have finished entering the details of your issue, click Report Issue. Your request is listed on the My Case List page.
In addition, your request creates a work order in Inntopia’s internal development tracking software. The issue is evaluated and re-prioritized when appropriate. The issue is then assigned to the appropriate engineering team depending on the type of information you entered.
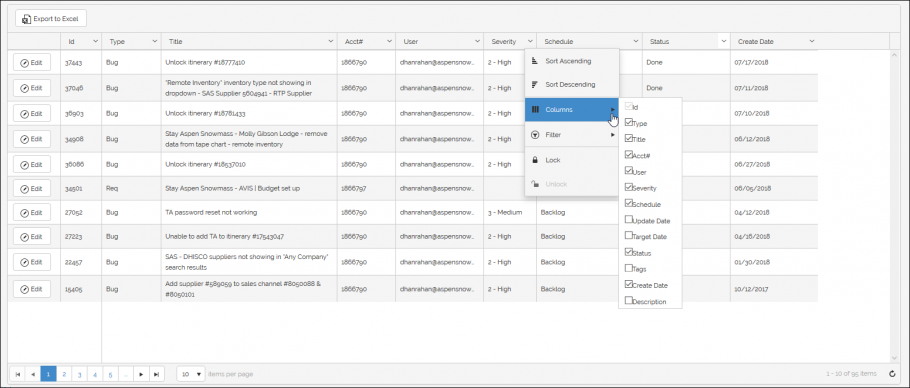
You can quickly check the status of any case you have opened in INNTERACT. You can also edit the title of a case. In addition, you can export the list to Excel. You can filter and sort large lists of cases by any of the column headers.
Case status designations include:
- New – Case has been submitted to Inntopia.
- Approved – Case has been evaluated, prioritized, and assigned to a Product Owner (PO) to review and approve requirements.
- Ready for Team – Case has been prioritized and assigned to an engineering team.
- Committed – Work on the case is in progress.
- Ready for PO – Case has been coded and is being tested by the Product Owner.
- Done – Case has been resolved; work is complete and waiting for deployment to the Production environment.
-
From the INNTERACT home page, click View My Cases. The case list for your set account appears showing both Requests and reported Issues.
- To list all cases from all of your accounts, check the Search ALL Accounts box and then click Search.
- To customize the list, click the down arrow in a column header. The options for customizing the list appear.
- To sort the list, click either Ascending or Descending.
- To customize which columns appear in the list, in the Columns drop-down list, select and de-select the column header names.
- To filter the list, click the Filter drop-down list. Enter the filter criteria and click Filter.
Note: The filter fields are pre-populated to exclude Removed items from the list. To view Removed items, click Clear in the filter options.
- To move the columns, click a column header and drag it to the desired position.
- To lock a column to keep it in a particular position, click Lock. To unlock a column, click Unlock.
- To search for a specific case, in the Search Id or Title & Description field, enter the case ID, title, or description and click Search. The cases containing your search criteria are listed.
- To export the list to an Excel spreadsheet, click Export to Excel. The exported file includes only the columns selected to appear on the screen. Hidden columns will not appear on the spreadsheet.
You can make changes to the case title, attach additional files, or add information to the description in a case.
To ensure effective issue reporting, it is important for your organization to develop its own internal process for reporting bugs and other issues. Inntopia highly recommends following the below guidelines:
- Appoint just a few key users to access INNTERACT.
- Before submitting a new case, verify that no one else from your organization has already reported the same issue.
- If it is a training issue, please direct your questions to Inntopia Partner Services before submitting a case.
- Submit the case properly by entering a short and precise title and all required information.
- Select the correct "Project" and "Area" so that your case gets routed properly to the Inntopia team. "Project" refers to your organization's name and "Area" refers to the type of issue you are reporting. For example, Project: Winter Park, Area: Packages.
- There are times when it is helpful to provide the version of your Internet browser and the operating system that you are using. If you are unsure of how to obtain this information, please use this link and submit the detail in the case.
Below are two examples of the information submitted in INNTERACT cases on the same issue. One is a good example of the step-by-step detailed description of the issue. The other is an example of incomplete information being provided.
Good Example
Title: CRS search filtered by ‘Hot Tub’ returns no results
- Begin a New CRS Search in the ‘ABC CRS’ ‘Sales ID 123456’
- Enter dates to Check-in: 4/10 and Check-out: 4/12 (this is mid-week, off-season and I know inventory with a Hot Tub is available)
- Check the ‘Hot Tub’ box under ‘Room Amenities’
- Click "Search."
- No results are returned
Bad Example
Title: Search not functioning properly
- Search for dates filtered by ‘Hot Tub’


