Customer Profile
Before you can save or reserve an itinerary, you must create a customer profile to associate with the itinerary. A history of all activity associated with each customer is kept in the Inntopia system.
Customer profile refers to the virtual folder in the Inntopia system that contains a customer's information such as:
|
|
|
|
|
|
|
|
A Customer history is kept as a record of the itineraries that have been saved for a customer that also includes all products that a customer ever reserved. If you try to save or reserve an itinerary before creating a customer profile, the Inntopia system prompts you to enter the customer information. First and last name, address, and phone number are required components of a customer profile.
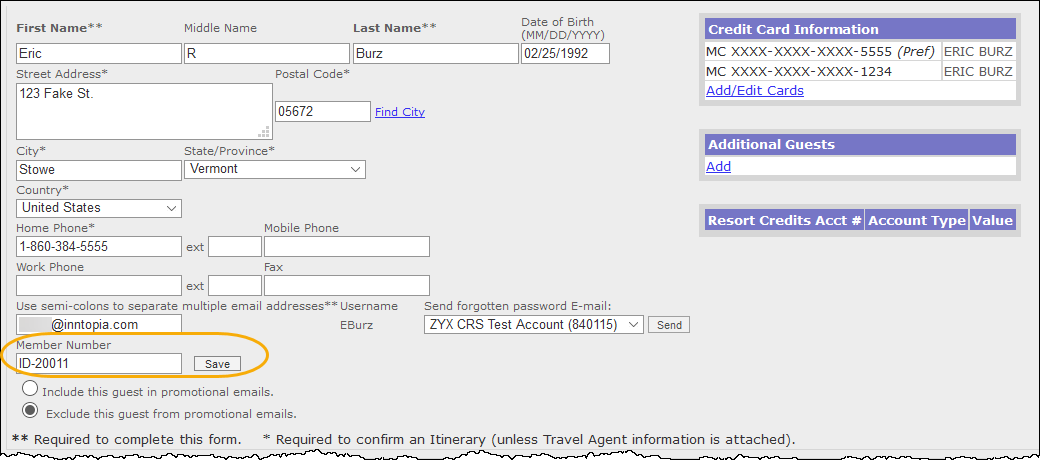
When you create a customer profile, you can choose to include or exclude a customer from promotional email campaigns. You can also add notes or a Member Number to the profile.
A member number is a tracking number for a guest that is tracked outside the Inntopia system. A member number can be used to help a reseller track a specific guest regarding repeat bookings, groups, or organizations that donate on different levels.
For example, a non-profit organization may give discounted or preferred pricing for those guests who may make various levels of contributions. The guest is then assigned a specific number and/or letter to identify which level of contributor they are.
You can enter a Member Number in the customer profile.
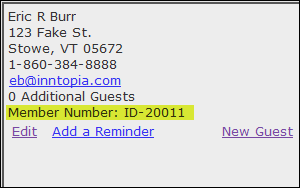
After a member number has been saved in the customer profile, it is also visible in the customer information under the Itinerary window.
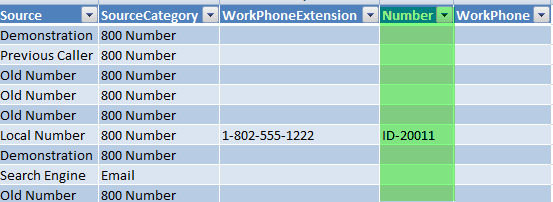
The member number can also be found in the AR&AP reports section, under Data Exporter Guest Export excel version.
A customer profile is usually created after conducting a product search. However, you can create the profile first. In either case, the procedure is the same.
- Log into your Inntopia CRS account and from the CRS home page, click New Session and log a marketing source. To open the session in a new window, check the Open in new window box. Otherwise, leave this box unchecked.
- In the Customer window, enter the guest's last name in the Last Name (required) field.
- Click Find. The Add Guest link appears. If a customer already has a profile in the system or if there is more than one customer with the same last name, a list of profiles to choose from also appears in the Search | Details window.
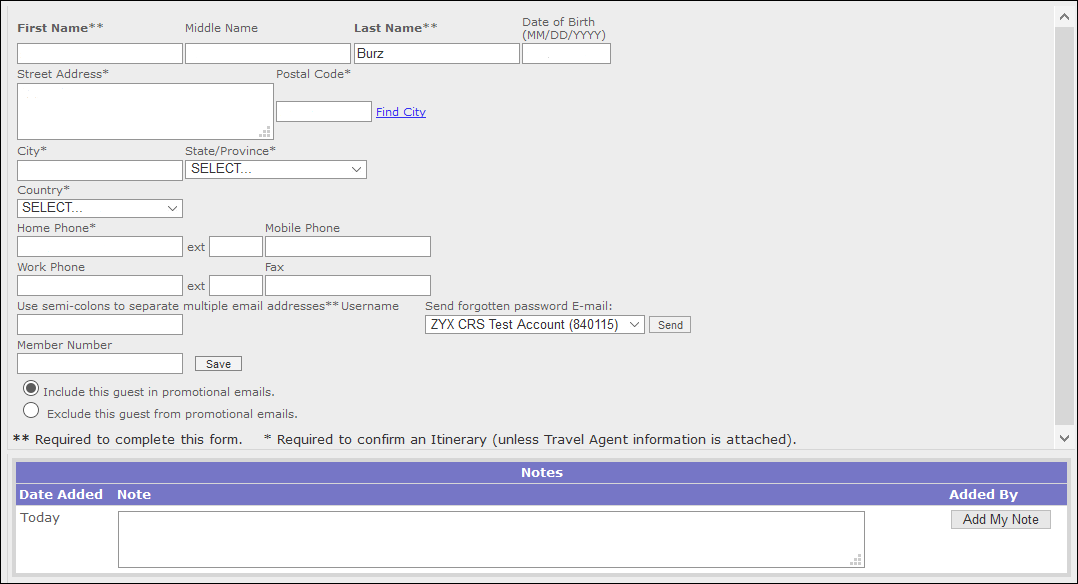
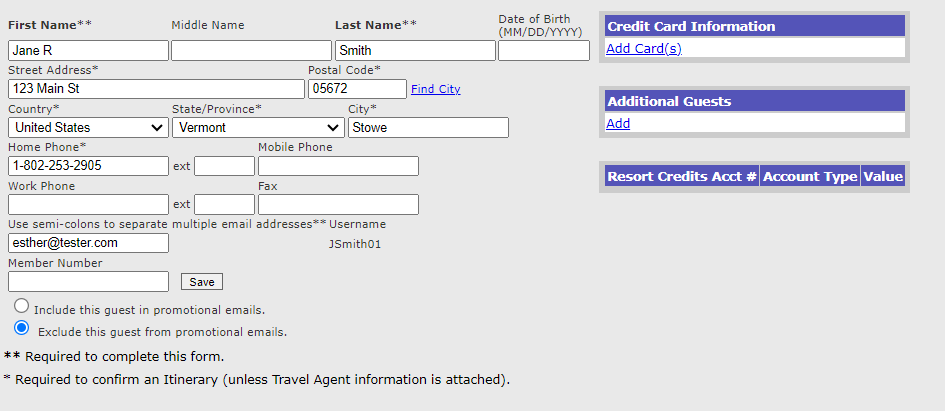
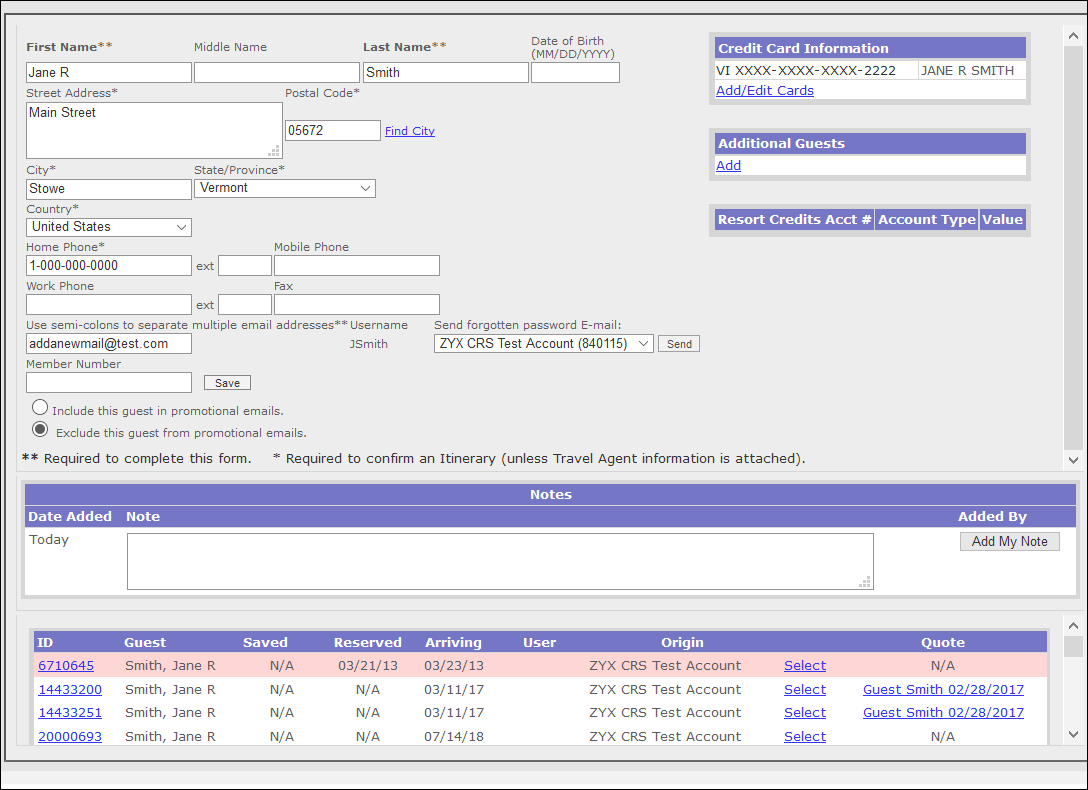
- Click Add Guest. The Customer Profile screen appears with the guest name entered in the Last Name field.
- Enter information in the following required fields:
- First Name – Enter the guest's first name.
- Street Address – Enter the guest's street address.
- Postal Code – Enter the guest's ZIP or postal code and click Find City. The city, state/province, and country fields are filled in automatically for you.
- City – If not already visible, enter the city or town in which the guest lives.
- State/Province – If not already visible, enter the state or province in which the guest lives.
- Country – If not already visible, enter or select from a drop-down list the country in which the guest lives.
- Home Phone – Enter the guest's home phone number.
- If desired, enter information in the following optional fields:
- Middle Name – Enter the guest's middle name or initial.
- Date of Birth – Enter the guest's date of birth.
- Mobile Phone – Enter the guest's mobile phone number.
- Work Phone – Enter the guest's work phone number.
- Fax – Enter the guest's fax number.
- Member Number
- Email – Enter the guest's email address (required). Use semi-colons to separate multiple email addresses.
- Choose to Include or Exclude this guest from promotional emails by clicking the appropriately corresponding radio button.
- To add a note about this guest, enter it into the Notes window.
- Click Save. A message appears stating the information was saved successfully. Links to add additional guests and enter credit card information appear and the itinerary can now be reserved and associated with the customer profile.
You can either add additional guest information and/or credit card information now, or enter it at a later time.
You can add additional guests to a customer profile at any time. Additional guest information can only be edited or deleted if additional guests have already been added.
- Log into your Inntopia CRS account and from the CRS home page, click New Session and log a marketing source. To open the session in a new window, check the Open in new window box. Otherwise, leave this box unchecked.
- In the corresponding text box of the Customer window, enter the last name of the person to whose profile you want to add guests.
- Click Find. A list of profiles with similar names to what you entered appears.
- Find the profile you want to edit and click its corresponding Select link. The name you selected appears in the Customer window.
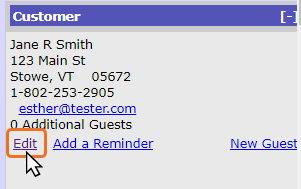
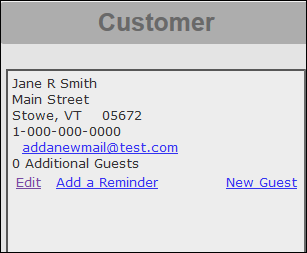
- In the Customer window, click Edit. The Edit Customer Profile screen appears with the information previously entered for the customer displayed in the fields.
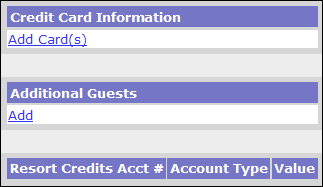
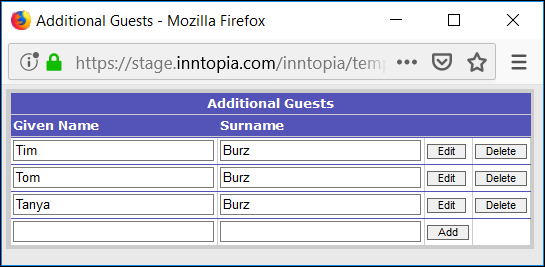
- In the Additional Guests box on the Customer Profile screen, click Add. The Additional Guests pop-up window appears.
- In the fields on the Additional Guests window, enter the first (Given) and last (Surname) names of the guest you want to add to the profile and click Add. The name you entered appears listed in the Additional Guests pop-up window and in the Additional Guests box on the Customer Profile screen.
- When you have finished adding guests to the customer profile, close the Additional Guests pop-up window.
- In the Additional Guests box, click Add/Edit. The Additional Guests pop-up window appears.
- Find the guest you want to edit and make the changes in the Given and/or Surname fields. Click the corresponding Edit button. The changes you made appear in the pop-up window and in the Additional Guests box on the Customer Profile screen.
- When you are finished editing guests, close the Additional Guests pop-up window.
- In the Additional Guests box, click Add/Edit. The Additional Guests pop-up window appears.
- Find the guest you want to delete and click the corresponding Delete button. The guest name is removed from the pop-up window and the Additional Guests box on the Customer Profile screen.
- When you are finished deleting guests, close the Additional Guests pop-up window.
You can enter multiple cards on a customer's profile. The first card you enter is automatically the default, or preferred, card. Unless otherwise specified at the time a reservation is made, the Inntopia system uses the preferred card first. If there are multiple cards on a customer profile, any of the cards can be specified as the preferred card.
Important Note: Inntopia provides secure guest payment card fields for entering and storing customer credit card information. Card holder details such as card number, CVV, and any other personally identifying information must only be entered in these secure fields within Inntopia CRS. Entering credit card information in any other fields within the Inntopia platform (such as Guest Notes) is strictly against PCI compliance standards and is done entirely at the risk of the Inntopia partner.
- Log into your Inntopia CRS account and from the Inntopia CRS home page, click New Session and log a marketing source. To open the session in a new window, check the Open in new window box. Otherwise, leave this box unchecked.
- In the corresponding text box of the Customer window, enter the last name of the person to whose profile you want to add a credit card.
- Click Find. A list of profiles with similar names to what you entered appears.
- Find the profile you want to edit and click its corresponding Select link. The name you selected appears in the Customer window.
- In the Customer window, click Edit.
The customer profile fields appear with the information previously entered for the customer displayed in the fields.
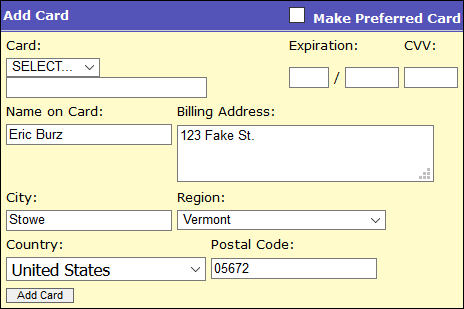
- In the Credit Card Information box, click Add Card(s) or Add/Edit Cards. The Add Card pop-up window appears with most fields pre-populated with the customer information.
- In the first Card field, choose a card type from the drop-down list:
- AX – American Express
- MC – Master Card
- VI – Visa
- To set this card as the preferred card going forward, check the Make Preferred Card box. Otherwise, leave this box unchecked.
- In the next Card field, enter the card number.
- In the Expiration fields, enter the month and year the card expires.
- If your CRS is set up to collect it, in the CVV field, enter the Card Verification Value for the card.
- If the Name on Card differs from the name on the customer profile, enter the correct name in the Name on Card field.
- If the Billing Address differs from the address on the customer profile, enter the correct billing address.
Note: If your payment gateway uses Address Verification Services (AVS), an address must be entered on the credit card screen.
- Click Add Card. A message appears stating the credit card information was saved successfully. The credit card information appears on the screen with only the last four digits of the card number visible.
You can enter additional cards in a customer profile, update expiration date or billing address information, or change which card is the preferred card.
You cannot delete a credit card from a customer profile or from the Inntopia system. Expired cards remain in the Inntopia system appearing in red.
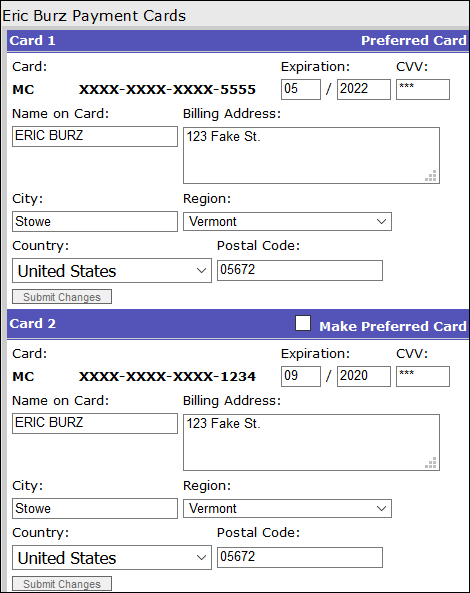
- From the Customer Profile screen, click the Add/Edit Cards link. The Payment Cards window for that customer appears listing the information for each card entered. The preferred, or default, card appears at the top of the list.
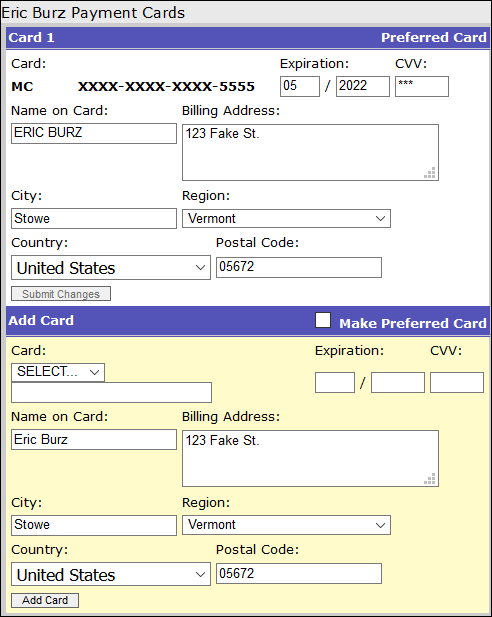
- To add a new card, scroll to the bottom of the list, enter the new card information, and click Add Card. The card information is added to the list and the card appears listed on the Customer Profile screen.
- To update expiration date or other billing information, scroll to the card you want to update, enter the information and click the card's corresponding Submit Changes button.
- To change which card is the preferred, or default, card used for credit card transactions, click on find the card you want to mark as the preferred card and click its corresponding Make Preferred Card check box. The card is made the preferred card and is moved to the top of the list of cards visible on the Customer Profile screen.
The Nexio payment gateway integration uses the Wallet entry form in Inntopia CRS for collecting and storing customer credit card information. This entry form is different from the form used in other Inntopia payment gateway integrations.
- In the Credit Card Information box, click Add Card(s) or Add/Edit Cards.
The Saved Cards pop-up window appears. If there are any previously saved cards in the customer profile, they are listed on the window. The preferred card is indicated by a check mark.
- To add a new card, click + Add New. The Add New Card fields appear with most fields pre-populated with the customer information.
- In the Name on Card field, enter the card holder name.
- In the Card Number field, enter the credit card number.
- In the Expire field, enter the month and year the card expires (MM/YYYY).
- In the CVV field, enter the Card Verification Value for the card.
- If the address information differs from the address on the customer profile, enter the correct information in the appropriate fields.
Note: The Nexio payment gateway uses Address Verification Services (AVS); therefore, an address must be entered on the credit card screen.
- If the card is NOT meant to be the preferred card on file, uncheck the Preferred box. Otherwise, leave this box checked.
- Click Add New. A message appears stating the credit card information was saved successfully. The credit card information appears listed on the screen with only the last four digits of the card number visible.
For existing customer credit cards, you can update billing address information or change which card is the preferred card.
You cannot delete a credit card from a customer profile or from the Inntopia system. Expired cards remain in the Inntopia system but do not appear in the list of cards.
- From the Customer Profile screen, click the Add/Edit Cards link. The Saved Cards window for that customer appears listing the information for each card entered. The preferred, or default, card appears at the top of the list.
- To update billing information, scroll to the card you want to update, click its corresponding down arrow to expand the form, enter the information, and click Save.
- To change which card is the preferred, or default, card used for credit card transactions, expand the card you want to mark as the preferred card, click its corresponding Preferred check box, and click Save.
The card is made the preferred card and is moved to the top of the list of cards visible on the Customer Profile screen.
- Log into your Inntopia CRS account and from the CRS home page, click New Session and log a marketing source. To open the session in a new window, check the Open in new window box. Otherwise, leave this box unchecked.
- In the corresponding text box of the Customer window, enter the last name of the customer whose profile you want to view.
- Click Find. A list of profiles with similar names to what you entered appears.
- Find the customer profile for which you want to view the history and click its corresponding Select button. The name you selected and corresponding customer information appear in the fields in the Customer window.
- In the Customer window, click Edit. The Customer Profile screen appears with the customer information appearing at the top and the customer history beneath.
The History portion of the Customer Profile screen is divided into two primary sections: Notes and the list of itineraries associated with the customer.
The Notes section contains all Customer Notes that were previously entered into the profile by agents over time. The notes are date-stamped for reference and have no size limit, but should be concise and clear so that other agents understand them easily.
A list of all of the itineraries that have been saved or reserved for the customer in the order in which they were created is at the bottom of the screen.
Itineraries are color coded to denote their status in the Inntopia system. The color codes for itineraries are as follows:
- White = Saved itinerary
- Yellow = Saved itinerary online
- Green = Reserved itinerary with an arrival date in the future
- Grey = Cancelled itinerary
- Pink = Reserved itinerary with a pending modification
- Blue = Reserved itinerary with an arrival date in the past
Note: Reserved itinerary color codes (Green and Blue) are based on the arrival date of the entire itinerary.
- To open an itinerary from the listing in the Customer History, click on the itinerary’s corresponding Select link.
Agents can assist a customer with resetting their online password in Inntopia eComm.
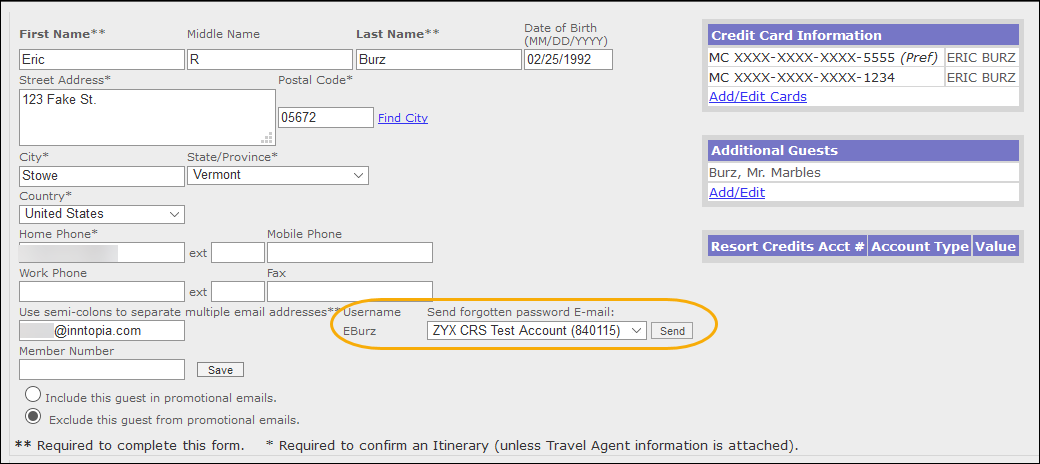
On the Customer Profile screen in Inntopia CRS, agents can see the customer’s online username and an option to select an account to send an email that contains a link for generating a new password to the email address associated with the account.
- Only sales channels set to use eComm appear in the drop-down list.
- Sales channels set to prohibit online bookings do not appear in the drop-down list.
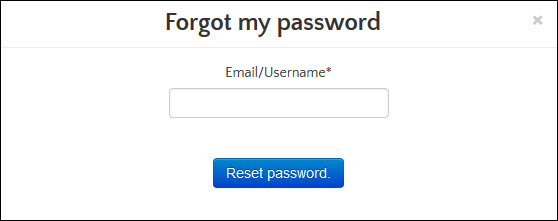
The email that is sent to the guest contains the customer’s username and a link to the eComm reset password screens.
The user enters their user name and clicks Reset Password. A temporary password is sent to the email address corresponding to the user name. The user can then enter the temporary password in the subsequent screen to reset their password to one of their choosing.
