Manage Promotion Discounts
Promotion discounts can be applied as a single discount to all products for a selected supplier or as individual discounts on specific products. You can enter tiered rate discount overrides as well as date overrides based on the original discount type for individual products or for all the products associated with a discount. Date overrides apply only for the specified date range.
- Login to Inntopia RMS or Inntopia CRS and click the Promotions tab.
- From the list of promotions on the Promotions page, click the name of the promotion with which you want to work. The components for that promotion are listed.
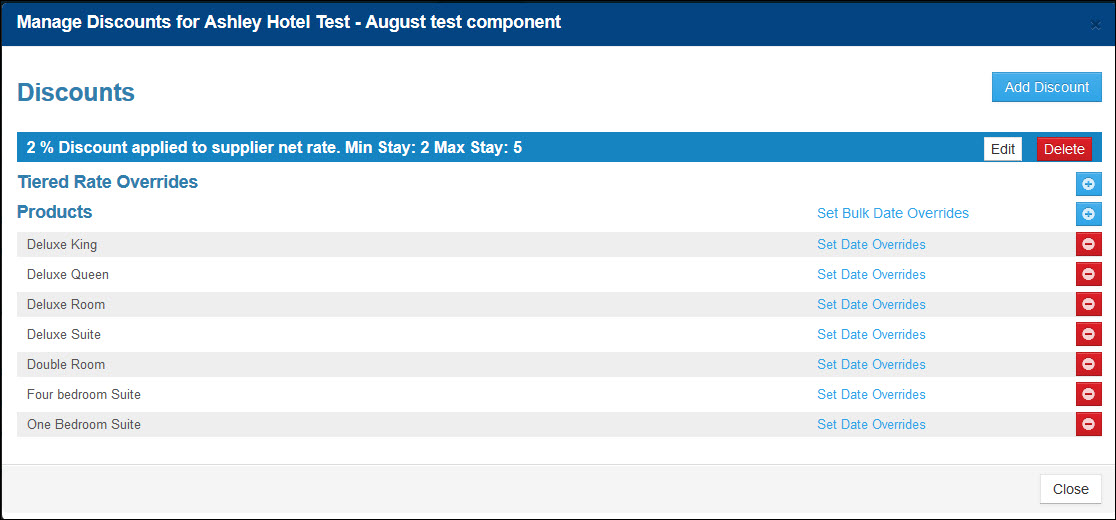
- In the Options drop-down list for the component you want to work with, select a supplier. The Manage Discounts window appears. This window displays the supplier name and the component name.
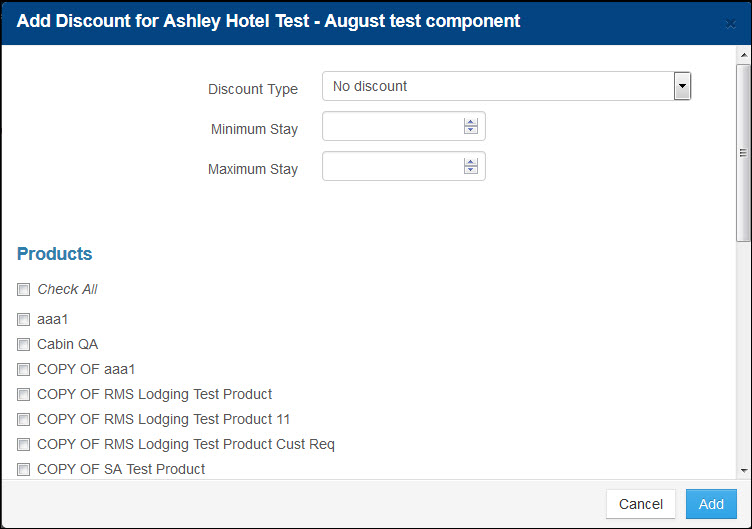
- Click Add Discount. The Add Discount for <supplier – component> screen appears.
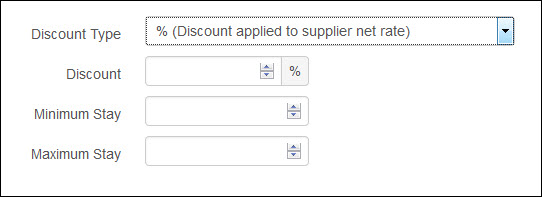
- From the Discount drop-down list, select the type of discount. The discount fields that appear may vary depending on the type of discount you are entering.
For detailed explanations of Discount Types, click here.
- Enter the discount amount and information that may apply depending on the type of discount you selected.
- If applicable, enter Minimum and Maximum Stay amounts. If you want to enter Tiered Rate Discount Overrides, you must enter at least 1 in the Minimum Stay field.
- In the list of products, check off each one to which the discount will apply. To add the discount for all products, click Check All to select all the products.
- Click Add. The selected products are now listed in the Products area and the discount you entered applies to the selected products from that supplier.
- Login to Inntopia RMS or Inntopia CRS and click the Promotions tab.
- From the list of promotions on the Promotions page, click the name of the promotion with which you want to work. The components for that promotion are listed.
- In the Options drop-down list for the component you want to work with, select a supplier. The Manage Discounts window appears. This window displays the supplier name and the component name.
- To make a change to a discount, click Edit, enter the new information, and click Save. The changes apply to all the products associated with the discount.
- To delete a product from the discount, click that product's corresponding red Remove Product button and click Yes to confirm.
- To add a product to the discount, click the blue Add Product button
 , select products, and click Add.
 - To delete an entire discount, click its corresponding Delete button
 and click Yes to confirm. All information for that discount is removed and the products are no longer associated with that discount.
 - When you have finished adding discounts, click Close to return to the Promotions page.
You can assign varying discount overrides to a single promotion based on the length of stay of a lodging item on an itinerary. You can apply as many overrides to a discount as you want.
Tiered rate discounts can be useful if you want to add a graduated discount to a product.
For example, you can add a discount of 5% off a lodging product with a minimum stay of two nights. To encourage guests to stay longer, you can offer a 10% discount for staying three nights and then a 15% discount for staying five nights, and so on.
For the Tiered Rate Overrides row to appear, you must configure a minimum stay on the initial discount setup. That minimum can be set to "1" or something longer if applicable.
- Login to Inntopia RMS or Inntopia CRS and click the Promotions tab.
- On the Promotions page, find the component you want to work with and click its corresponding Settings button and then select the supplier for which you want to enter a discount override. The Manage Discounts for <supplier> page appears with discounts listed.
- Find the discount for which you want to enter an override and in the Tiered Rate Overrides section, click the corresponding, blue Add Override button. The Add Override for <supplier – component> appears.
- From the Discount Type drop-down list, select the type of discount override you want to apply. The discount fields specific to your chosen discount type appear.
- Enter the discount override information and click Add. The override is listed in the Tiered Rate Overrides section and applies to the products included in the original discount.
- To remove an override, click its corresponding red Delete button. The override is removed.
- Overrides are not supported for Free day/night (recurring) discounts.
- Tiered rate discount overrides are only supported in RMS.
- Tiered rate discount overrides are currently only supported for lodging products.
- Date overrides are removed upon deleting a component.
- Set Bulk Date Override applies to all tiers and cannot be applied to one specific tier.
You can enter date overrides based on the original discount type for individual products or for all the products associated with a discount.
- Find the component you want to work with and click its corresponding Settings button and then select the supplier for which you want to enter a date override. The Manage Discounts page appears with discounts listed.
- On the Manage Discounts page, find the discount for which you want to set a date override.
- To set a date override for an individual product, click the product’s corresponding Set Date Overrides link.
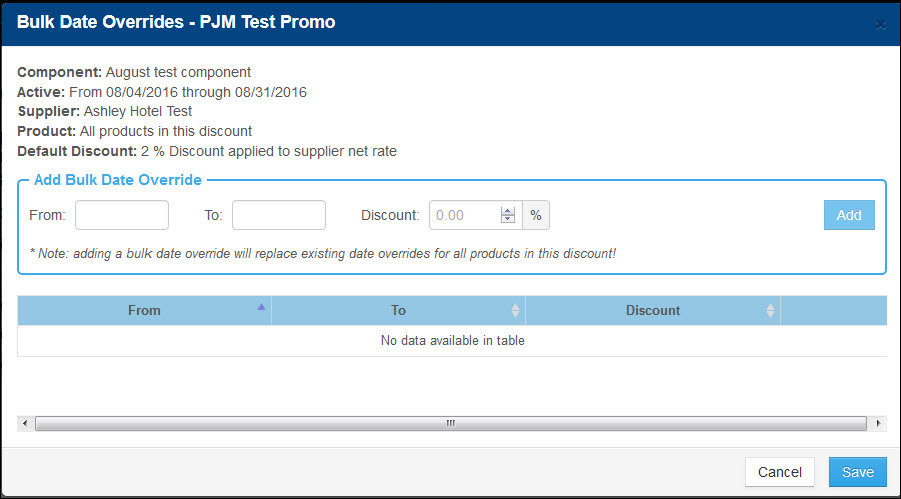
To set a date override for all the products associated with the discount, click the discount’s corresponding Set Bulk Date Overrides link.Note: Adding a bulk date override will replace existing date overrides for all products in the discount.
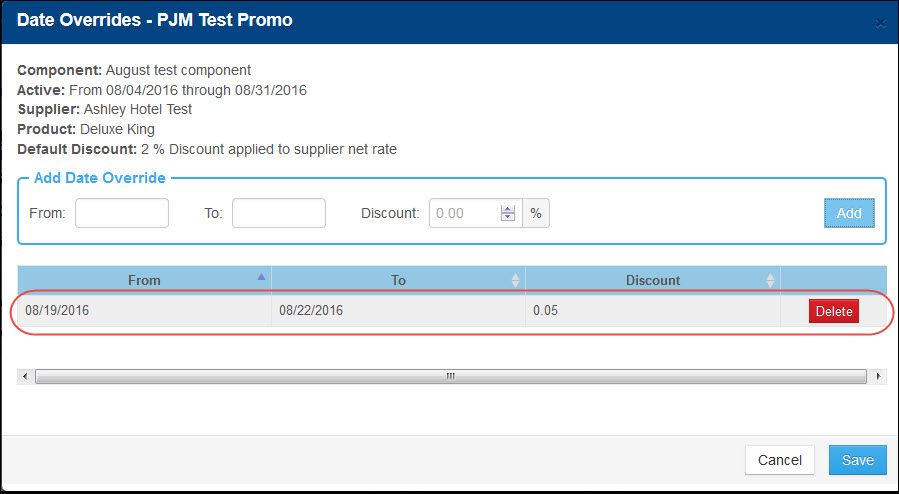
Depending on which type of date override you are setting, either the Discount Overrides page or the Bulk Discount Overrides page appears.
- In the Add Date Override section From and To fields, enter the dates during which you want to override the original discount dates.
- In the Discount field, enter the new discount amount based on the original discount.
For example, if the original discount was 20% off and you want to set an override for a date range of 25% off, you would enter 25 in the Discount field. Or, if the original discount was Stay four nights, get one night free and you want to set an override for a date range to stay four nights, get two nights free, you would enter 2 in the Discount field. Alternatively, you can enter a zero in the discount field to offer no discount for the date range.
- Click Add. The override appears listed on the page.
- When you have finished entering overrides, click Save. Each product on the Manage Discounts page that is associated with the discount now has a corresponding Edit Date Override link.
- To edit an individual product’s Date Override, you must first delete the override and then enter a new one.
- Open the discount’s Edit Date Overrides page.
- First delete the override by clicking its corresponding Delete button.
- Enter the new override information and click Add.
- When you are finished making changes to the override, click Save.
- To apply Date Overrides to all products in a discount, open the discount’s corresponding Set Bulk Date Overrides page, enter the new information, click Add, and then click Save.
- To delete all existing Date Overrides for all products in a discount, open the discount’s corresponding Set Bulk Date Overrides page, and click Save.
The message “Existing date overrides will be removed for all products in this discount. Are you sure?” appears. Click Yes to confirm.

