Itinerary Search
There are five primary ways to search for an itinerary.
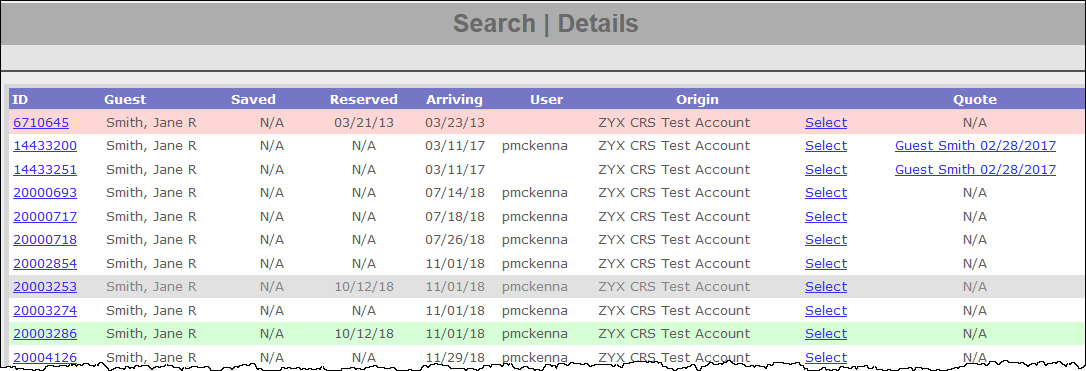
Itineraries are color coded to denote their status in the Inntopia system. The color codes for itineraries are as follows:
- White = Saved itinerary
- Yellow = Saved itinerary online
- Green = Reserved itinerary with an arrival date in the future
- Grey = Cancelled itinerary
- Pink = Reserved itinerary with a pending modification
- Blue = Reserved itinerary with an arrival date in the past
Note: Reserved itinerary color codes (Green and Blue) are based on the arrival date of the entire itinerary.
Note: If all the items in a saved itinerary have all been removed, the itinerary no longer appears in searches; however, a record of the saved itinerary is kept in the Inntopia System database.
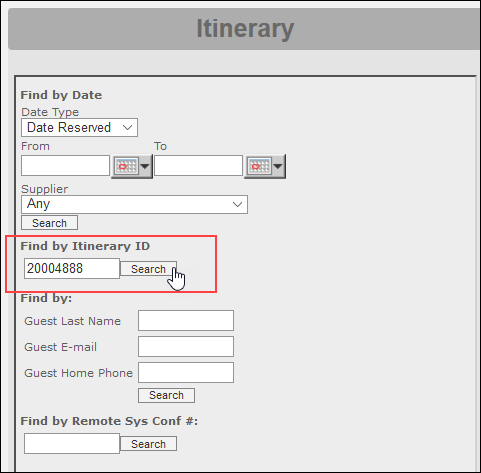
Use this method when a customer calls back and provides you with the Itinerary ID they received at the time the itinerary was saved or reserved.
- From the CRS home page, click New Session and log a marketing source. To open the session in a new window, check the Open in new window box. Otherwise, leave this box unchecked.
- In the Agentopia Itinerary window, in the Find by Itinerary ID box, enter the ID number given to you by the customer.
- Click Search. The corresponding itinerary with the Itinerary ID is listed.
- To open the itinerary, click Select.
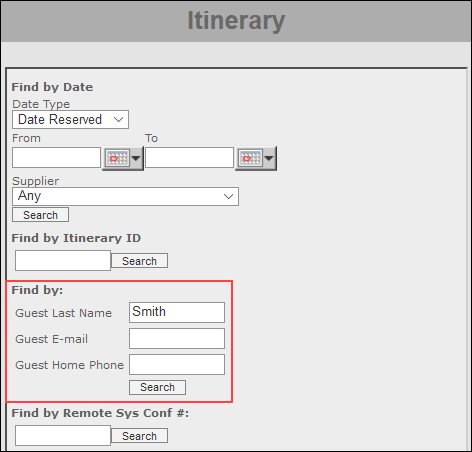
Use this method when you do not know the Itinerary ID or dates the itinerary was saved.
- From the CRS home page, click New Session and log a marketing source. To open the session in a new window, check the Open in new window box. Otherwise, leave this box unchecked.
- In the corresponding field in the Agentopia Itinerary window, enter either the customer's last name, email address, or home phone number (there is no specific format required for entering the phone number).
- Click Search. A list of all Itineraries in the system fitting the criteria that you entered appears.
- Find the itinerary that matches your customer and click its corresponding Select link. The itinerary opens in the Itinerary and Customer windows.
When selecting from multiple options on an itinerary search, verify that you are working with the correct itinerary by asking the customer to confirm information on the customer profile such as a home phone number or email address.
You can also search for an itinerary using the confirmation number from a third-party system with whom Inntopia has an interface for reservation delivery and that sends Inntopia a confirmation number in response to the reservation delivery. Examples include RTP, Siriusware, or Springer-Miller.
Confirmation numbers are located in your remote system and on the Reservation Detail window in Inntopia RMS.
You can conduct a generalized search using date and supplier information. This method of search may return multiple results forcing you to select the appropriate itinerary. This method is useful when you don’t know the itinerary ID, or the customer’s last name. You can choose to search by Date Reserved, Date Arriving, or Date Saved.
- From the CRS home page, click New Session and log a marketing source. To open the session in a new window, check the Open in new window box. Otherwise, leave this box unchecked.
- From the Find by Date drop-down list in the Agentopia Itinerary window, select the Date Type by which you want to search for the itinerary. Choose from:
- Date Reserved – Day that the itinerary was reserved
- Date Arriving – Day that the guest is arriving for the reservation
- Date Saved – Day that the itinerary saved
- In the From and To date fields, use the calendars to enter the date the itinerary was reserved, saved, or the arrival date. If you do not remember the exact date, enter a range of dates during which you think the itinerary was saved, reserved, or of the expected arrival.
- From the Supplier drop-down list, select the supplier with which the itinerary was saved. If you do not know the supplier, leave this field at the default setting of "Any."
- Click Search. The results of your search appear.
- Find the itinerary you want to open and click its corresponding Select link.
Note: When selecting from multiple options on an itinerary search, verify that you are working with the correct itinerary by asking the customer to confirm information on the customer profile such as a home phone number or email address.
Use this method to find an itinerary using information in the customer profile.
- From the CRS home page, click New Session and log a marketing source. To open the session in a new window, check the Open in new window box. Otherwise, leave this box unchecked.
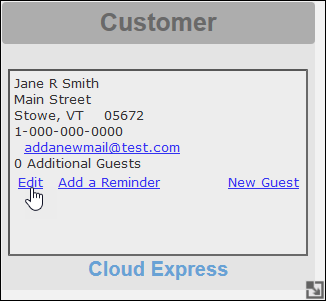
- In the Customer window, enter Last (or First and Last) Name, Email address, or Home Phone number of the customer whose itinerary you are trying to locate. (There is no specific format required for entering the phone number.)
- Click Find. A list of all customer profiles in the System having the last name that you entered, as well as any names that contain the last name you entered appears (e.g., searching for “Smith” also returns “Smithers”).
- Find the profile for your customer and click its corresponding Select link. The customer information appears in the Customer window.
- In the Customer window, click Edit.
The customer profile appears with Customer Information in the top section and itineraries associated with the customer listed beneath the Notes section.
- Find the itinerary you want to open and click on its corresponding Select link. The itinerary appears in the Itinerary window.


