Product-Specifc Taxes and Fees
Tax types displayed in a product-specific tax table are applied to the specified product instead of the company-level or product category taxes. Use this option to create a new product-specific tax that overrides the supplier-level and/or product category tax. You can also use this tax table to make a product exempt from company-wide taxes.
For information on excluding tax from supplier payables (British Columbia, CA only), click here.
- The amount of tax to be paid to the supplier is configured on the Accounting Rules tab of each Inntopia CRS sales channel. You can select to pay the entire tax collected from the guests to your suppliers (Pay tax on retail amount) or to pay the tax amount on only the net rate owed to the suppliers (Pay tax on wholesale amount). Choosing to pay the tax amount on only the net (wholesale) rate will require the reseller to remit the tax owed on their margin/commission earned.
- The amount of fees paid to the supplier is always based on the retail amount collected from the guest as well as any tax collected on the fee.
- Log into Inntopia RMS and click the Products tab. The Products page appears.
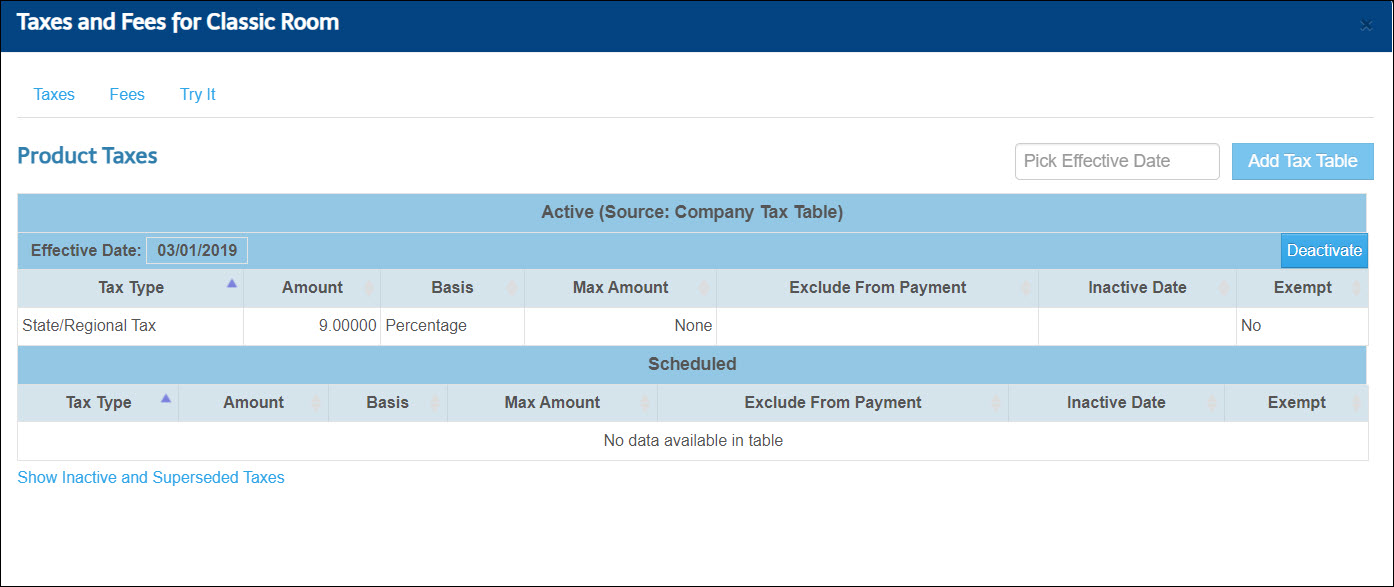
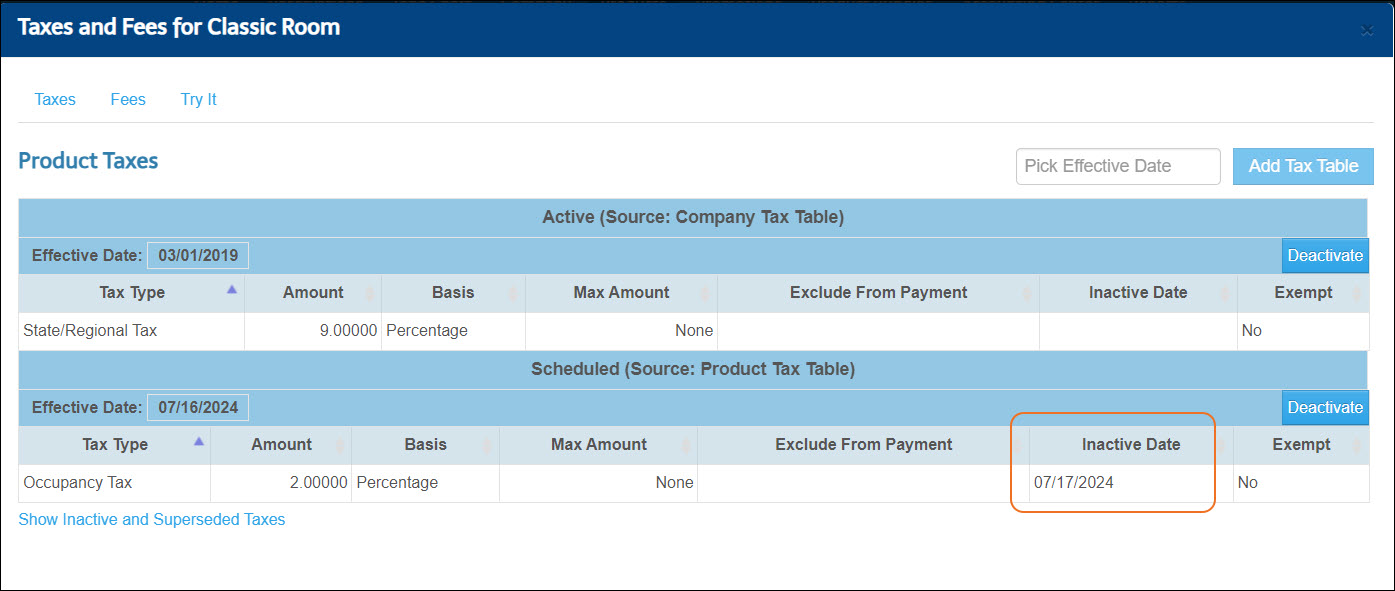
- Find the product for which you want to add a new tax and in the Settings drop-down list for that product, click Taxes and Fees. The Product Taxes screen showing any active or scheduled taxes and fees for that specific product appears.
- In the Pick Effective Date field, select the date you want the new tax to take effect. This date must be a date in the future.
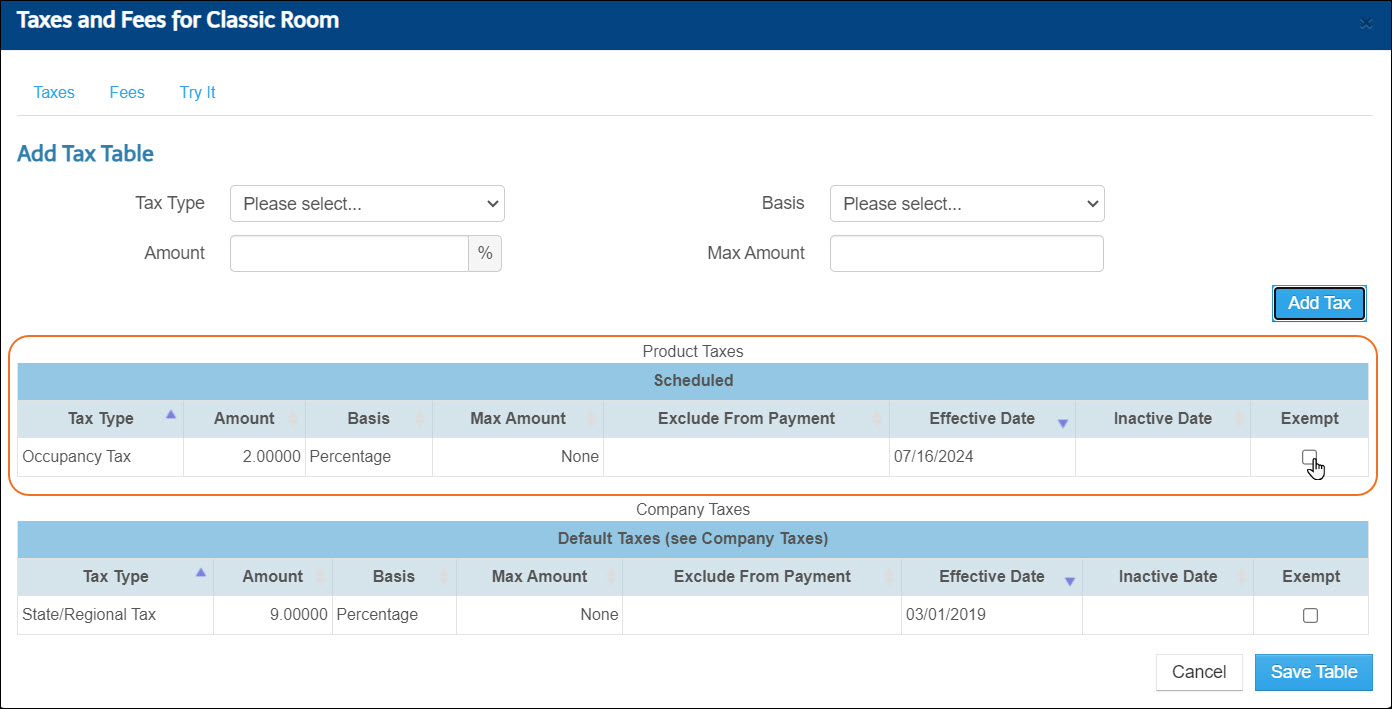
- Click Add Tax Table. The Add Tax Table fields appear.
- From the Tax Type drop-down list, select the type of tax you want to add for the product.
- From the Basis drop-down list, select the basis on which the tax is calculated.
- %Percentage – Tax amount is applied as a percentage to the itinerary total.
- Per Day/Night – Tax amount is applied to each day/night on the itinerary.
- Per Reservation – Tax amount is applied to the total reservation value of supplier’s items on the itinerary.
- Per Item (Quantity) ordered – Tax amount is applied on a per quantity basis to each item on the itinerary.
- Per Person/Per Day – Tax amount is applied to each person listed for each day/night of the itinerary.
- Per Adult/Per Day – Tax amount is applied to each adult listed for each day/night of the itinerary.
- Per Child/Per Day – Tax amount is applied to each child listed for each day/night of the itinerary. The tax per child looks at the minimum child age setting on the company page to determine whether or not to charge the tax on the child.
- In the Amount field, enter the amount of the tax.
- To set a maximum amount of the tax collected, enter the amount in the Max Amount field. This field can be left blank.
- Click Add Tax. The new tax appears in the list of scheduled product taxes.
- To make the specific product exempt from a supplier-wide or product-category tax type already in place, click the tax type’s corresponding Exempt button.
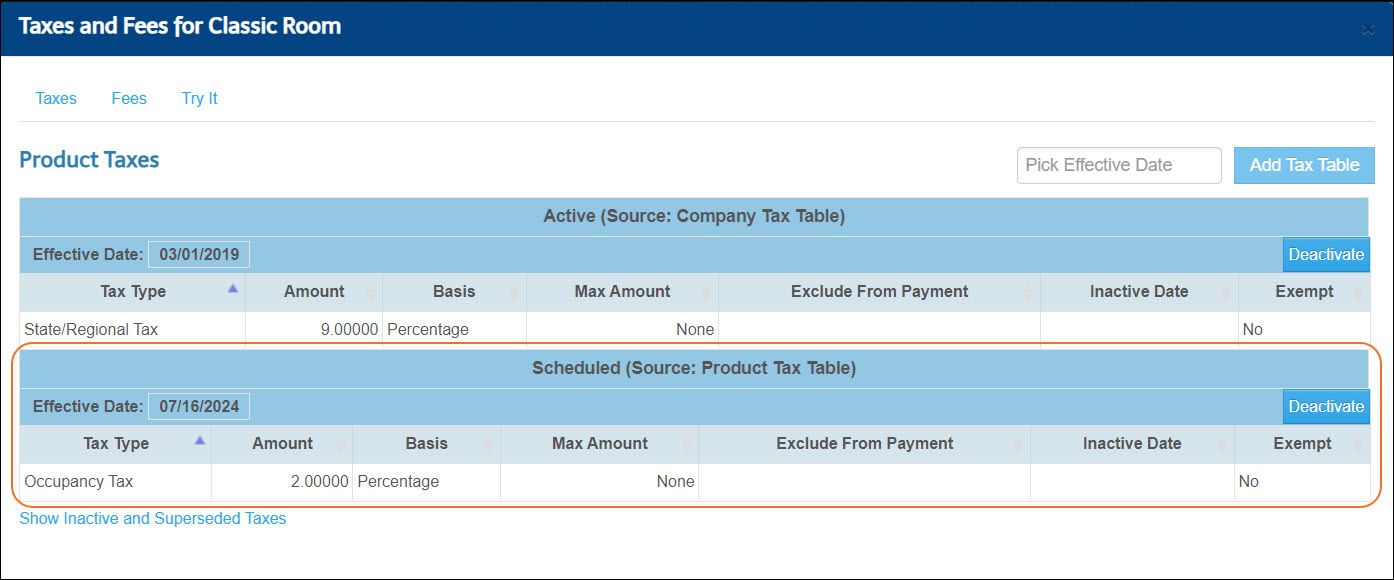
- When you finish adding and exempting taxes for the product and are satisfied with your changes, click Save Table. The tax table is added and appears in the Scheduled area on the Product Taxes page.
The tax goes into effect and is moved to the Active section of the screen at midnight on the selected Effective date.
Note: For Per Person, Per Adult, Per Child tax basis: If the quantity of a particular item on an itinerary changes, the system automatically assumes the tax applies for the same number of persons and applies per person tax accordingly. If the number of persons on the new item is less than or greater than the original person amount on the itinerary, the item must be booked as a separate product on the itinerary.
Note: Taxes cannot be edited once they are saved. If you make an error when entering a tax, you must deactivate the tax and create a new one to supersede the one with the error.
You can select a date on which a product tax will be deactivated.
- Log into Inntopia RMS and click the Products tab. The Products page appears.
- Find the product for which you want to deactivate a tax and, in the Settings drop-down list for that product, click Taxes and Fees. The Product Taxes screen showing any active or scheduled taxes and fees for that specific product appears.
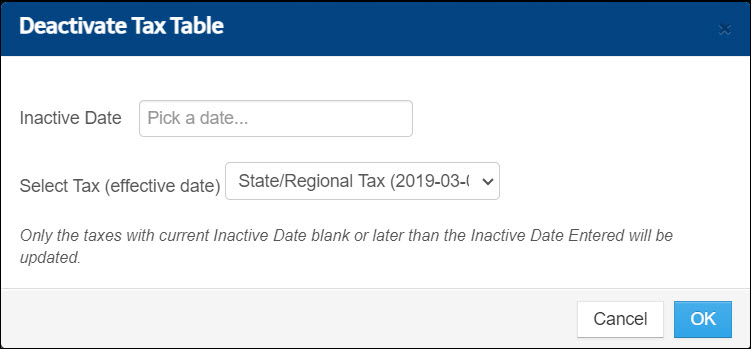
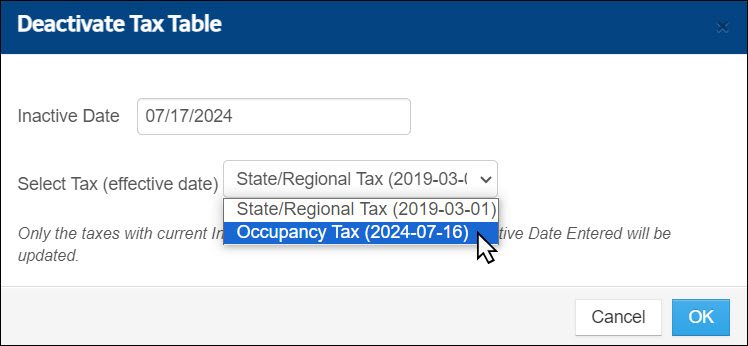
- Find the tax you want to deactivate and click the table's corresponding Deactivate button. The Deactivate Tax Table window appears.
- In the Inactive Date field, enter the date the tax table will become inactive.
- From the Select Tax (effective date) drop-down list, select the specific tax you want to deactivate.
- Click OK. The inactive date appears in the tax table and will render the table inactive as of the date you entered.
Note: To avoid a gap in collecting tax when scheduling a new tax for a tax change, the Inactive Date of the current tax and the Start Date of the new tax must be the same.
For example, if a tax change occurs on 1/10/2025, set the Inactive Date of the current (expiring) tax to 1/10/2025 and the Start Date of the new tax also to 1/10/2025.
Fees are specific to products and cannot be implemented for an entire supplier or product category.
When the effective date for a fee is spanned by the stay dates of a reservation, per-diem fees are not charged for any day of the reservation. For example, a cleaning fee on a per-diem basis takes effect on June 1. A reservation with an arrival date of May 30 and departure date of June 3 will not be charged the cleaning fee for any day of this reservation.
Note: To create two or more fees using the OTHER Fee Type category, each fee must have the same Effective Date and different Basis types.
- Log in to Inntopia RMS and click the Products tab. The Products page appears.
- Find the product for which you want to add a new fee and in the Settings drop-down list for that product, click Taxes and Fees. The Product Taxes screen appears.
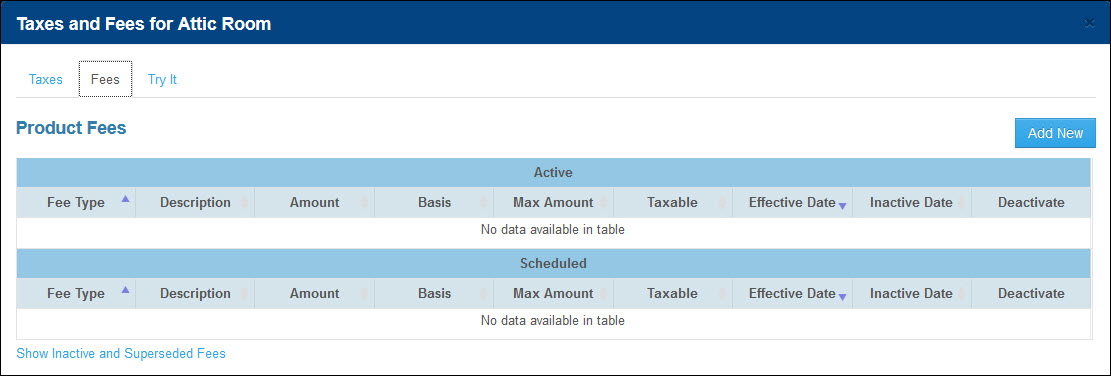
- Click the Fees tab. The Product Fees page appears.
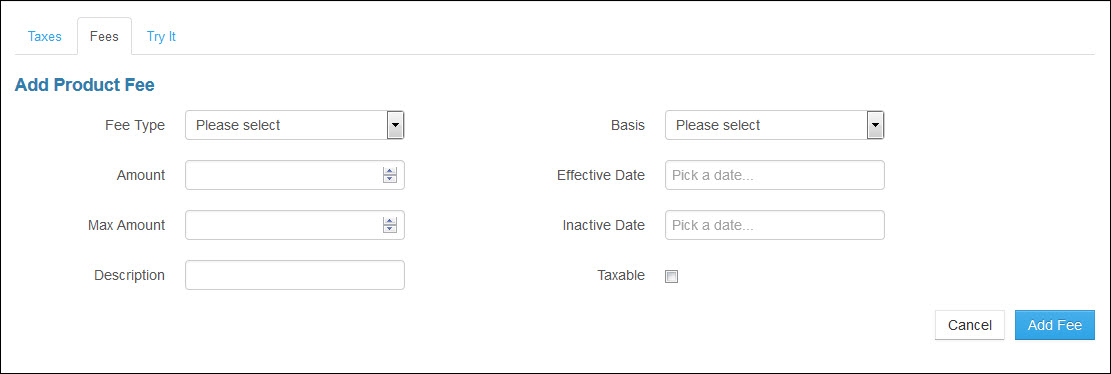
- Click Add New. The Add Product Fee screen appears.
- From the Fee Type drop-down list, select the type of fee you want to add for the product.
- In the Amount field, enter the amount of the fee you want to add.
- To set a maximum amount of the fee collected, enter the amount in the Max Amount field. This field can be left blank.
- In the Description field, enter a description of the fee. If nothing is entered in this field, the system automatically populates it with the name of fee chosen from the Fee Type drop-down list.
- From the Basis drop-down list, select the basis on which the fee is to be calculated.
- % (Percentage) – Fee amount is applied as a percentage to the itinerary total.
- Per Day/Night – Fee amount is applied to each day/night on the itinerary.
- Per Item (Quantity) ordered – Fee amount is applied on a per quantity basis to each item on the itinerary.
- Per Person – Fee amount is applied to each person on the itinerary.
- Per Adult – Fee amount is applied to each adult on the itinerary.
- Per Child – Fee amount is applied to each child on the itinerary.
- Per Person/Per Day – Fee amount is applied to each person listed for each day/night (lodging products only) on the itinerary.
- Per Adult/Per Day – Fee amount is applied to each adult listed for each day/night(lodging products only) of the itinerary.
- Per Child/Per Day – Fee amount is applied to each child listed for each day/night (lodging products only) of the itinerary. The fee per child looks at the minimum child age setting on the company page to determine whether or not to charge the fee on the child.
Note: For Per Person, Per Adult, Per Child fee basis: If the quantity of a particular item on an itinerary changes, the system automatically assumes the fee applies for the same number of persons and applies per person fee accordingly. If the number of persons on the new item is less than or greater than the original person amount on the itinerary, the item must be booked as a separate product on the itinerary.
- In the Effective Date field, select the date you want the system to begin calculating the fee. This date can only be a date in the future.
- If you want to set a date that the fee will expire or become inactive, enter the date in the Inactive Date field. You can choose to set an inactive date at a later time.
- If you want the fee to be taxed at the rate set up for the product you are working with, check the Taxable box.
- Click Add Fee. The new fee is added to the list of fees scheduled to take effect.
- To view the entirety of a description, hover your mouse over the Description field.
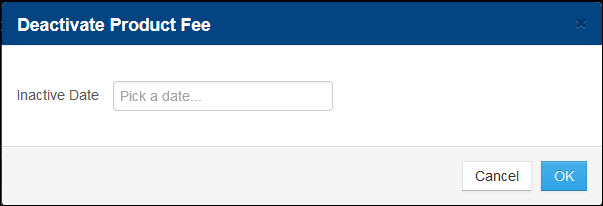
- If you have not already done so and want to set a date that the fee will expire or become inactive, click the fee's corresponding Deactivate button. The Deactivate Product Fee window appears.
- Select the date the fee is to become inactive and click OK. The fee will be rendered inactive on the specified date.
Note: To avoid a gap in collecting a fee when scheduling a new fee for a fee change, the Inactive Date of the current fee and the Start Date of the new fee must be the same.
For example, if a fee change occurs on 1/10/2025, set the Inactive Date of the current (expiring) fee to 1/10/2025 and the Start Date of the new fee also to 1/10/2025.
