Manage Suppliers in Inntopia CRS
You can add or remove suppliers in your Inntopia CRS account so that their products appear in or are removed from your sales channel(s). Once a supplier is added to your sales channel, you must configure the supplier settings.
- Log into your Inntopia CRS account.
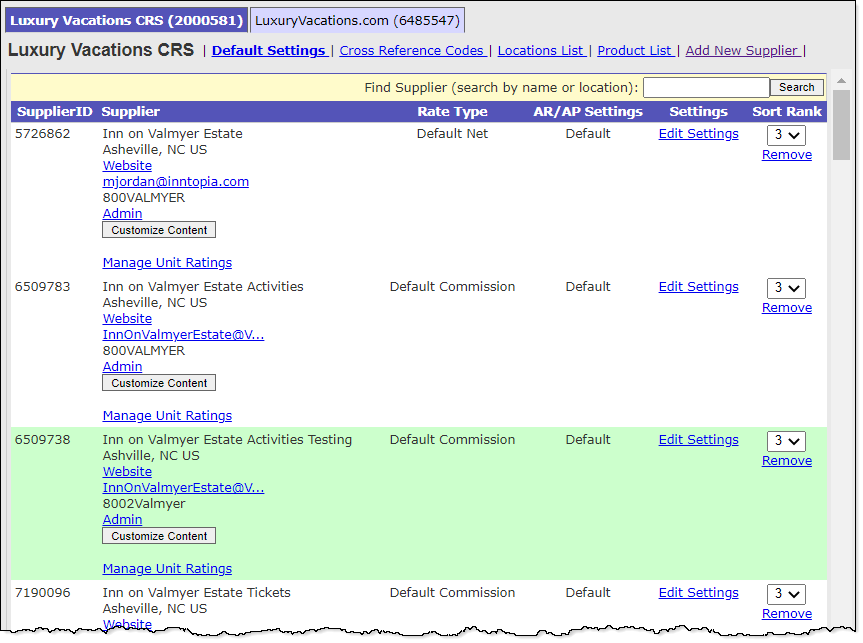
- From the tabs listed across the top of the page, click the Suppliers tab. The Suppliers page opens.
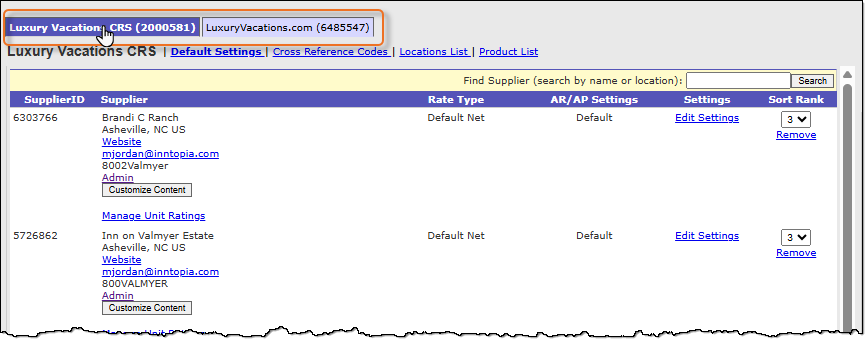
- From the sales channels listed across the top of the Suppliers page, choose the specific sales channel to which you want to add the supplier.
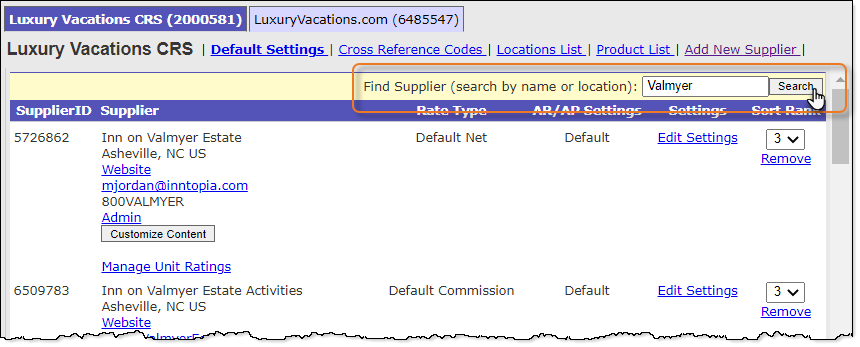
- In the Find Supplier (search by name or location) field, enter the supplier name or location you want to add to your supplier list and click Search.
Note: Pressing the Enter key on your keyboard does not activate this search; you must click the Search button on the screen to activate the search process.
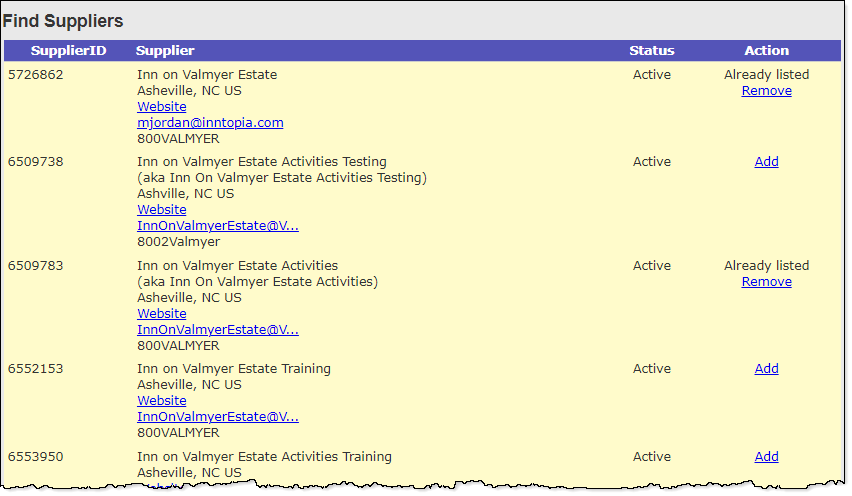
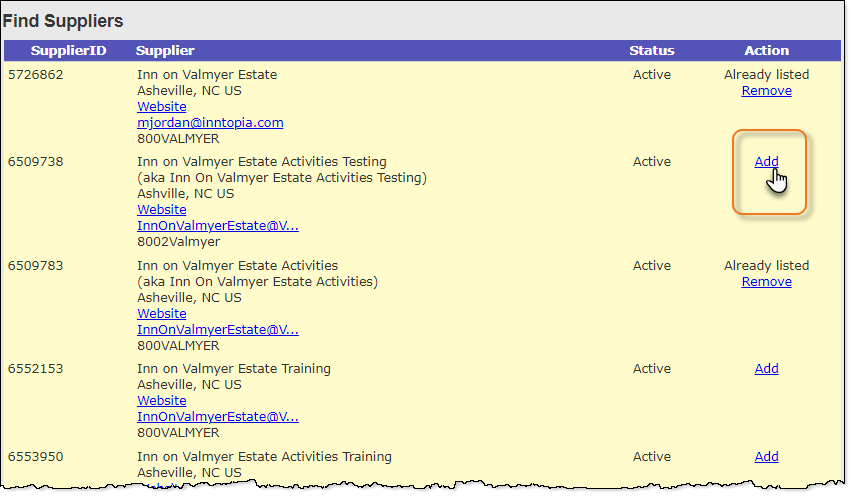
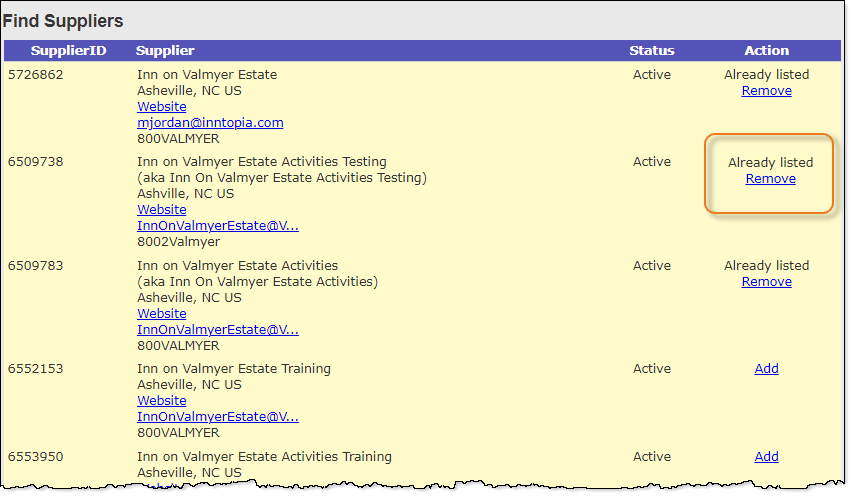
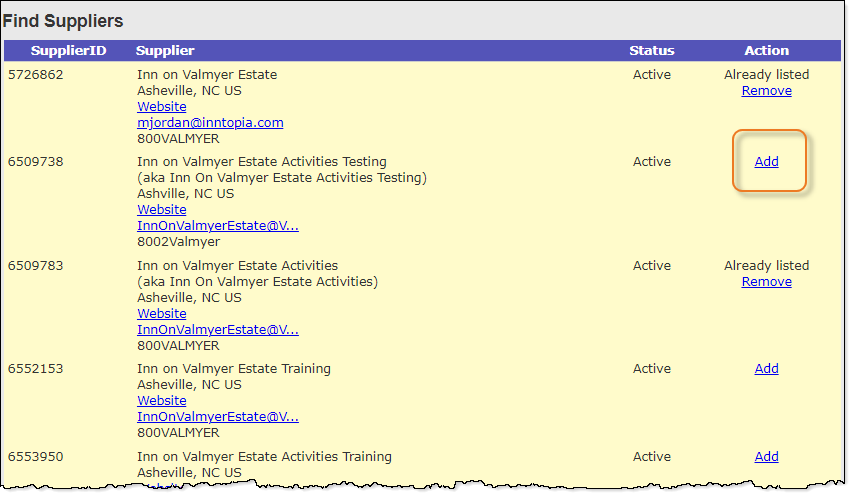
All suppliers with the name of the account or suppliers within the location you entered are listed on the Find Suppliers screen on the right side of the page. The Status column lists whether the account is active or inactive and the Action column shows whether the supplier is available to add or has already been added. - From the list of suppliers on the Find Suppliers screen, find the supplier account you want to add to your supplier list and in the Action column, click its corresponding Add button.The supplier's account information appears on the left side of the page highlighted in green to indicate that the supplier has been successfully added to your list.On the Find Suppliers screen on the right side of the page, the Add button corresponding to the supplier you just added changes to read Already listed and includes a Remove link for removing this supplier from the list of added suppliers.
- If you want a supplier's products to appear on multiple sales channels, you must separately add that supplier to each sales channel on which you would like a supplier's products to appear.
- If you do not see the Suppliers tab upon logging into your Inntopia CRS account, contact your CRS administrator to add your permissions to this page.
Once a supplier has been added to your sales channel, you must configure the supplier to determine how payment is collected, when and how payables will issued, cancellation fees, commissions earned, and net rates.
Inntopia's Reseller Collect business model, in which resellers collect payment from guests and then submit payables to suppliers, is the most efficient and secure method of collecting payments from guests.
Reseller Collect requires a secure, tokenized payment gateway set up within Inntopia. As the reseller, you collect payment via the payment gateway through Inntopia CRS and online sales channels and then disburse payments to suppliers based on accounting rules, deposit, cancellation, and commission policies, and other configuration settings.
You can configure default settings that will apply to all suppliers added to your sales channel account or settings for individual suppliers. Supplier-level settings supersede default reseller-level settings.
Accounting rules determine how payment is collected from guests and subsequently distributed to suppliers.
The instructions for configuring default accounting rules and supplier-specific rules are almost identical. Configuring a supplier-specific rule requires entering an override date as part of the configuration. Suppliers with supplier-specific accounting rules are indicated as such in the AR/AP Settings column on the supplier list as Reseller Override.
- Log into your Inntopia CRS account.
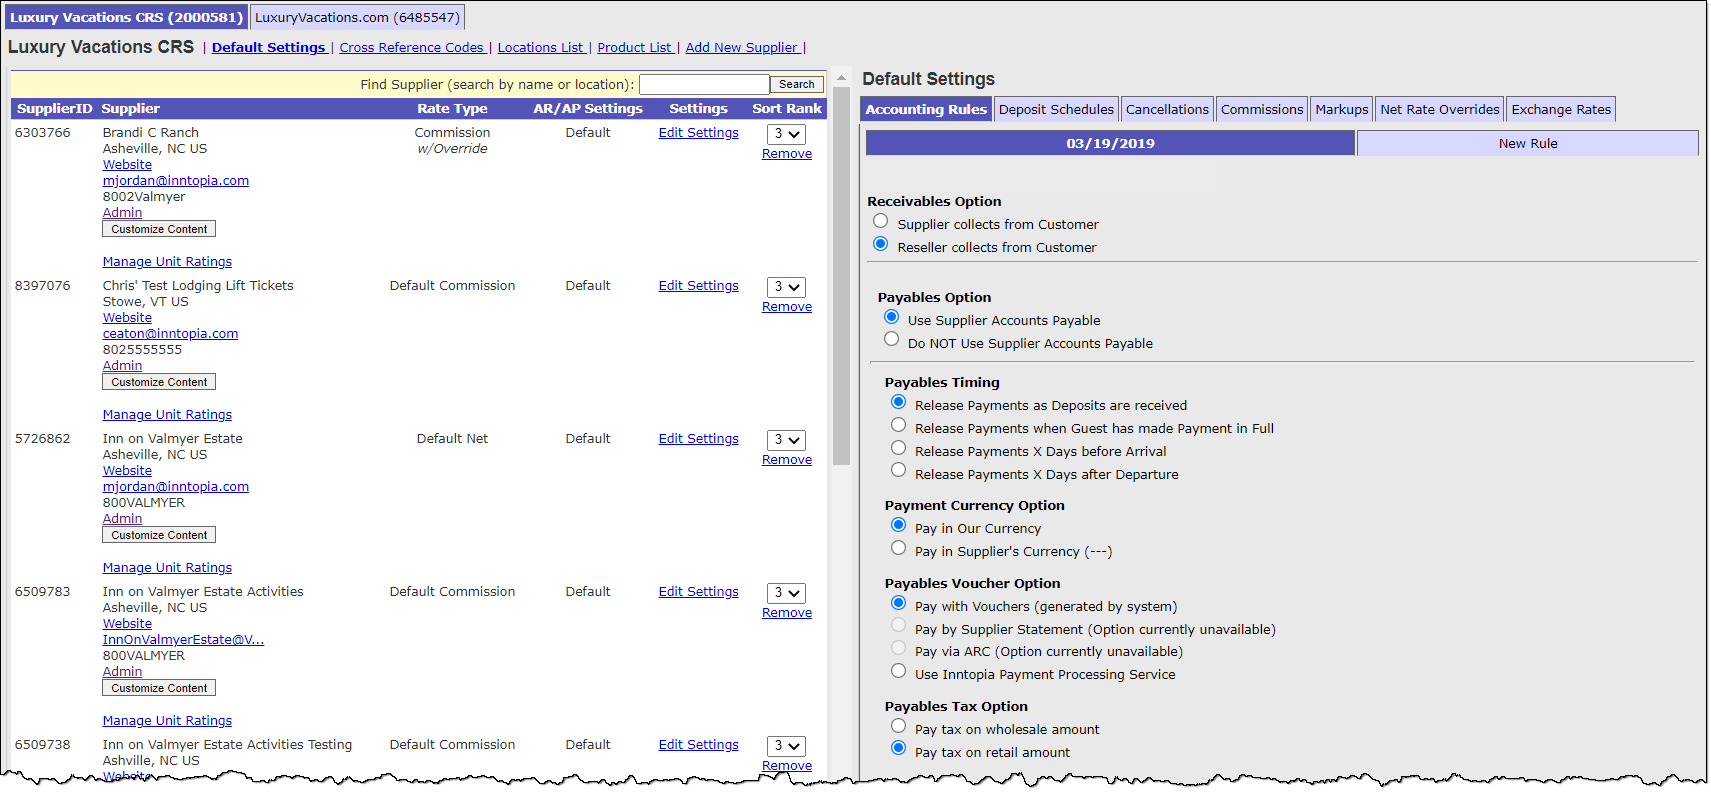
- From the tabs listed across the top of the CRS home page, click the Suppliers tab. The Suppliers page opens listing all suppliers previously added to your parent sales channel on the left side of the screen and the Accounting Rules tab open on the Default Settings side of the screen. Additional child sales channel supplier lists are displayed in tabs across the top in order of sales channel ID.
- To configure default accounting rules for a different sales channel, on the top of the screen, find and click the tab of the sales channel you want to work with. The accounting settings available for the selected sales channel appear in the Accounting Rules tab.
- To configure the accounting rules for a specific supplier, in your list of suppliers click the supplier's corresponding Edit Settings link. The accounting settings available for the selected supplier appear in the Accounting Rules tab.
- Click the New Rule tab.
- If you are setting a supplier-specific rule, in the Override Rule Effective As of field, enter the date on which the supplier-specific (override) rule is to take effect. Otherwise, leave this field blank.
- In the Receivables Option section, select the Reseller collects from Customer radio button.
- In the Payables Option section, select how supplier payables will be generated.
- Use Supplier Accounts Payable – Payables to suppliers are generated automatically by the Inntopia voucher system. Data is recorded for accurate reporting.
- Do NOT Use Supplier Accounts Payable – Inntopia system does NOT create payables to suppliers. No ability to record and report payables data within the Inntopia system.
If you select this option, click Add Rule. The Accounting Rules are complete and you can proceed to Set Up Deposit Schedules.
- If you select Use Supplier Accounts Payable, in the Payables Timing section, choose when payments are generated and released into the Supplier & Travel Agent Payables queue.
- Release Payments as Deposits are received
- Release Payments when Guest has made Payment in Full
- Release Payments X Days before Arrival –
- In the Number of Days Before or After field, enter the number of days prior to the guest arriving/using the product that you want to release payments to the supplier.
- To withhold payment to the supplier until the customer has paid in full, click the Check here if you wish to override the timing and hold payment until guest payment has been received in full box.
- Release Payments X Days after Departure –
- In the Number of Days Before or After field, enter the number of days after the guest departs/finishes using the product that you want to release payments to the supplier.
- To withhold payment to the supplier until the customer has paid in full, click the Check here if you wish to override the timing and hold payment until guest payment has been received in full box.
- In the Payment Currency Option section, choose whether to make payments to suppliers in your currency or in the supplier's currency.
- Pay in Our Currency – Payments are made in the reseller's currency.
- Pay in Supplier's Currency (---) – Payments are made in the supplier's currency (indicated in parentheses).
- In the Payables Voucher Option section, select how supplier payments will be generated.
- Pay with Vouchers (generated by system) – Inntopia system creates a payment voucher with a corresponding voucher number which can be accessed by the supplier in the Accounting Center of their RMS account and can be included with payment to the supplier.
- Pay by Supplier Statement (Option currently unavailable)
- Pay via ARC (Option currently unavailable)
- Use Inntopia Payment Processing Service (Option currently unavailable)
- In the Payables Tax Option section, determine how taxes will be paid on the amounts owed to suppliers.
- Pay tax on wholesale amount – The tax amount included with supplier accounts payable transactions will be the tax calculated on the net amount due to the supplier. If you select this option, you will be responsible for reporting and paying the portion of the taxes charged on your margin or commission.
- Pay tax on retail amount – The tax amount included with supplier payable transactions will be the full amount of the taxes paid by the consumer. If you select this option, the supplier will be responsible for reporting and paying ALL taxes due.
- Click Add Rule. The default accounting rules are now in place for all suppliers in your Inntopia reseller account. If you entered a supplier-specific override, the rules for that supplier supersede the default accounting rules.
Before setting up deposit schedules for your supplier configuration, it's important to understand how deposit schedules work in Inntopia. Visit About Deposit Schedules.
- Log into your Inntopia CRS account.
- Check to see which precedence is in use for your account:
 Determine Precedence
Precedence determines whose deposit schedules will take precedence over the other for items purchased.
- On your Inntopia CRS top navigation, click the System tab. The Preferences page appears.
- In the list of system preferences, find Deposit Schedule and Cancellation Policy Preferences.
- CRS (Reseller Precedence) – CRS/Reseller's deposit schedules will be in effect for all items on an itinerary. Reseller precedence allows for more control over policies such as a reseller-wide policy that would override individual supplier policies.
- Supplier (Supplier Precedence) – Suppliers' deposit schedules will be in effect for individual items sold on an itinerary.
- If your account is set up as Reseller Precedence, proceed to Step 3 below.
- If your account is set up as Supplier Precedence, it is important to set up default, sales-channel-level deposit schedules on your account to eliminate the possibility of bookings occurring that use the Inntopia system-wide default deposit schedule of 100% due at time of booking.
- On your Inntopia CRS top navigation, click the Suppliers tab. The Suppliers page opens listing all suppliers previously added to your sales channel on the left side of the page and the Default Settings open on the right side of the page.
- To set the deposit schedules for a different sales channel, on the top of the screen, find and click the tab of the sales channel you want to work with. The Default Settings for selected sales channel appear.
- To set deposit schedules for a specific supplier, in your list of suppliers click the supplier's corresponding Edit Settings link. The configuration settings for the selected supplier appear on the right side of the page.
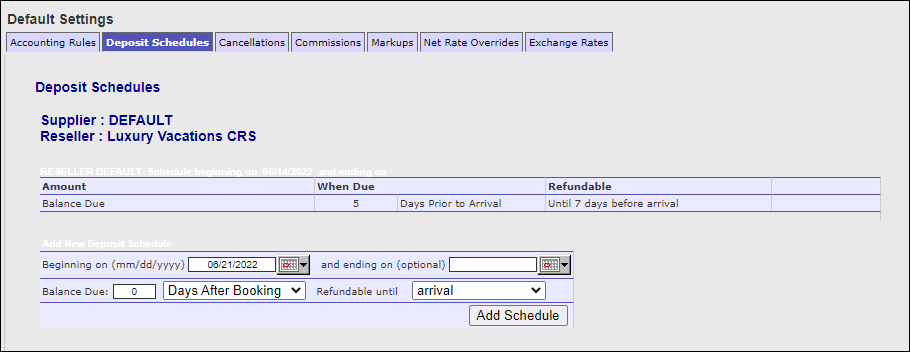
- Click the Deposit Schedules tab. The Deposit Schedules page appears showing any previously-created deposit schedules.
- In the Beginning on date field of the Add New Deposit Schedule section, enter the date the deposit schedule is to go into effect. (This deposit schedule will apply to itineraries with arrival dates on and after this date.)
- To enter a date on which this deposit schedule will expire, enter the date in the Ending on (optional) date field. If you do not enter a date in this field, the deposit schedule stays in effect until a deposit schedule with a later Beginning on date is added.
Note: When entering a subsequent deposit schedule, Inntopia recommends a start date that overlaps with the ending date of the expiring schedule. An overlap date prevents any potential gaps in deposit schedule coverage. For example, if Deposit Schedule A is in effect from June 1 – June 30, Deposit Schedule B should be in effect from June 30 – July 31 (rather than July 1 – July 31).
- In the Balance Due box, enter the number of days the balance is to be due either before arrival or after booking. For balance due at time of booking, enter 0 Days After Booking. For balance due at time of arrival, enter 0 Days Prior to Arrival.
- From the Balance Due drop-down list, select whether the balance is to be due Days After Booking (the date the reservation is made) or Days Prior to Arrival.
- In the Refundable until drop-down list, select one of the following choices to indicate when and/or whether the balance amount is to be refundable or non-refundable.
- Arrival – the deposit amount can be returned until the day the guest is scheduled to arrive (system default).
- Never – the deposit is non-refundable.
- Days Before Arrival – enter a number of days before and up to the date the guest is scheduled to arrive that the deposit amount can be returned to the guest.
- Days After Booking – enter a number of days after the guest books the reservation that the deposit can be returned to the guest.
-
Click Add Schedule. The new deposit schedule appears on the screen showing the Balance Due deposit information and a section for adding additional deposits.
- To add an additional deposit due from the customer to the deposit schedule:
In the Amount fields, select the basis and amount of the initial deposit:
- % – Enter the percentage of the total price of the item(s)
- Flat Fee – Enter a fixed amount of the deposit
- Nights/Days (Lodging Only) – Enter the number of nights or days
- In the When Due fields, enter the number of days before or after booking the deposit is due.
- In the Refundable fields, select one of the following choices to indicate when and/or whether the deposit amount is to be refundable or non-refundable.
- Arrival – the deposit amount can be returned until the day the guest is scheduled to arrive (system default).
- Never – the deposit is non-refundable.
- Days Before Arrival – enter a number of days before and up to the date the guest is scheduled to arrive that the deposit amount can be returned to the guest.
- Days After Booking – enter a number of days after the guest books the reservation that the deposit can be returned to the guest.
-
Click Add Deposit. The deposit schedule will be in effect for all suppliers' products sold through your Inntopia account for which there is not a product- or promotion-specific deposit schedule in place.
Before setting up cancellation policies for your supplier configuration, it's important to understand how cancellation policies work in Inntopia. Visit About Cancellation Policies.
Note: The automated cancellation fee feature must be activated by Inntopia staff. To request that this feature be activated in your system, contact Inntopia Partner Services.
- Log into your Inntopia CRS account.
- Check to see which precedence is in use for your account:
 Determine Precedence
Precedence determines whose cancellation policies will take precedence over the other for items purchased.
- On your Inntopia CRS top navigation, click the System tab. The Preferences page appears.
- In the list of system preferences, find Deposit Schedule and Cancellation Policy Preferences.
- CRS (Reseller Precedence) – CRS/Reseller's policies will be in effect for all items on an itinerary.
- Supplier (Supplier Precedence) – Suppliers' policies will be in effect for individual items sold on an itinerary.
- If your account is set up as Reseller Precedence, proceed to Step 3 below.
- If your account is set up as Supplier Precedence, it is important to set up default, sales-channel-level cancellation policies on your account to eliminate the possibility of bookings occurring that use the Inntopia system-wide default cancellation policy.
- On your Inntopia CRS top navigation, click the Suppliers tab. The Suppliers page opens listing all suppliers previously added to your sales channel on the left side of the page and the Default Settings open on the right side of the page.
- To set the cancellation policies for a different sales channel, on the upper left side of the screen, click the tab of the sales channel you want to work with. The Default Settings for that sales channel appear.
- To set cancellation policies for a specific supplier, in your list of suppliers click the supplier's corresponding Edit Settings link. The configuration settings for the selected supplier appear on the right side of the page.
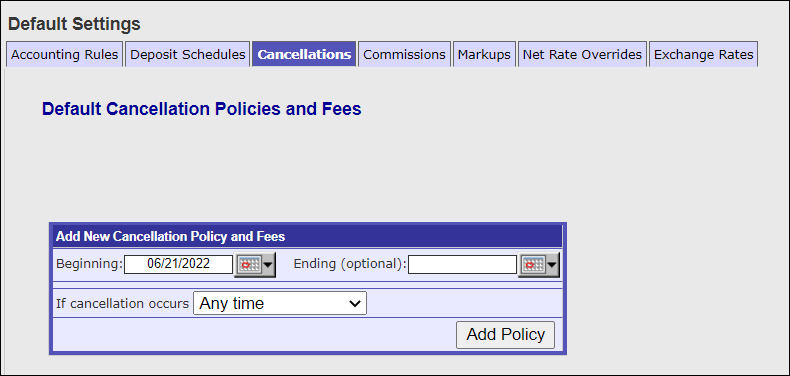
- Click the Cancellations tab. The Cancellation Policies and Fees screen appears.
- In the Beginning date field, enter the date the cancellation policy is to go into effect. (This cancellation policy will apply to itineraries with arrival dates on and after this date.)
- To enter a date on which this cancellation policy will expire, enter the date in the Ending (optional) date field. If you do not enter a date in this field, the cancellation policy stays in effect until a policy with a later Beginning on date is added.
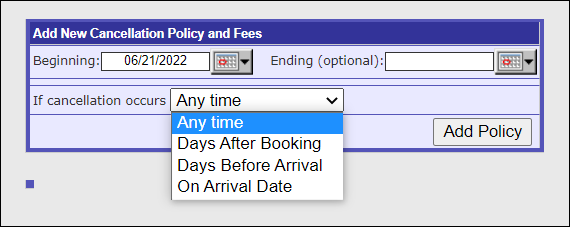
- From the If cancellation occurs drop-down list, select one of the following options:
- Any Time – If a cancellation occurs any time after the reservation has been made, a cancellation fee could be incurred and the customer is charged the cancellation fee.
- Days After Booking – If a cancellation occurs on or after the specified number of days after booking, a cancellation fee could be incurred and the customer is charged the cancellation fee.
- Days Before Arrival – If a cancellation occurs on or after the specified number of days before the arrival date, a cancellation fee could be incurred and the customer is charged the cancellation fee.
- On Arrival Date – Set a time on the arrival date such that if a cancellation occurs at or after the set time on the arrival date, a cancellation fee could be incurred and the customer is charged the cancellation fee.
For example, a cancellation policy states that the fee is assessed on cancellations that occur after 12:00 PM on the arrival date. A customer who cancels at 10:00 AM on the arrival date is not charged the cancellation fee. A customer who cancels at 12:10 PM on the arrival date is charged the cancellation fee.
- Click Add Policy. The cancellation policy information you entered appears on the screen with additional fields for entering cancellation fee information.
- To add a cancellation fee to the cancellation policy:
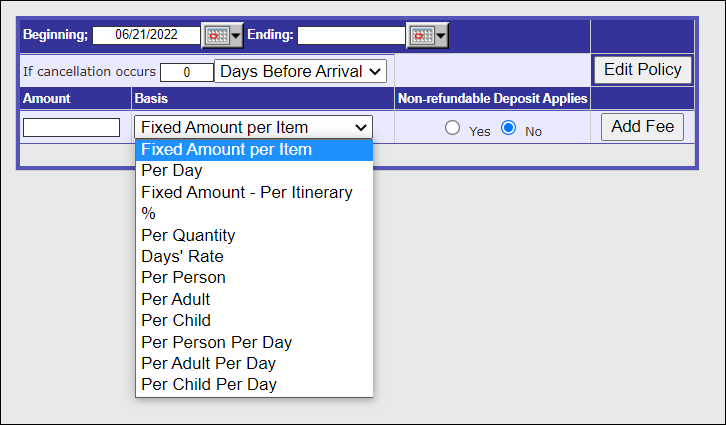
- In the Amount field of the cancellation policy, enter the amount of the cancellation fee.
- From the drop-down list in the Basis column, select a fee basis.
- % (Percentage) – Fee amount is applied as a percentage to the itinerary total.
- Per Day/Night – Fee amount is applied to each day/night on the itinerary.
- Per Item (Quantity) ordered – Fee amount is applied on a per quantity basis to each item on the itinerary.
- Per Person – Fee amount is applied to each person on the itinerary.
- Per Adult – Fee amount is applied to each adult on the itinerary.
- Per Child – Fee amount is applied to each child on the itinerary.
- Per Person/Per Day – Fee amount is applied to each person listed for each day/night (lodging products only) on the itinerary.
- Per Adult/Per Day – Fee amount is applied to each adult listed for each day/night(lodging products only) of the itinerary.
- Per Child/Per Day – Fee amount is applied to each child listed for each day/night (lodging products only) of the itinerary. The fee per child looks at the minimum child age setting on the company page to determine whether or not to charge the fee on the child.
Note: For Per Person, Per Adult, Per Child fee basis: If the quantity of a particular item on an itinerary changes, the system automatically assumes the fee applies for the same number of persons and applies per person fee accordingly. If the number of persons on the new item is less than or greater than the original person amount on the itinerary, the item must be booked as a separate product on the itinerary.
- In the Non-refundable Deposit Applies column, select the radio button to indicate whether a non-refundable deposit applies to the cancellation fee.
- Yes – the non-refundable deposit, or a portion thereof, is used to pay the cancellation fee. The total cancellation charge-back to the guest is the GREATER of the amount of the non-refundable deposit or the cancellation fee, but not both.
- No – the cancellation fee is charged to the customer separately and no portion of a non-refundable deposit is used to pay the cancellation fee. The total cancellation charge-back to the guest is the SUM of the non-refundable deposit and the cancellation fee.
- Click Add Fee. The cancellation fee is added to the cancellation policy.
For information on setting up supplier commissions, click here.
For information about and instructions on setting net rate markups and overrides, visit Set Net Rates in CRS.
Note: Net rate markups and overrides are only available for use with the Reseller Collect business model.
For information about and instructions on setting up custom currency exchange rates, visit Currency Exchange Rates .
Note: Custom exchange rates are only available for use with the Reseller Collect model.
You can configure a cross-reference code for each supplier in your parent sales channel. You can use the codes to export data to your accounting software and/or to populate information in the By Accounting Category section of the Guest Payment Review report.
- Supplier cross-reference codes can only be configured on your parent sales channel, and can include as much or as little information as you need for each supplier.
- Supplier cross-reference codes can be made up of whatever information you want according to how you manage your accounting. You can enter numerical or alpha characters for any of the fields. For example, you may want to enter a numerical code as Your Supplier ID whereas another company may choose to use a word or series of letters for theirs.
- Log into your Inntopia CRS account.
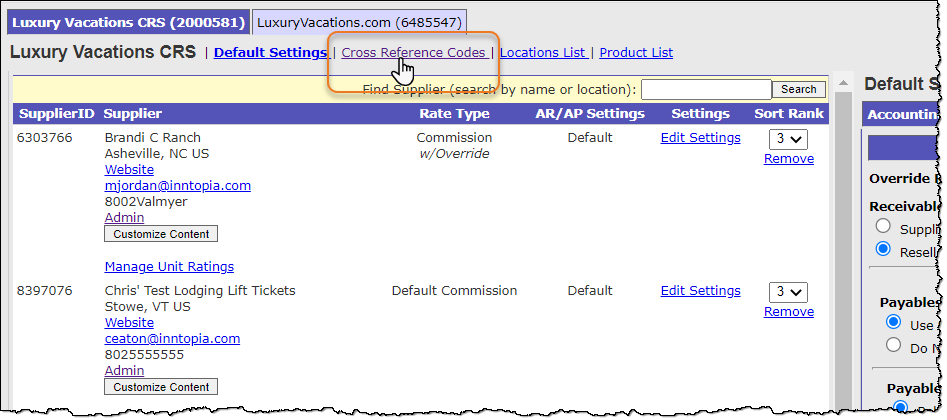
- From the tabs listed across the top of the page, click the Suppliers tab. The Suppliers page opens listing all suppliers previously added to your parent sales channel on the left side of the screen.
- Click the Cross Reference Codes link.
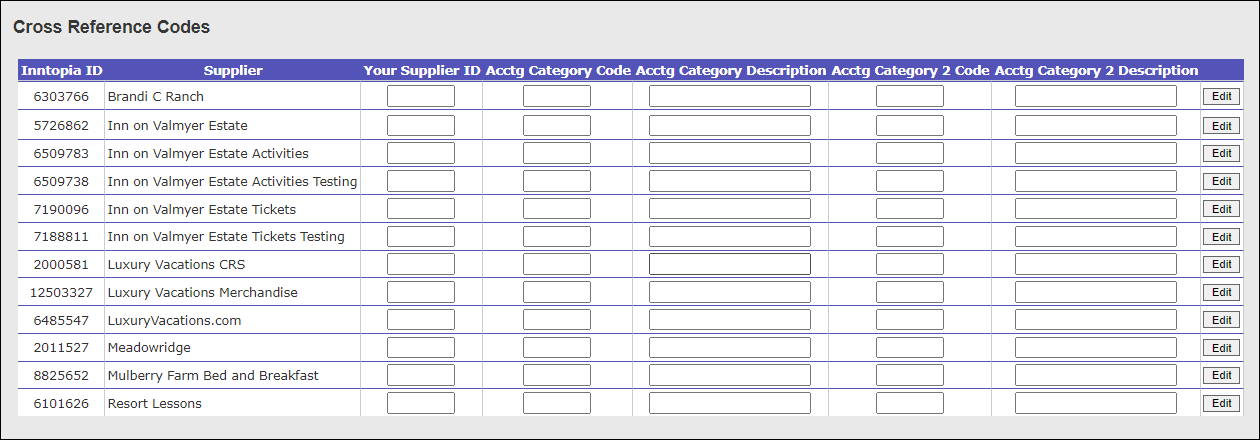
The Cross Reference Codes screen appears listing each supplier associated with your parent sales channel.
- Find the supplier(s) for which you want to enter cross-reference codes and enter numerical or alpha information in any of the following optional fields:
- Your Supplier ID
- Acctg Category Code
- Acctg Category Description
- Acctg Category 2 Code
- Acctg Category 2 Description
- Click Edit. The cross-reference codes you entered for the supplier are saved.
- To make changes to a cross-reference code, make edits directly in the fields you want to change and click Edit.
You can remove a supplier from your sales channel using the supplier's corresponding Remove button on either the list of suppliers OR from the Find Supplier search results.
If you do not see the Suppliers tab upon logging into your Inntopia CRS account, contact your CRS administrator to add your permissions to this page.
- Log into Inntopia CRS.
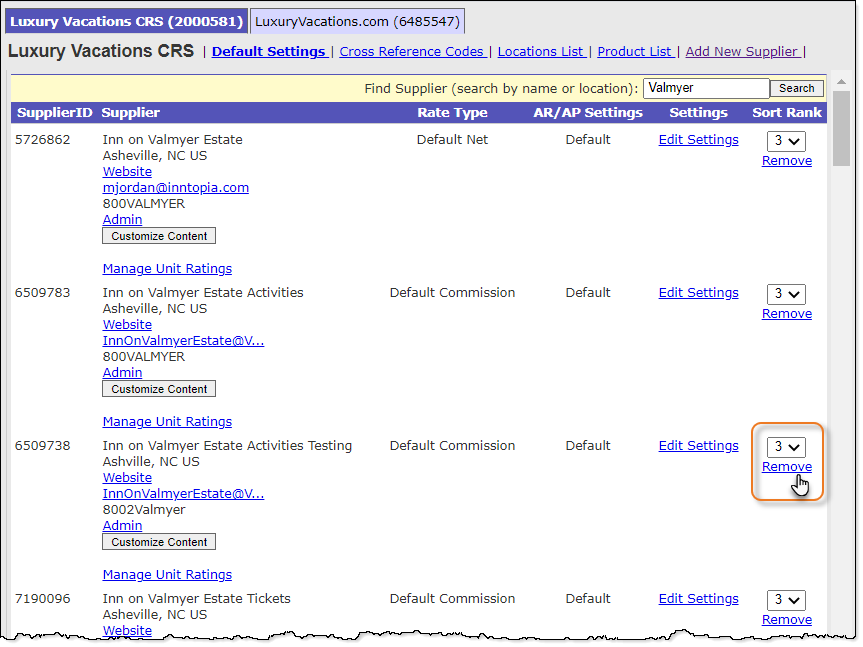
- From the tabs listed across the top of the page, click the Suppliers tab. The Suppliers page opens listing all suppliers previously added to your sales channel on the left side of the page.
- To remove a supplier directly from the supplier list:
- Scroll through the list of suppliers, find the one you want to remove, and click its corresponding Remove button.The supplier's account information is removed from the left side of the page. In the Action column on the Find Suppliers screen on the right side of the page, an Add button replaces the Already Listed text and the Remove button.
- To search for the supplier you want to remove:
- In the Find Supplier (search by name or location) field, enter the supplier name or location and click Search.
Note: Pressing the Enter key on your keyboard does not activate this search; you must click the Search button on the screen to activate the search process.
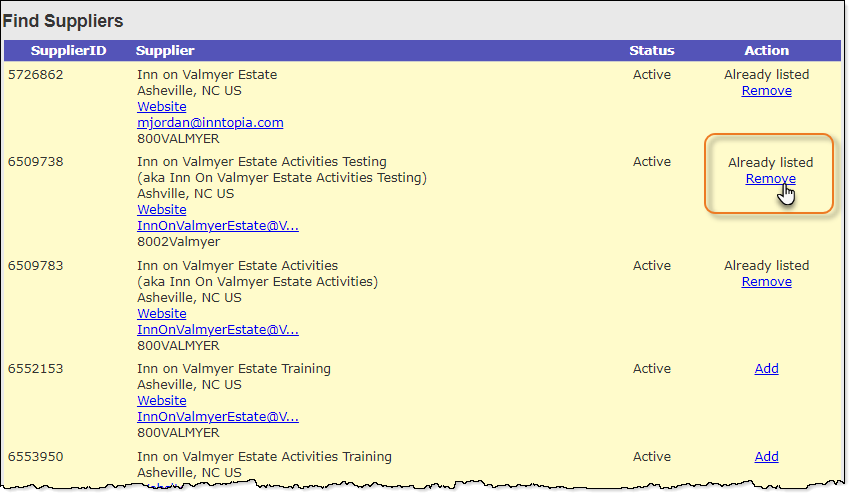
All suppliers with the name of the account or suppliers within the location you entered are listed on the Find Suppliers screen on the right side of the page. - From the list of suppliers on the right side of the page, find the supplier account you want to remove from your supplier list and in the Action column, click its corresponding Remove button.The supplier's account information is removed from the left side of the page. In the Action column on the Find Suppliers screen on the right side of the page, an Add button replaces the Already Listed text and the Remove button.
- In the Find Supplier (search by name or location) field, enter the supplier name or location and click Search.
