Build New List
In Inntopia Marketing Cloud, a list is defined as a specific segment of your customers. Lists can be as simple as a quick geographic pull or as complex as a highly targeted, multi-criteria segment. Once built, lists can be named and saved into list folders. If you use Acoustic® as your email client, you can use existing Acoustic tags to refine your lists.
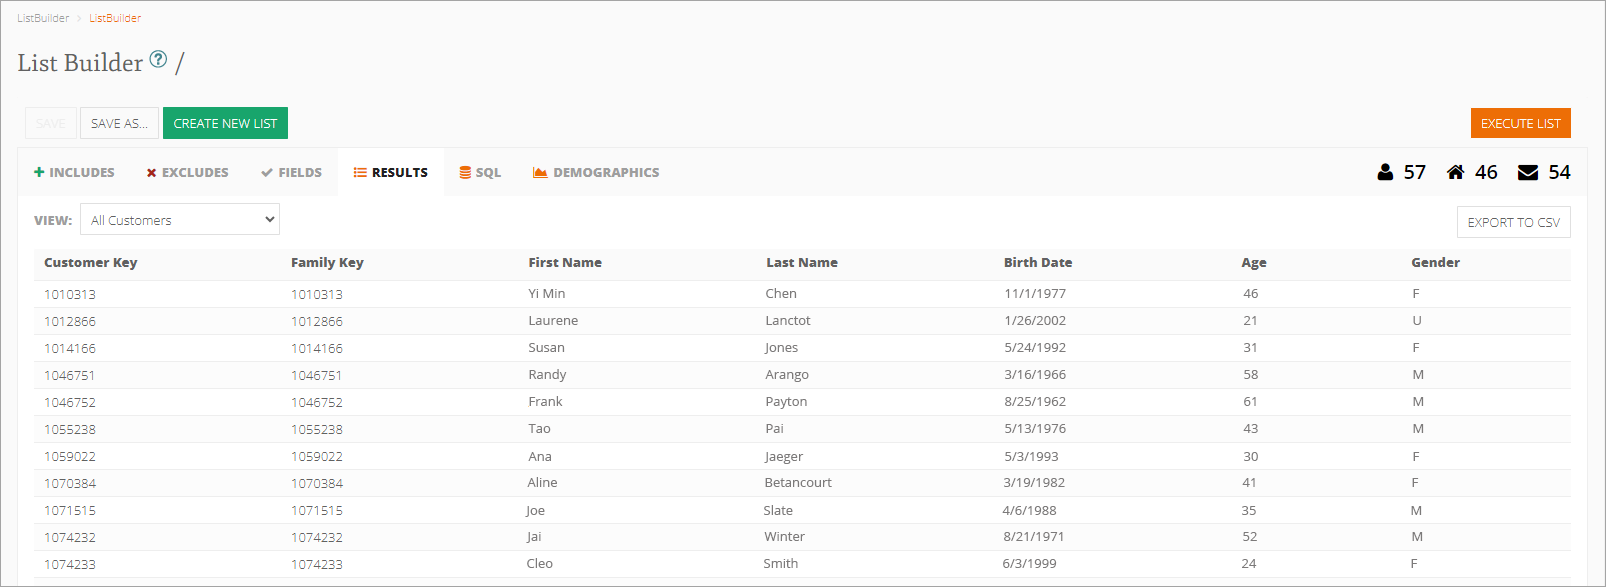
Once complete, lists contain a standard set of output fields (Customer Key, Family Key, First Name, Last Name, Birth Date, Age, Gender) and can be viewed in different result sets.
To make creating queries easier, it’s important to become familiar with the List Builder user interface.
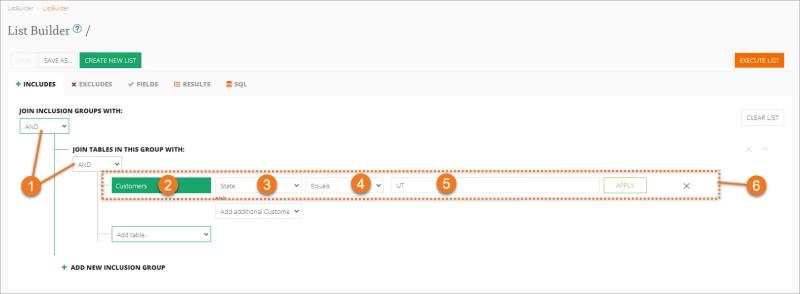
- Inclusion / Exclusion Groups – Use these groups to join parameters and indicate what type of customer is included or excluded from the list.
- Data Table – The cache of guest information stored in your Inntopia Marketing Cloud account from which the list data is pulled. For more information, review the About Data Tables section.
- Field – A data point that defines your list, i.e. indicate that you are searching for a state, number of nights, a date, a product, etc.
- Operator – Links the selected field to a value requirement. Examples include equals, greater than, less than or equal to, etc.
- Value – The specific information required for your list, such as a state abbreviation (UT, NY, CA, etc.), a numeral for a specific number of nights (2, 4, etc.), a date in the format DD/MM/YYYY (01/01/2024), etc.
- Parameter – Refers to the full statement you have defined (Data Table + Field + Operator + Value).
The basic steps for building and generating a new list in Inntopia Marketing Cloud are:
- Select a data table (Customer, Lodging, Survey, etc.)
- Select a data field
- Select an operator that links the field to a value (equals, between, etc.)
- Enter a value (such as an age or a date)
- Join tables or groups with AND or OR
- Execute the list
- Chose the view (Mailable, Emailable, Facebook Audience, etc.)
- Name and save the list
Lists are created by defining parameter statements. You can select a group of list parameters using inclusion and exclusion groups and AND/OR logic to create one or multiple parameter statements for your list.
Understanding the Inntopia Marketing Cloud data table structure lets you unlock the reporting and stories within your data. When using List Builder, you select the table(s) from which to extract data stored in your Marketing Cloud account; however, knowing what data is stored in each table, as well as how it is sourced, will help you get the most out of the platform.
Learn more about the Data Table Structure and explore the information stored within each data table.
Inclusion and/or Exclusion groups contain parameters that determine what type of customer is included or excluded from your list. You can create a list using a combination of "and/or" statements. When you include multiple Inclusion or Exclusion groups, you can use “and/or” statements to define whether the list should include/exclude customers who meet the criteria of all groups (“and” statement) or any group (“or” statement). Your lists can have an unlimited number of parameters and groups.
Using "and/or" logic in your parameter statements will drastically narrow or expand the data included in your query. It’s important to understand the difference between AND and OR so you build parameter statements that best meet your needs.
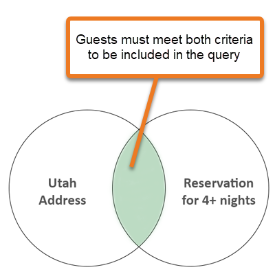
AND logic within your query narrows your results. To be included in the query, the guest must meet both (or all) criteria.
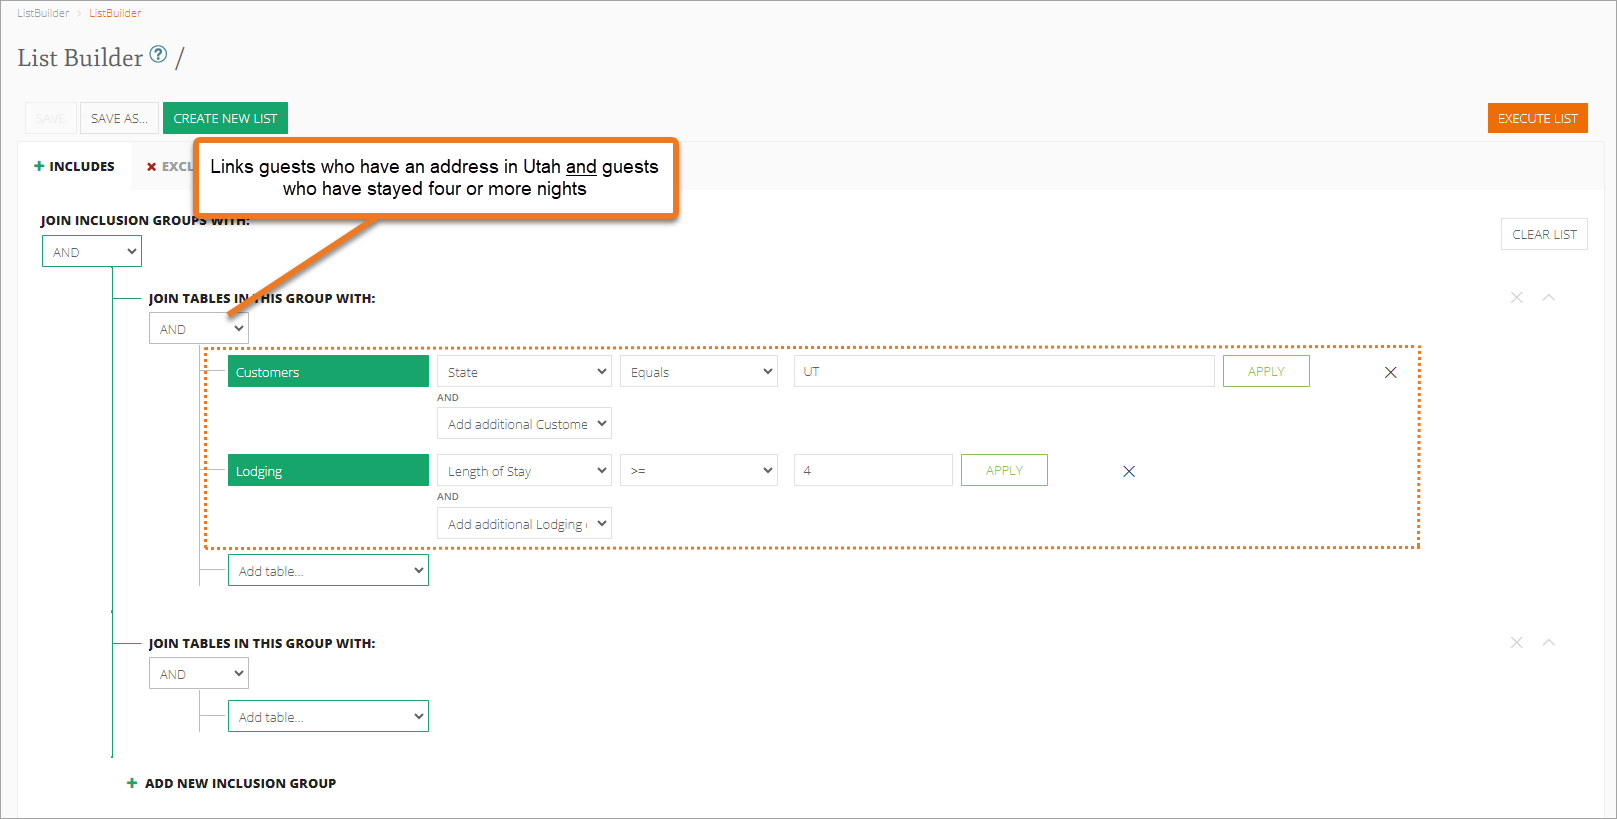
For example, in the following diagram, a guest must reside in Utah AND have a lodging reservation for four or more nights to be included in the query. A guest who only resides in Utah or only stayed four or more nights will not be included.
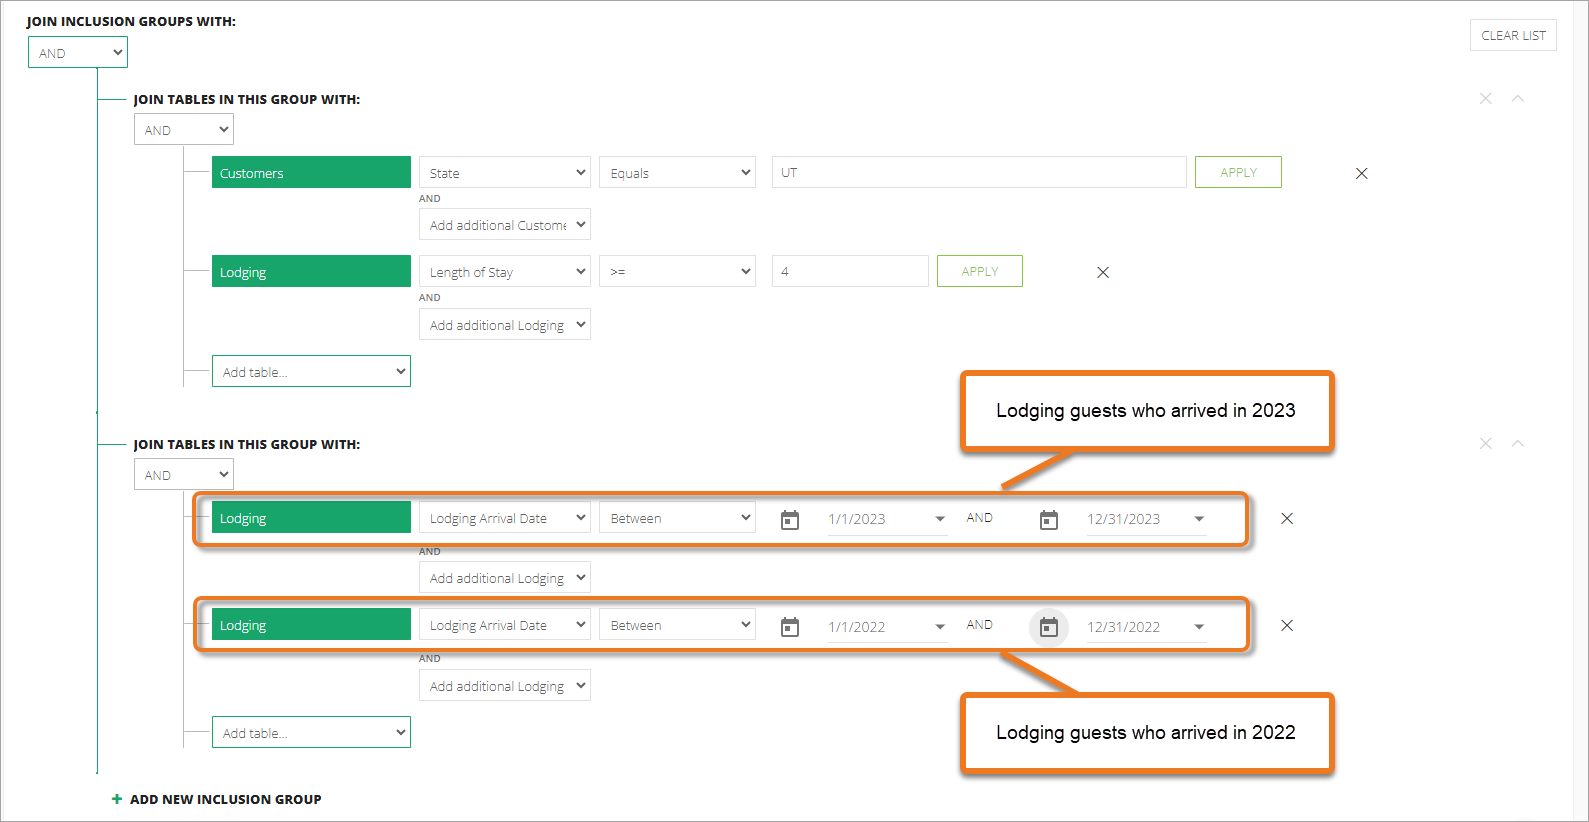
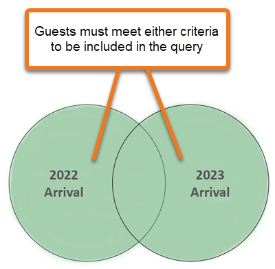
OR logic within your query expands your results. To be included in the query, the guest must only meet one criterion.
For example, in the following diagram, a guest could have arrived in 2022 OR arrived in 2023. They need not to have stayed both years to be included in the query.
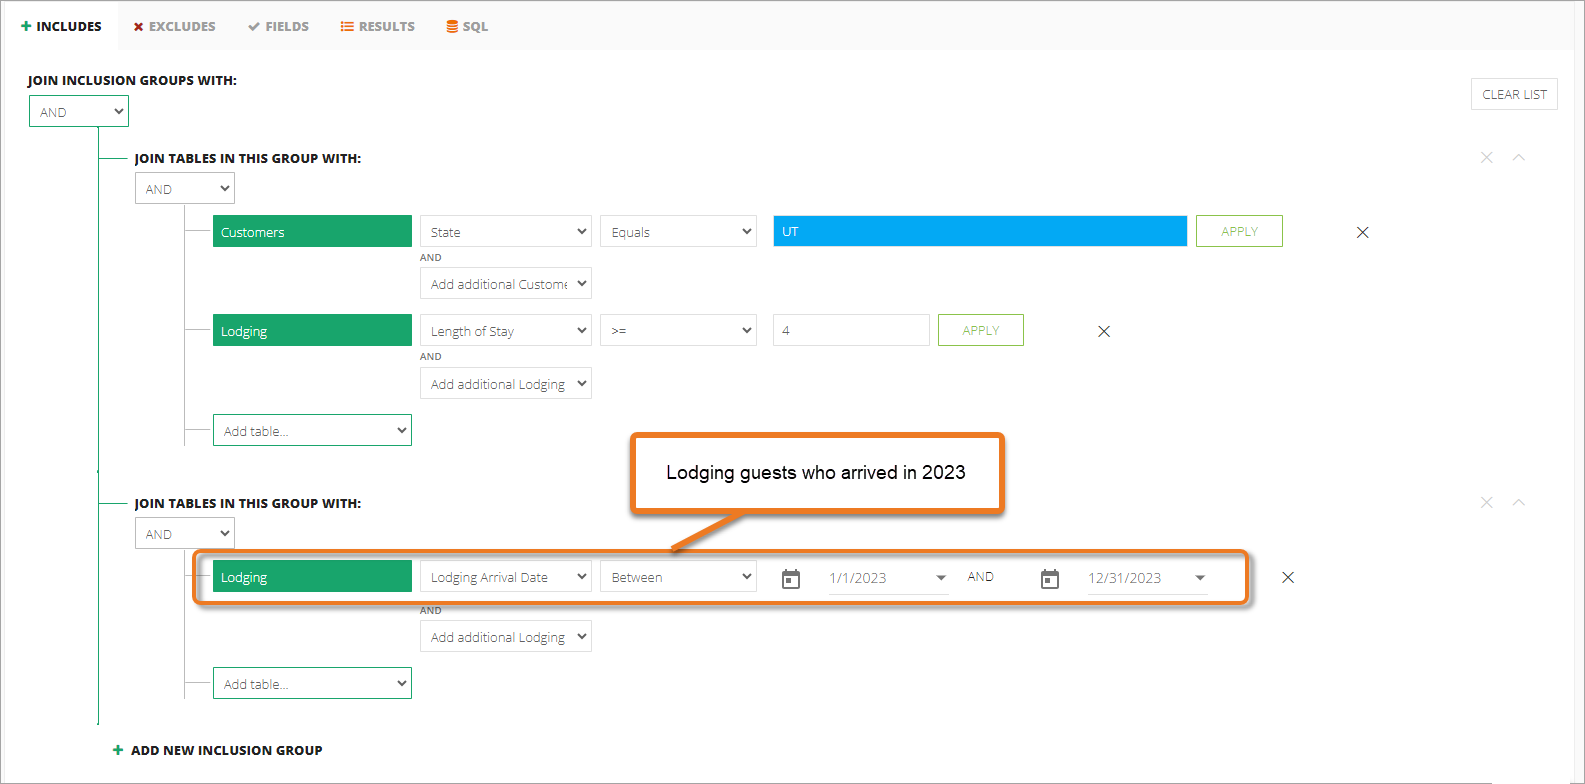
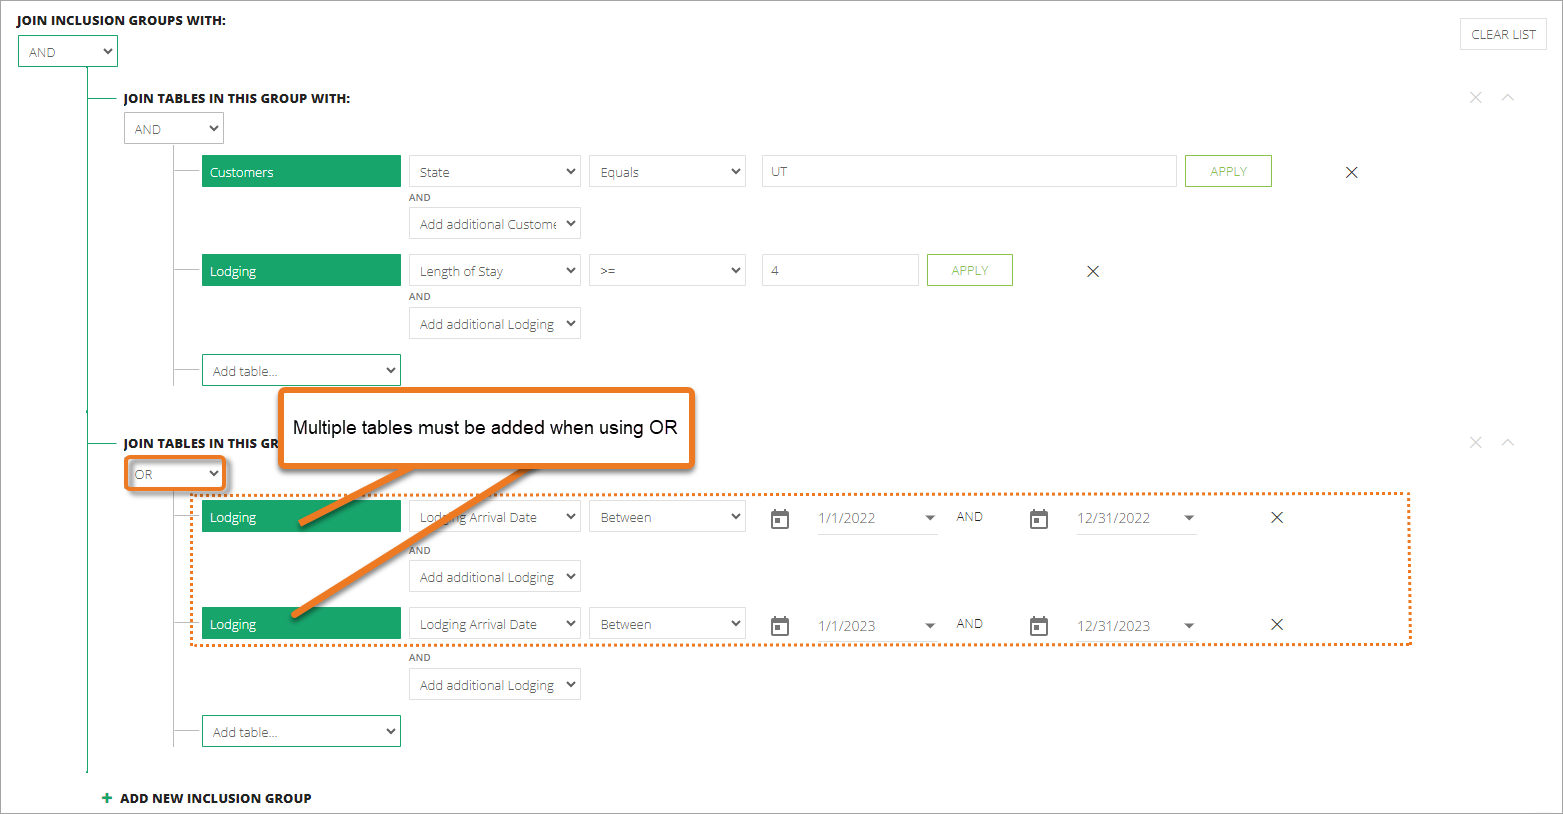
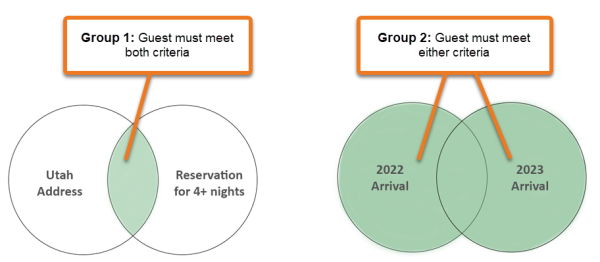
When you combine AND/OR statements into a complex query, you can pinpoint the data you want to extract from Inntopia Marketing Cloud. The query identifies guests who reside in Utah AND have a lodging reservation for four or more nights with an arrival in 2022 OR an arrival in 2023.
By combining these two groups, you can identify the guests that meet the criteria of all the areas shaded green.
The best way to familiarize yourself with the basic concepts and structure of List Builder queries is to build a basic list. Once you build and save a basic list, you can refine the results with additional criteria.
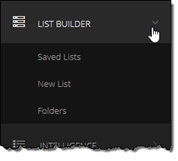
- From the left navigation menu on the Marketing Cloud dashboard, click List Builder. The List Builder menu expands.
Note: Depending on your browser, you may only see the List Builder icon
 . To expand the menu, hover your cursor over the icon.
 - From the List Builder menu, click New List. The List Builder/Create New List screen appears with the +Includes tab open.
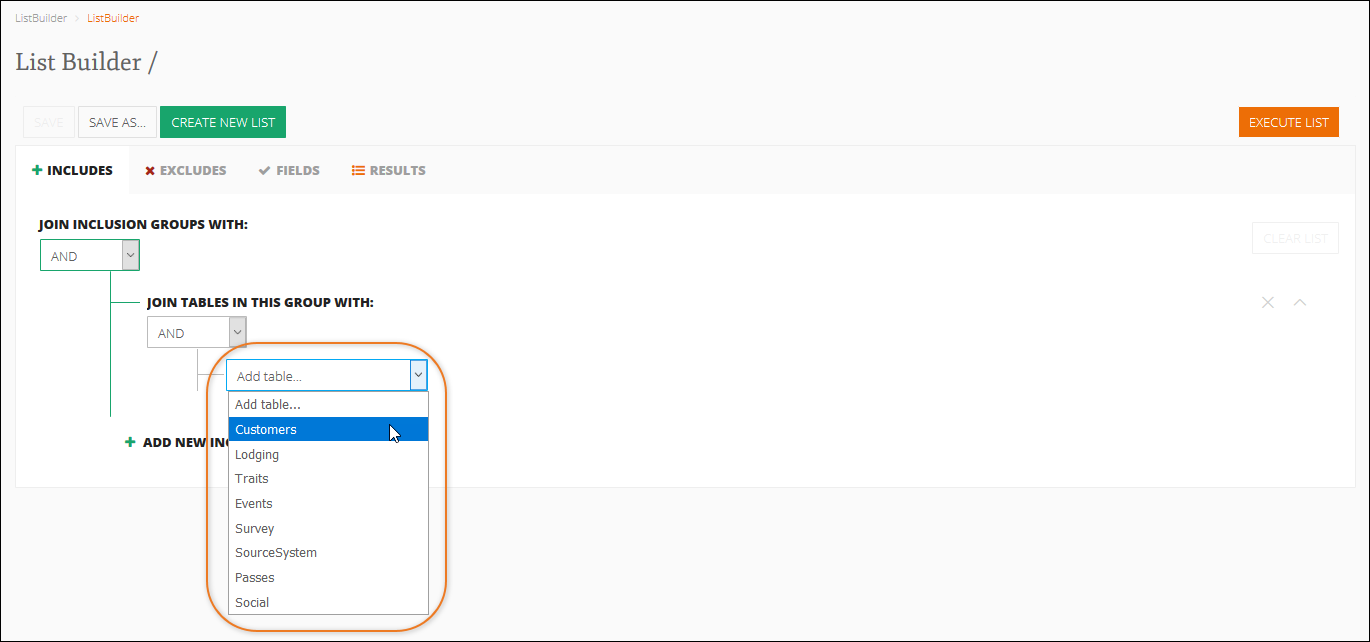
- From the Add table drop-down list, select the type of database table you want to include for building your list.
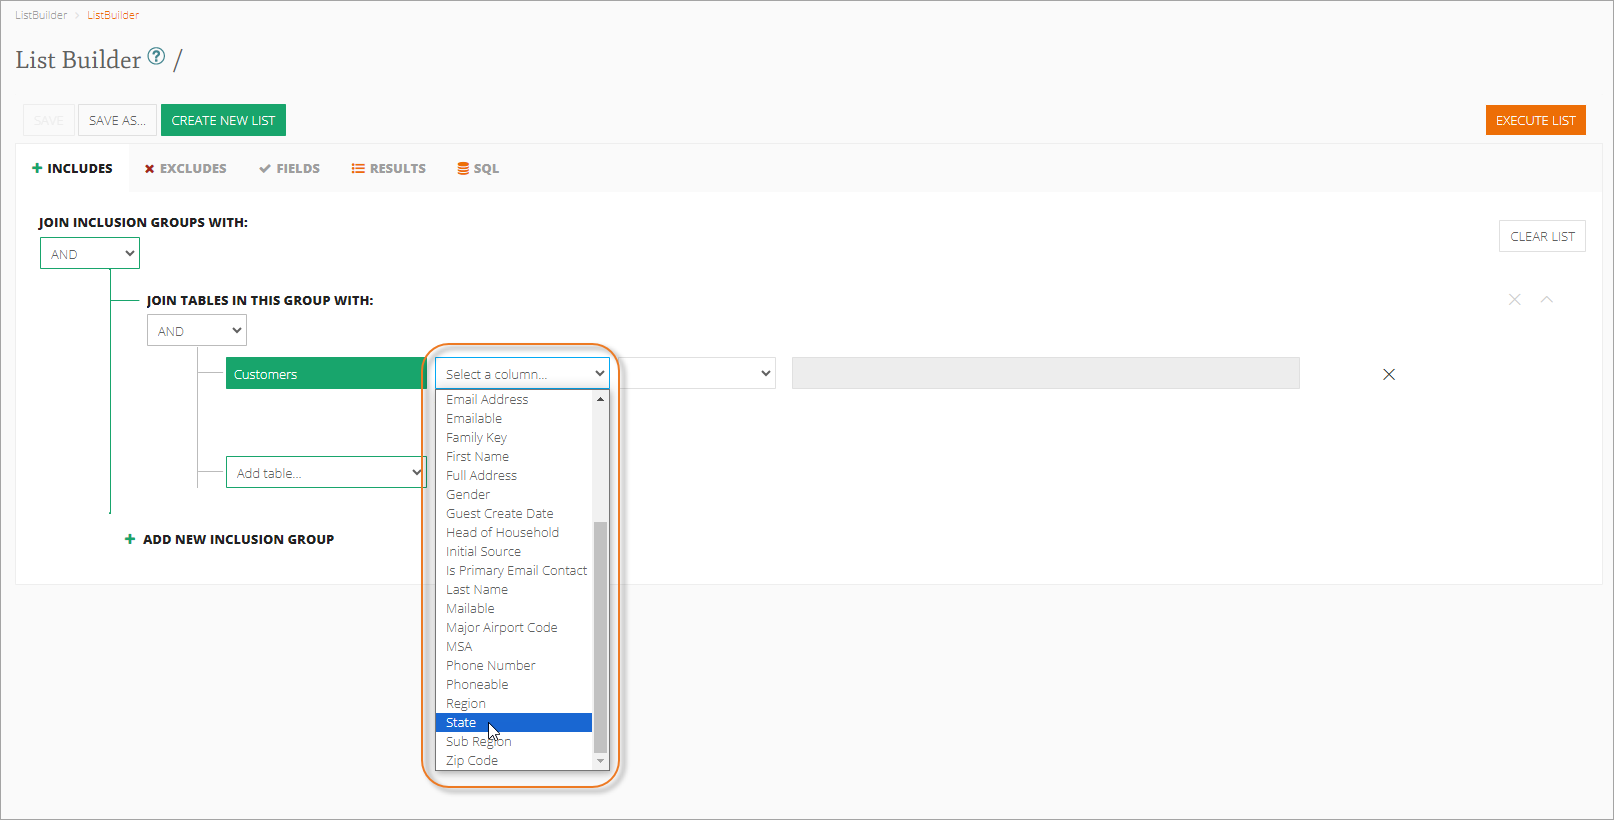
- Fields are data points that help further refine your parameter statement. From the Select a column drop-down list, select a field.
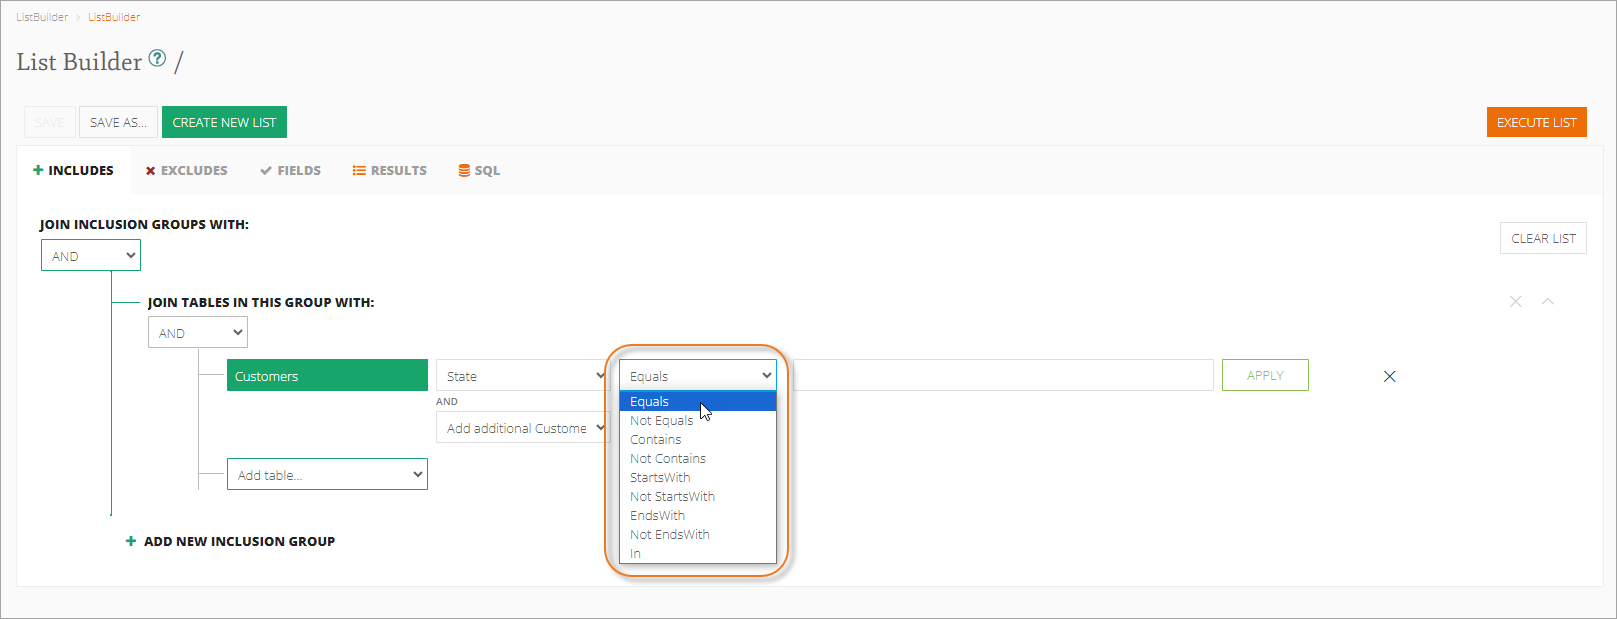
- The default operator is Equals. From the drop-down list, select an operator to link the selected field to a value requirement.
 Show Me Operator Options
The operators listed will depend on the data type of the field you selected. Available options include:
- Equals (=)
- Not Equals (≠)
- Greater Than (>)
- Greater Than or Equal (>=)
- Less Than (<)
- Between
- = CurrentDate <Relative Date>
- > CurrentDate <Relative Date>
- < CurrentDate <Relative Date>
- CurrentDate Between <Relative Date>
- Contains – The value requirement is found within the selected field.
- Not Contains – The value requirement is not found within the selected field.
- StartsWith – The value requirement is found at the beginning of the selected field.
- Not StartsWith – The value requirement is not found at the beginning of the selected field.
- EndsWith – The value requirement is found at the end of the selected field.
- Not EndsWith – The value requirement is not found at the end of the selected field.
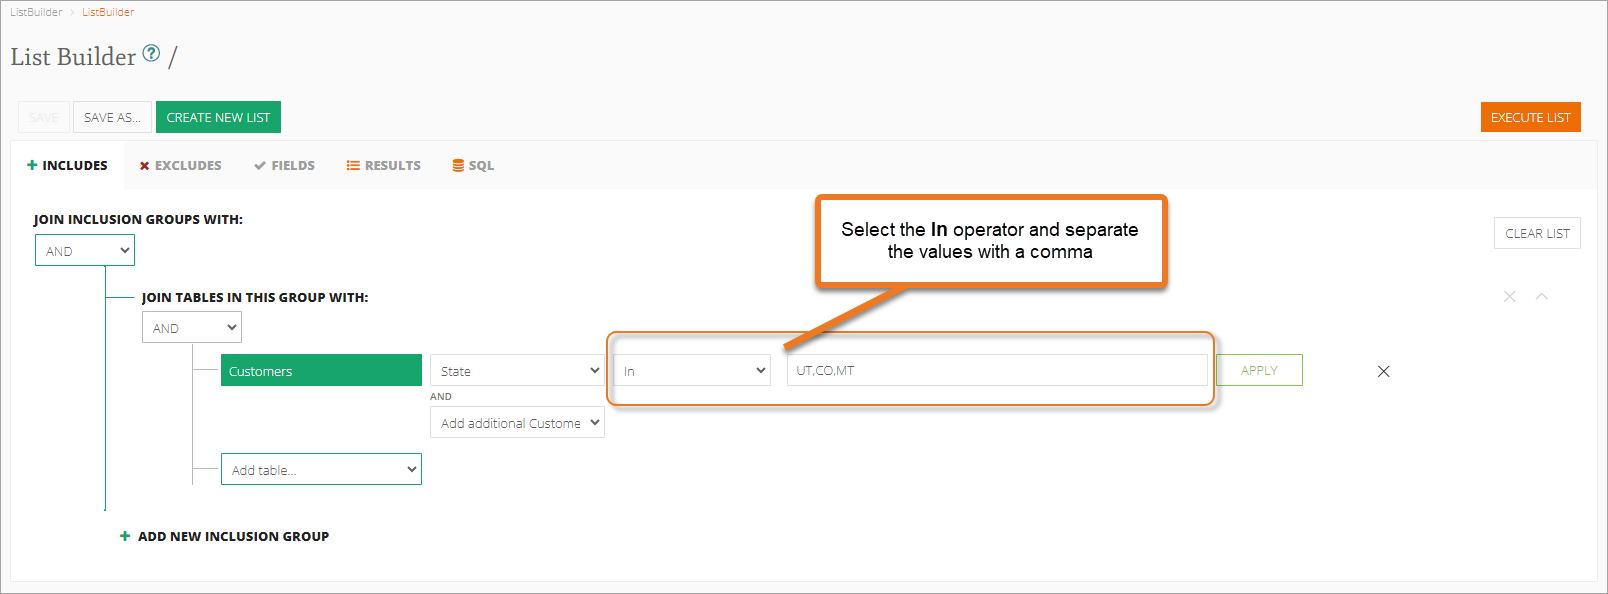
- In – One of multiple value requirements is found for the selected field.
 More About the In Operator
If using the “In” operator and entering multiple value requirements into a single field, use a comma (,) to separate the values (example: Denver, Burlington, Steamboat, etc.). The “In” operator functions as an additional OR statement.
In the following example, the query includes customers with an address in the states of Utah, Colorado, OR Montana.
You can also enter a relative date, which is a calculated date range that falls either before or after the current date the list is running (today).
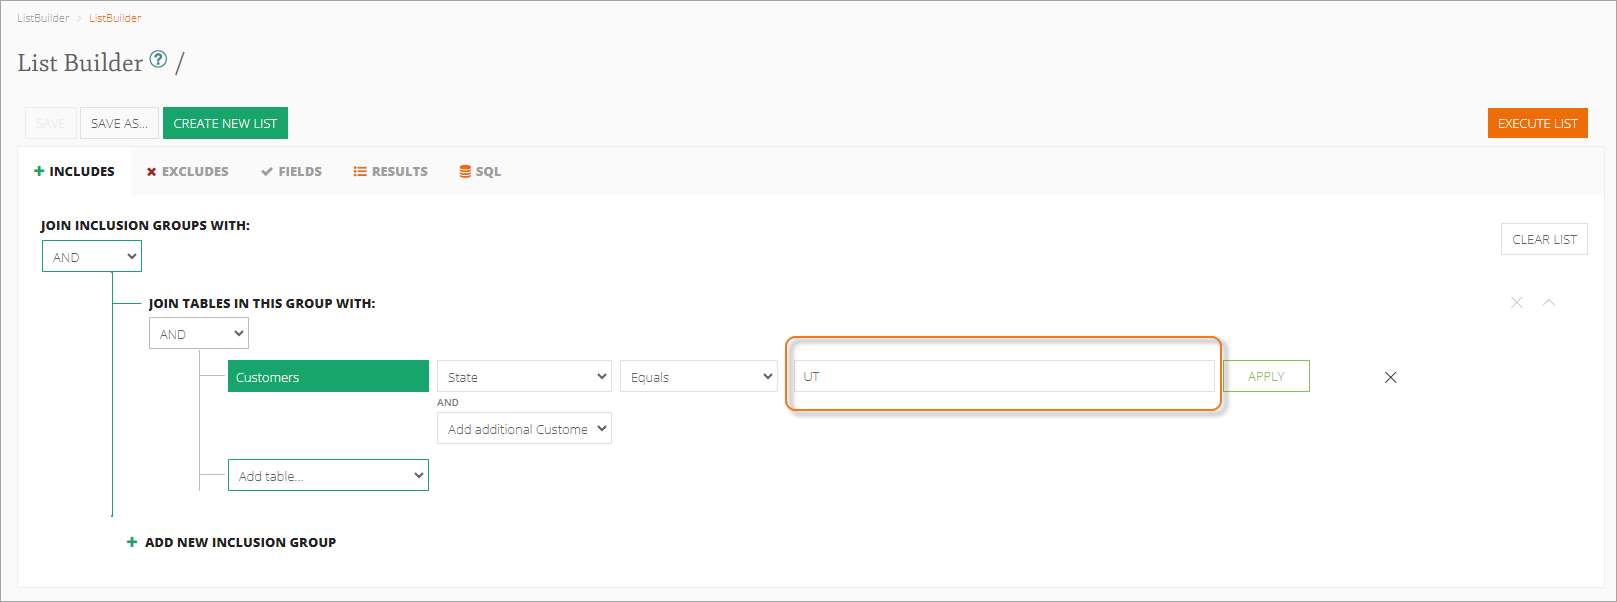
- In the value field, enter the desired value.
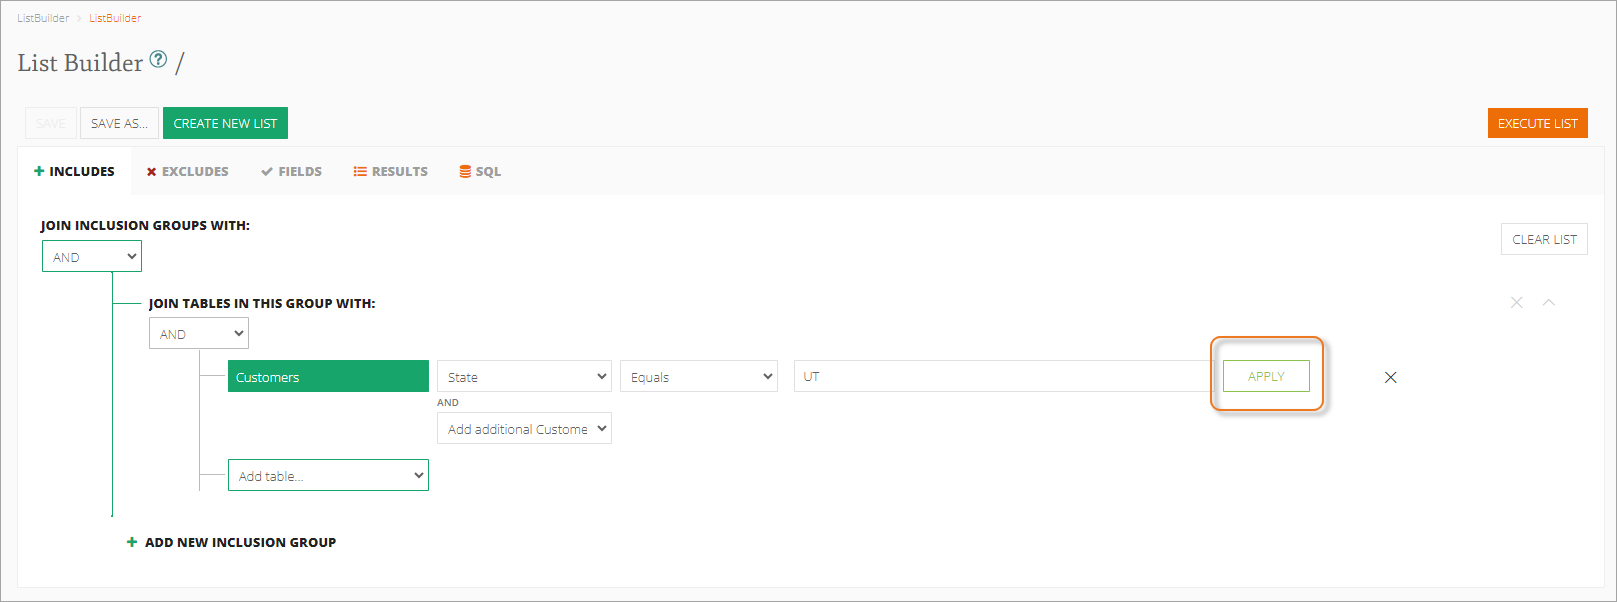
- Click Apply. The parameter statement is added to the table.
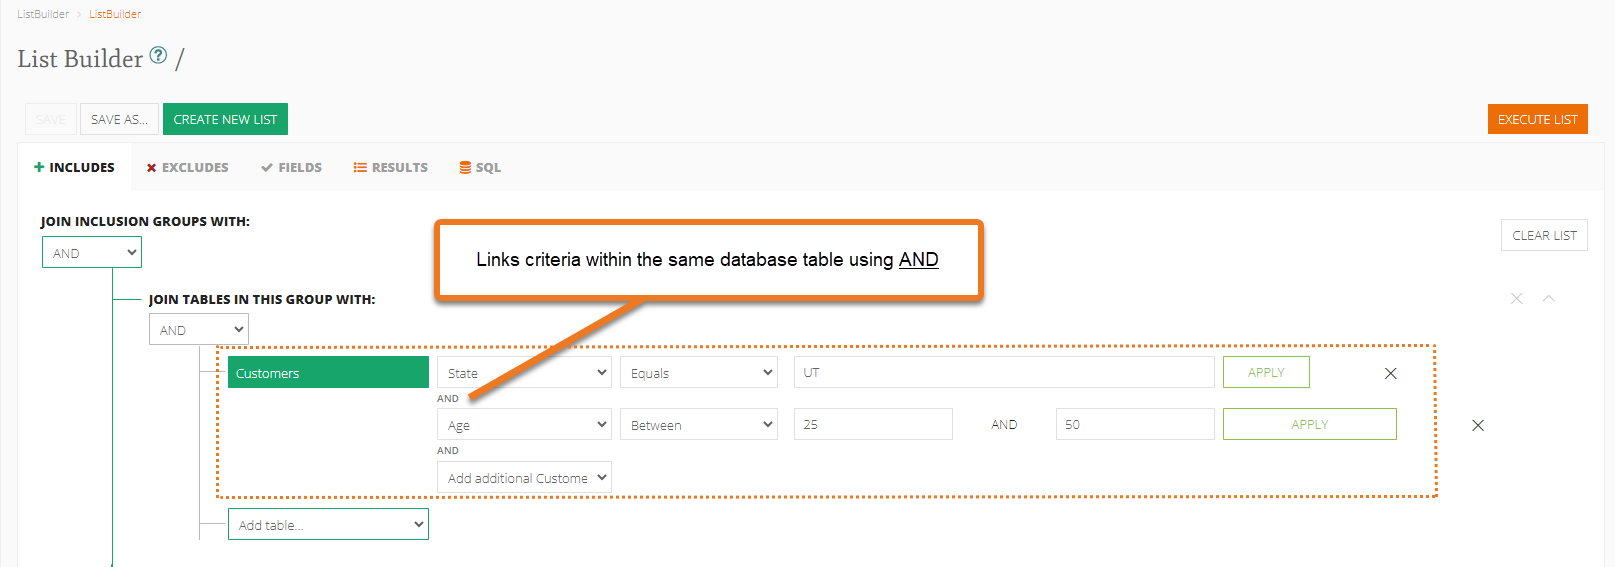
- To add more fields, operators, and values to the same database table, click the Add additional <table type> drop-down list. After adding each category and operator, click Apply.
In the following example, this parameter statement includes all guests with an address in Utah and who are between the ages of 25 and 50.
Note: Additional fields added to a parameter statement are automatically joined with the original category using an AND statement. To join an additional field with the original field using an OR statement, you must create a separate parameter statement for each additional field and then set the Join Tables in this Group With drop-down list to OR.
- To add more database tables to the Inclusion group, click the Add table drop-down list. After defining each parameter, click Apply.
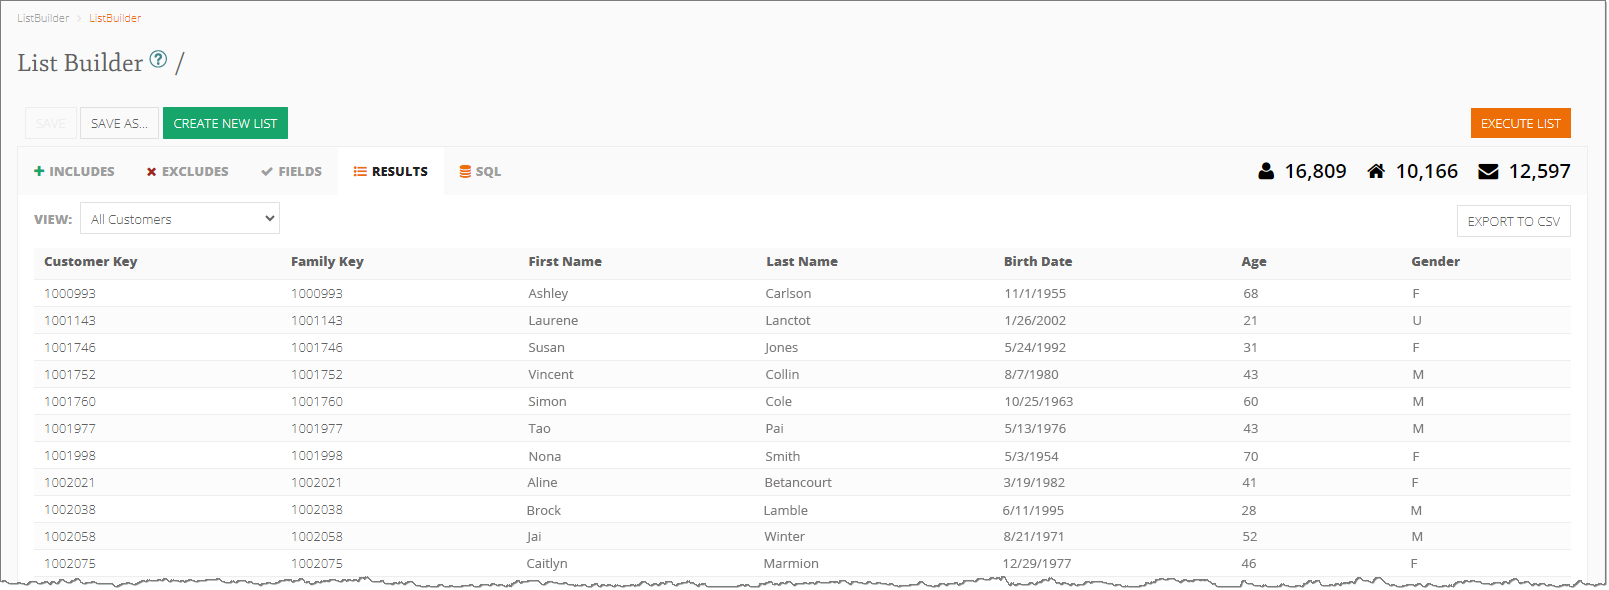
- When you have selected all desired parameters for your list, click Execute List. Your list results appear in the Results tab.
For information about additional options for viewing results, visit the View List Results – Additional options section.
- Name and save your list. For detailed information on naming and saving lists, visit the Name and Save a List section.
Note: You must save your list before you can sync it with an Email Service Provider (ESP).
As you become more familiar with List Builder, you can refine your list and create more complex queries.
- View your list. If it is not open, from the navigation menu, select List Builder and then Saved Lists. From the Saved Lists screen, find the list you want to refine and click its corresponding forward arrow.
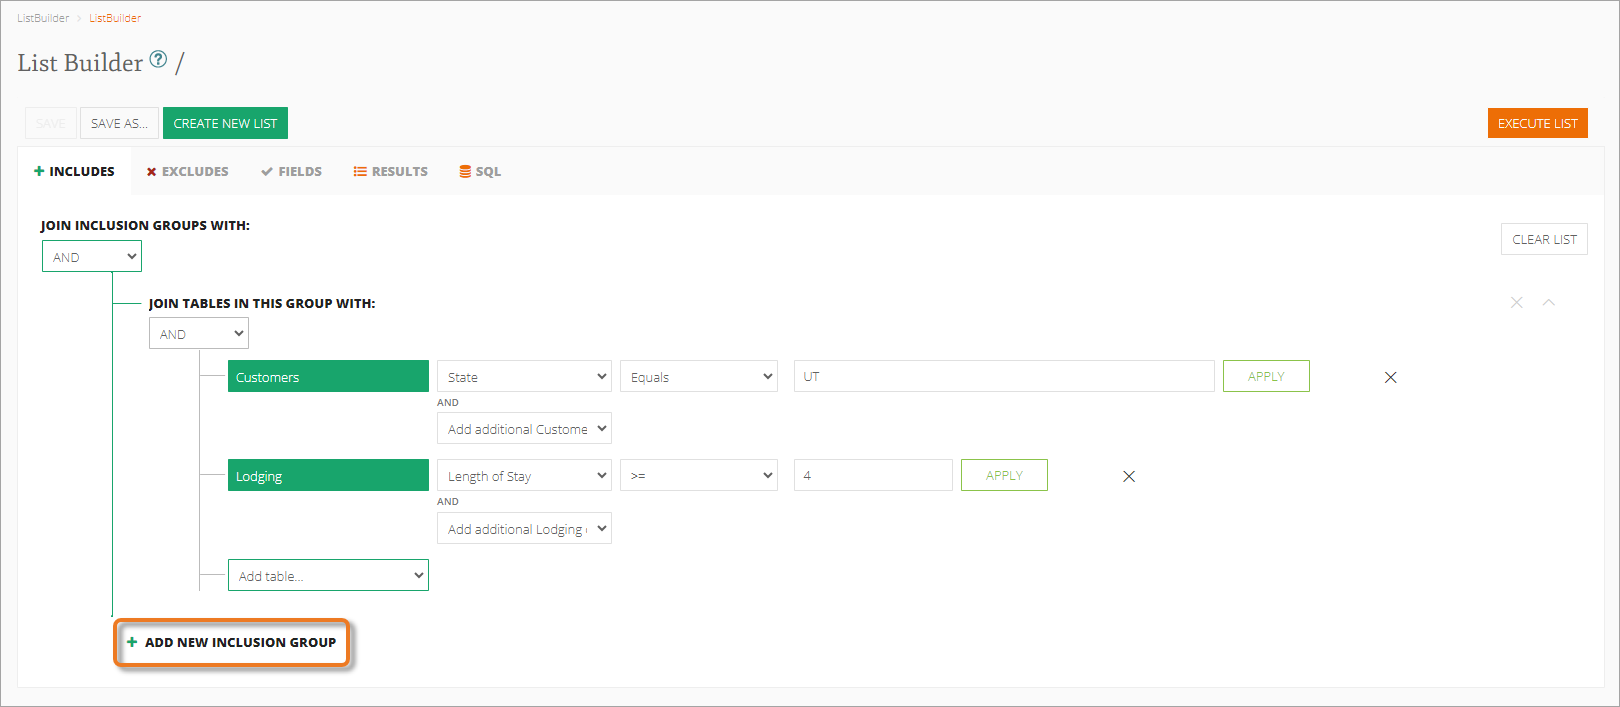
- To add a parameter statement, select + Add New Inclusion Group. The drop-down lists for creating tables within the Inclusion group appear.
- Select the table, field, operator, and value(s) to add to the statement.
- Add additional criteria to the statement as needed.
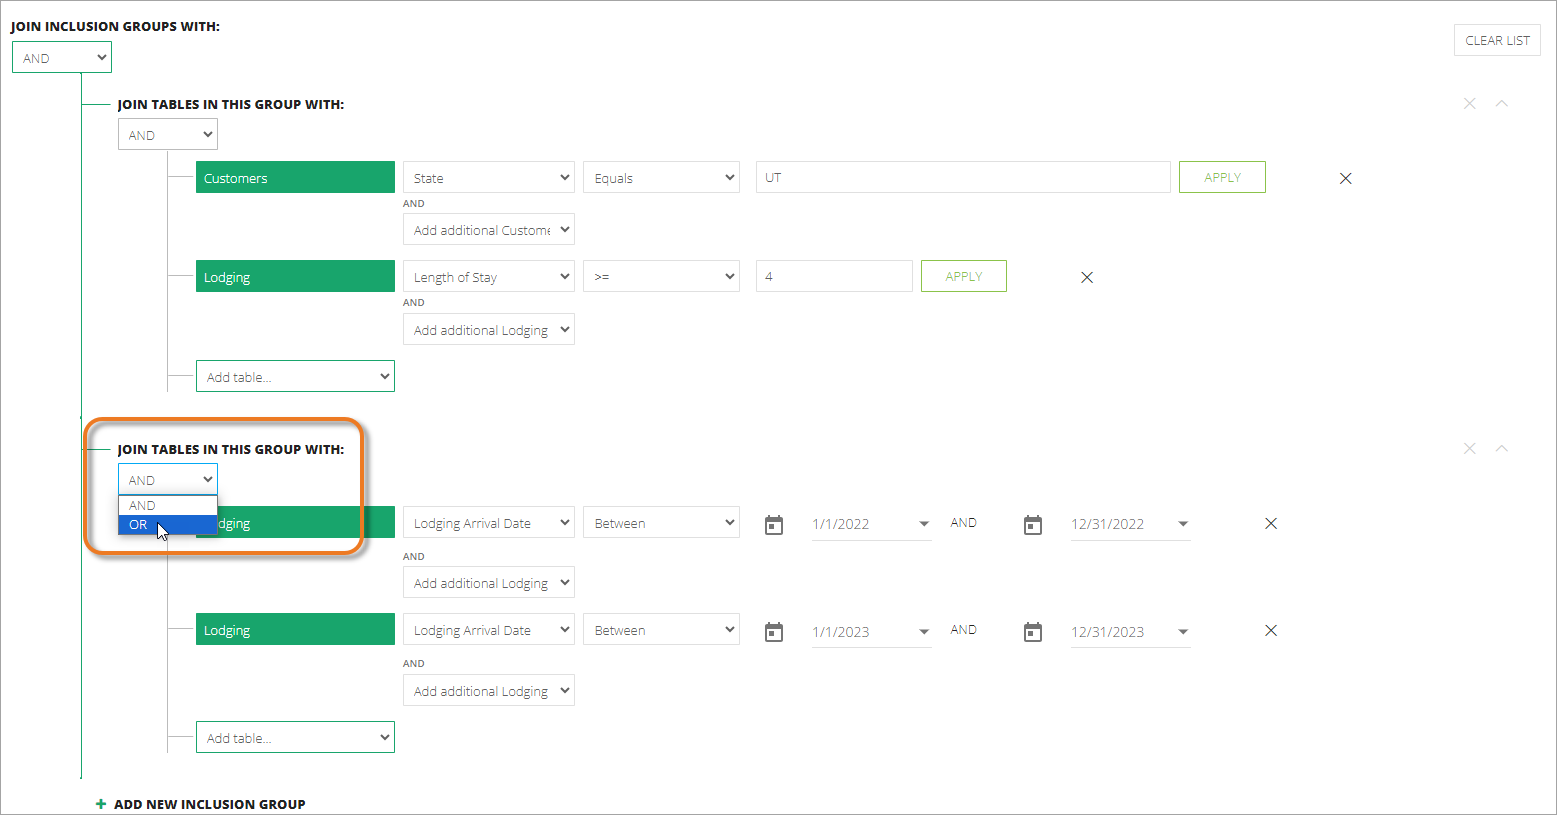
- To join the parameter statements with OR, select the Join Tables In This Group With drop-down list and select OR.
To join the table with an OR statement, you must add an additional table to the parameter statement.
- When you have selected all desired parameters for your list, click Execute List. Your list results appear in the Results tab.
For information about additional options for viewing results, visit the View List Results – Additional Options section.
- Name and save your list. For detailed information on naming and saving lists, visit the Name and Save a List section.
Note: You must save your list before you can sync it with an Email Service Provider (ESP).
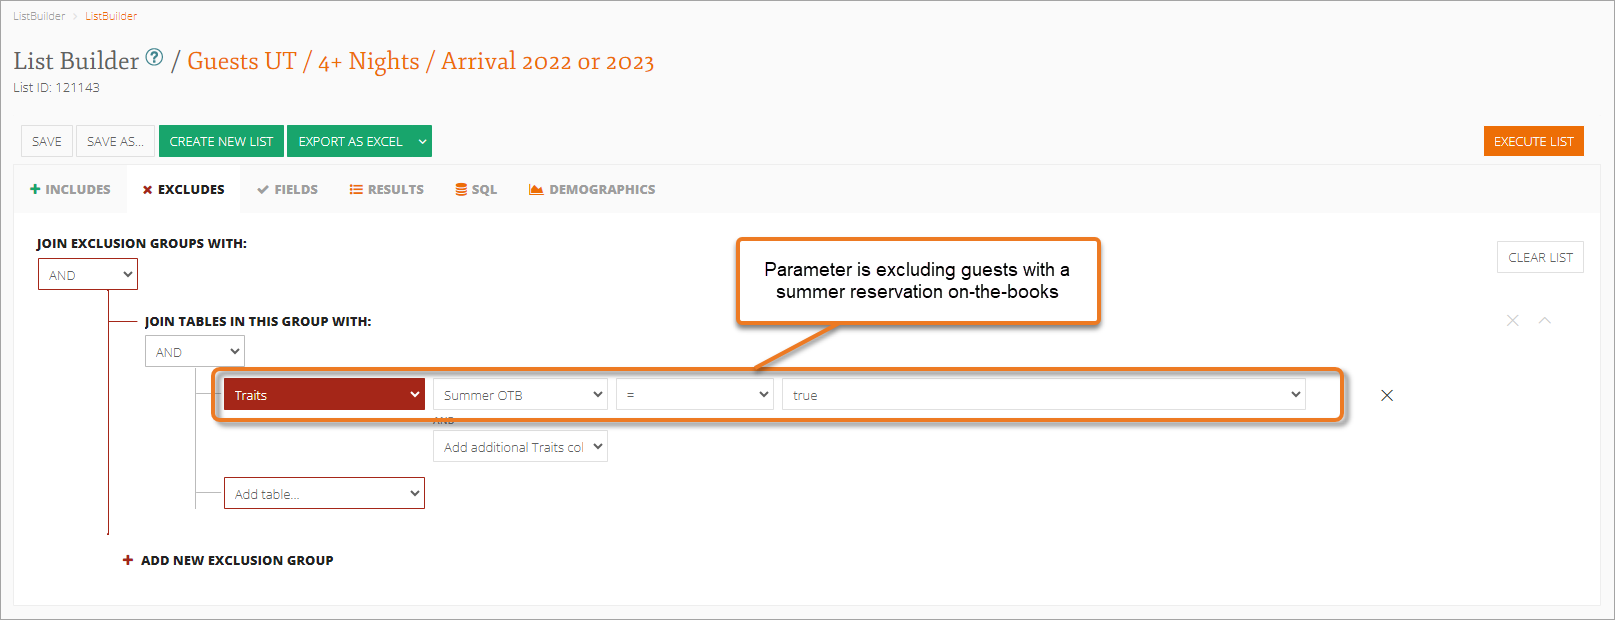
To exclude a group of guests from your list, add an AND parameter that fits your exclusion criteria.
For example, to send a promotion only to guests who do not have a summer reservation booked, you can add a parameter that excludes guests who already have a summer reservation on-the-books.

- Open your list and click the Excludes tab.
The Excludes tab opens.
- Select Add New Exclusion Group.
- Define the exclusion parameter(s) by selecting the table, field, operator, and value. Excluded parameters appear in red within List Builder. You can define multiple exclusions.
- When you have selected all desired parameters for your list, click Execute List.
- Your list results appear in the Results tab.
For information about additional options for viewing results, visit the View List Results - Additional Options section.
- Name and save the list. For detailed information on naming and saving lists, visit the Name and Save a List section.
Note: You must save your list before you can sync it with an Email Service Provider (ESP).
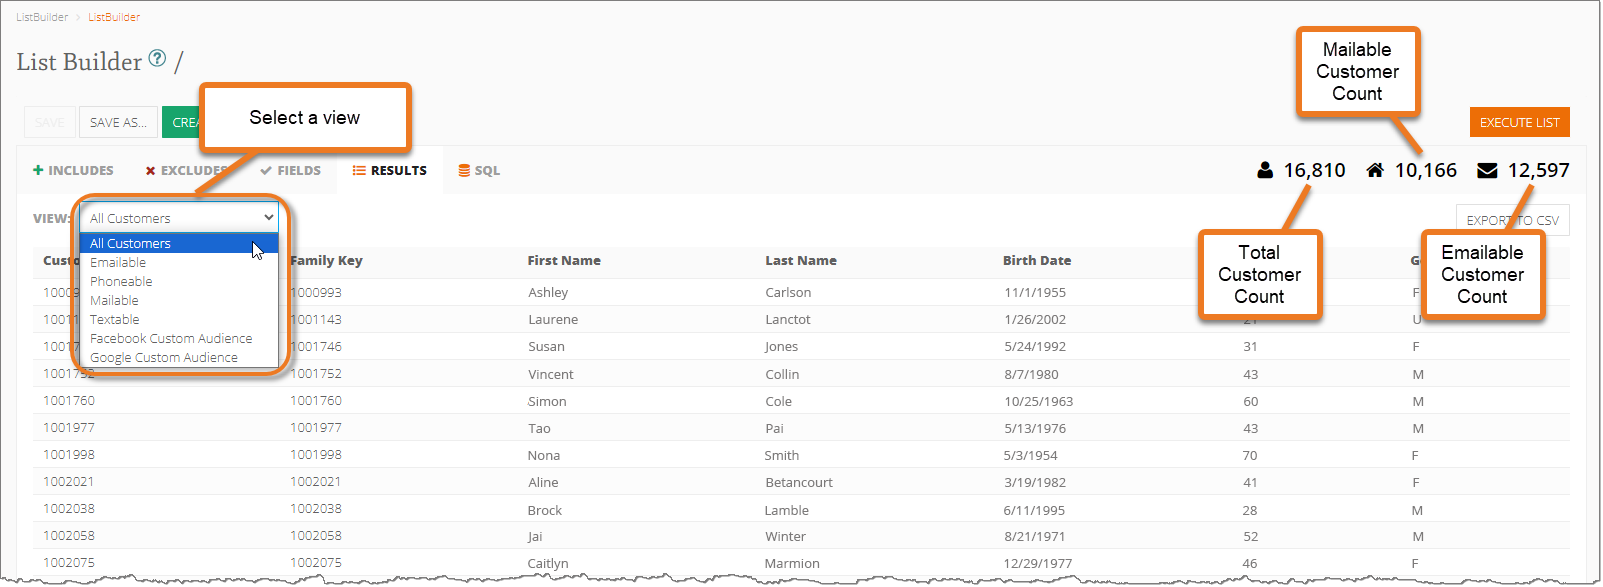
You can view lists that are specific to the type of export file you need to create, such as an emailable list or a Google Custom Audience list.
- From the Saved Lists screen, find and open the list whose results you want to view and click the Results tab. The Results List appears.
- To view list results in different sets, select one of the following views from the View drop-down list:
- Emailable – Customers from the results set who have a distinct email address.
- Phoneable – Customers from the results set who have a distinct phone number.
- Mailable – Customers from the results set who have a distinct mailing address.
- Textable – Customers from the results set who have a mobile phone number that can receive texts and who have opted-in to receive text messages.
- Facebook Custom Audience – Returns up to three (3) email addresses per customer that can then be exported to Facebook for matching with Facebook profiles.
- Google Custom Audience – Returns guests with a completed profile (name, address, phone number, and email) that can then be exported to Google for use in a Google Ads™ campaign.
Note: To view the results list in a different set (Emailable, Textable, Google Custom Audience, etc.), no custom output fields can be selected (from the Fields tab).
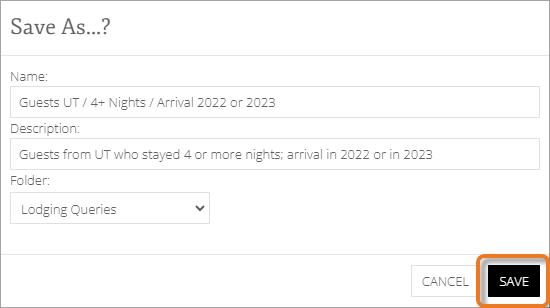
Once you generate a list, you can name and save it. You must save your list before you can sync it with an Email Service Provider (ESP).
You can also organize your lists by creating and using folders. For more information on creating folders, click here.
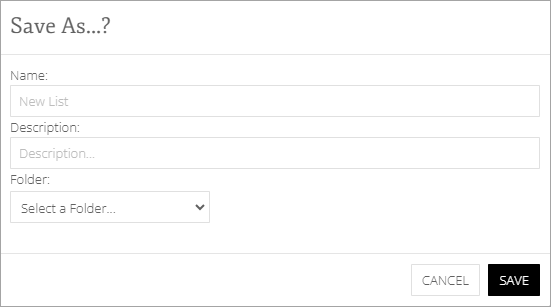
- From your list, click Save As.
The Save As screen appears.
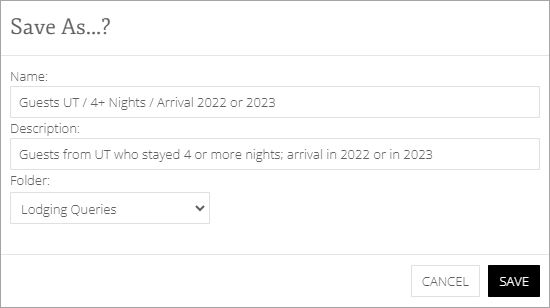
- In the Name field, enter a name.
- From the Select a Folder drop-down list, select a folder to which you want to save the list.
- In the Description field, enter a description of the query.
- If the folder to which you want to save the list has not yet been created, select the <No Grouping> folder. At a later time, you can <create a folder> and save the list to the folder.
- Click Save. The list is saved, and its name appears at the top of the List Builder screen.
The List Builder screen appears with the saved name.
If you use Acoustic as your email client, you can use the tags already created in Acoustic to refine your lists.
- From the Add table drop-down list, select Campaign.
- From the Select a column drop-down list, select Tag.
- The Select a value drop-down list now contains a list of tags created in Acoustic that can be used to include or exclude guests from your newly created list.
You can customize the information that appears on your list by selecting specific output fields. This optional feature is useful for conducting advanced analysis of customer data. For more information about using the Fields tab, click here.
A relative date is a calculated date range that falls either before or after the current date the list is running (today). When choosing a relative date, you can determine the duration before or after the selected date.
Using relative dates in your queries can be a powerful and efficient option. Relative dates allow the dates of a list to be automatically updated each time the list is executed without having to make any manual updates—this is particularly helpful for lists that are scheduled to send to your in-box on a regular cadence.
| Operator | Date Range | Example | Possible Use Case |
|---|---|---|---|
| = CurrentDate | Today | Today is March 19; this list will include data for March 19 only. | Every day, concierge wants an updated list of arriving guests. |
| > CurrentDate = 0 | Today through the future | Today is March 19; this list will include data starting March 19 and any future dates. | Revenue Manager wants the ability to pull a list of future VIP stays on demand. |
| > CurrentDate = 7 | Seven days from today through the future | Today is March 19; this list will include data starting March 26 and any future dates. | Front Office Manager wants to see all guests arriving beginning seven days from today and into the future. |
| > CurrentDate = –7 | Seven days before today through the future | Today is March 19; this list will include data for March 12 through March 19 and any future dates. | Revenue Manager who would like a list of anyone who stayed last week and also has a future trip scheduled (OTB). |
| < CurrentDate = 0 | All past dates up through today | Today is March 19; this list will include data for all past dates including March 19. | GM has requested a demographic breakdown of all past transactions for a particular line of business. |
| < CurrentDate = 7 | All past dates up through seven days in the future | Today is March 19; this list will include data for all past dates, today (March 19), and future dates through March 26. | Front Office Manager wants to see all guests who have a previous stay and have a booking in the next seven days. |
| < CurrentDate = –7 | All past dates up through seven days in the past | Today is March 19; this list will include data for all past dates through March 12. | Marketing Manager wants to send an update email to all guests who have not been on property for at least a week. |
| CurrentDateBetween = 0 AND 7 | Today through seven days in the future | Today is March 19th; this list will include data for March 19 through March 26. | Lodging Manager wants to see the reservations that are on the books for the next seven days, every Monday morning. |
| CurrentDateBetween = –2 AND 7 | Two days in the past through seven days in the future | Today is March 19; this list will include data for March 17 through March 26. | Rentals Manager wants a list of current and upcoming two-day rental products. |
| CurrentDateBetween = 3 AND 3 | Exactly three days in the future | Today is March 19; this list will include data for March 22 only. | Ski School Manager assigns private lessons three days in advance; so, each day they need a list of the lessons arriving three days from today. |
There are some fields that are commonly used on the Exclusions tab. These include employee, owner, group, lodging, OTB, and amount > 0 (to exclude the complimentary guests).
There is a field called Last Lodging Departure Date in the Customer Traits table and a field called Lodging Departure Date in the Lodging Area table.
Last Lodging Departure Date only has the last date your guest departed from the resort. Every time a guest stays with you, this date is automatically updated upon their departure. Use to find out the last time a guest stayed at your resort.
Lodging Departure Date has multiple dates for each guest, as there is a lodging departure date for each stay the guest has had at your resort. Use to find all departure dates a guest has had (or one that was not necessarily their last departure date).
