Modify a Reserved Itinerary
Unlike saved itineraries, a reserved itinerary starts the deposit schedule and triggers cancellation and modification policies. As a result, there are potential accounting issues to consider before modifying or cancelling a reserved itinerary
More advanced tasks associated with modifying a reserved itinerary include adjusting supplier payables or issuing refunds to customers.
Changing a product on a reserved itinerary has ramifications for the accounting and inventory systems of both the CRS and suppliers. Cancellation and modification fees, restocking inventory, and other administrative considerations must be addressed. Therefore, all modifications to a reserved itinerary, with the exception of adding a product, are made using the Modify button in the Itinerary window.
The Modify button appears in the Itinerary window only upon reserving an itinerary.
Modify, in the Inntopia system, refers to changing any of the parameters that make up a reserved itinerary, such as:
|
|
|
|
|
|
|
|
|
|
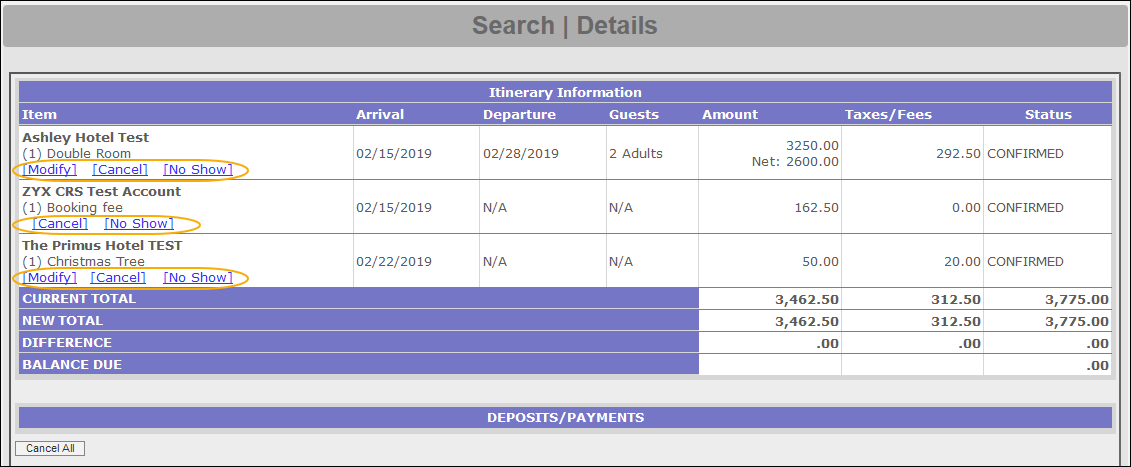
When you click Modify on the Itinerary window, the itemized itinerary appears with Modify, Cancel, and No Show links for editing each item on the itinerary.
The above example shows three active products (from two different suppliers) plus their booking fee on the itinerary. Although the products do not appear on a green background as in other features, their confirmed status appears in the far right Status column.
- Modify – Changes the arrival or departure date, the number of people on the itinerary, the number of a product (such as one or two hotel rooms), or the specific product the customer wants (from the same supplier).
- Cancel – Completely cancels a single product from an itinerary. When one product is being exchanged for another from two different suppliers, you must also use the Cancel feature. Cancelled products still appear on an itinerary in grey.
- No-Show – When a customer does not arrive for the use of a reserved product, you can mark it a “No-Show.” Cancelling the product commences cancellation procedures (which would perhaps withhold payment to the supplier). However, this feature keeps the product out of inventory and pays the supplier while flagging the reservation as a "No-Show."
- Cancel All – Completely removes all products on an itinerary.
- Status – The progress made in reserving a product for an itinerary.
Itineraries are color coded to denote their status in the Inntopia system. The color codes for itineraries are as follows:
- White = Saved itinerary
- Yellow = Saved itinerary online
- Green = Reserved itinerary with an arrival date in the future
- Grey = Cancelled itinerary
- Pink = Reserved itinerary with a pending modification
- Blue = Reserved itinerary with an arrival date in the past
Note: Reserved itinerary color codes (Green and Blue) are based on the arrival date of the entire itinerary.
- During a modification, the Inntopia system does not inherit new or read previous deposit schedules. When the amount of the itinerary is increased, the system requires the full payment for all items in the itinerary. If the amount of the itinerary is decreased (i.e. refunds), the system does not automatically issue a refund. Refunds are always a manual process in the Inntopia system. Some partners choose to use the auto-cancellation fees feature in situations where refunds are never applied.
- Inntopia recommends using the cash or check option to bypass the payment gateway and restrict customers from being incorrectly charged.
- When a modification involves new or different rates, those rates are automatically adjusted on the itinerary. Upon completion of the modification, rate adjustments may change the total amount due.
Below are explanations of each of the attributes you can modify for a particular product.
- Quantity – Change the number of a product a customer wants to purchase. For example, if a customer needs an identical lodging unit in addition to the one they have already reserved, you can increase the quantity of lodging units.
- Change the Product – Change the original product to a new one. Using this modify method, the product can only be changed to a different product offered by the same supplier. All of the supplier’s products of the same type as the original are available to select from the drop-down list.
- Arrival/Departure Date – Change either the original arrival or departure date, or both. For example, if a customer wants to extend their stay, you can enter a new departure date.
- Number of Guests (Adults and Children) – Change the number of adults, children, or both that plan to use the product. If you have multiple quantities of a product (a number more than "1" appears in the Quantity box), then the number of adults and children should equal the total number of adults and children using the products.
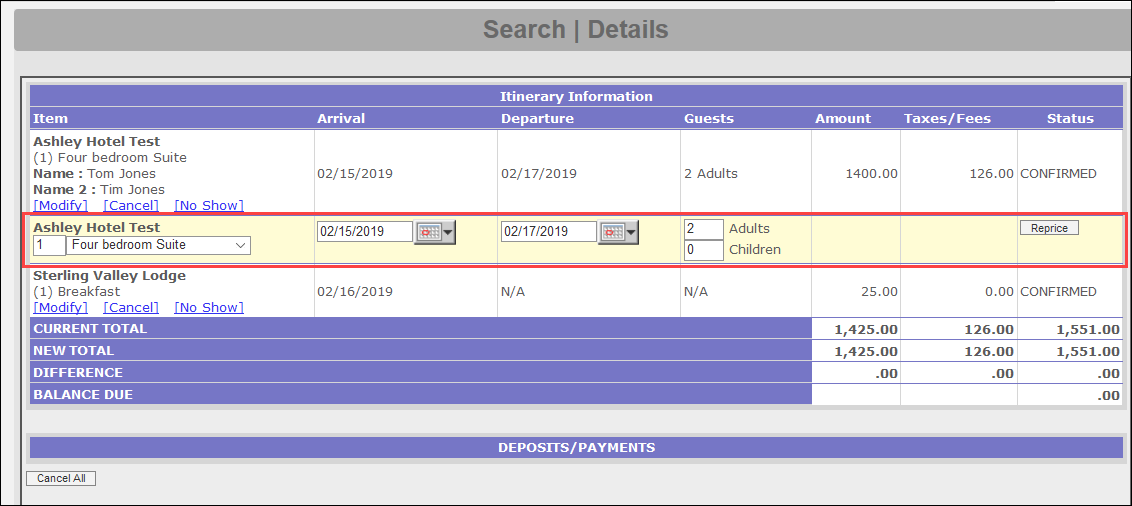
- Reprice – The Reprice button recalculates and displays new charges based on the changes you make to a product. These recalculated prices are not confirmed until you click to commit to the changes. If the customer decides not to accept the modifications at the time you re-price the product, you can choose to discard the changes and have the original totals remain on the itinerary.
Re-price also checks the system for policy and rules adherence (minimum stay, occupancy, advance booking, etc.) to ensure the product satisfies the overarching business requirements of the supplier and the CRS. If the system encounters a problem with a policy, a restriction warning appears on a red background. The reason for the restriction is listed on the left with Override and Discard buttons on the right.
Re-price also checks the system for inventory to make sure the modified product is available.
- Log into your Inntopia CRS account and from the CRS home page, click New Session and log a marketing source. To open the session in a new window, check the Open in new window box. Otherwise, leave this box unchecked.
- Search for and open the reserved itinerary to which you want to add a product.
- When the itinerary is open (the Customer and Itinerary windows are both populated), start a new lodging search or other product search.
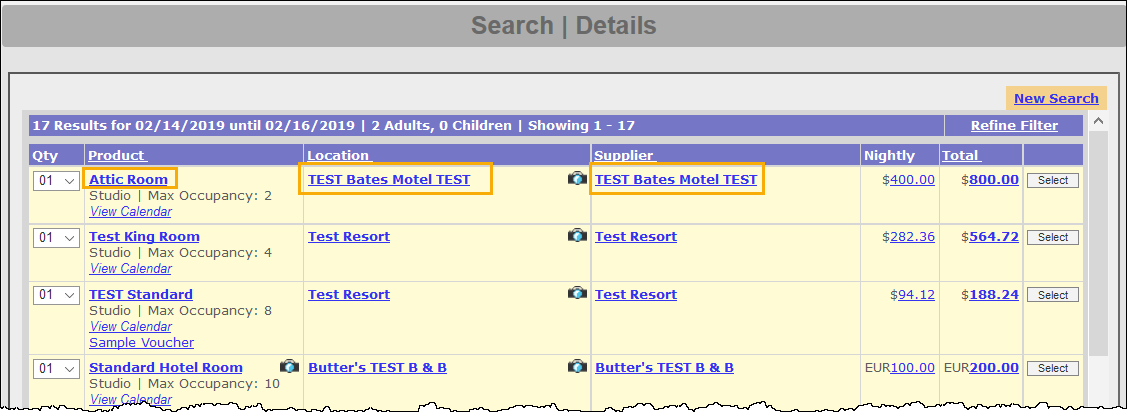
- Look through the search results and find a product to offer your customer.
- To review a product's details, click its corresponding Product, Location, and Supplier links to view their respective Description, Features, and Policies windows.
- To view the images (if any) that the supplier has associated with the product you found, click its corresponding camera icon
 .
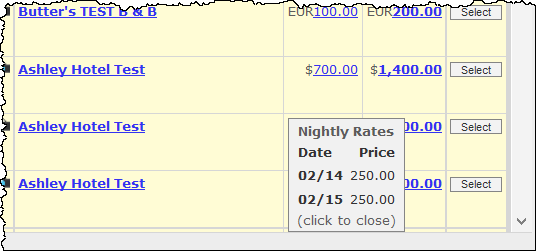
. - To check the nightly rate of the product, in the Nightly column, click on the dollar amount listed. A pop-up box displays the nightly rate for each date in the product.
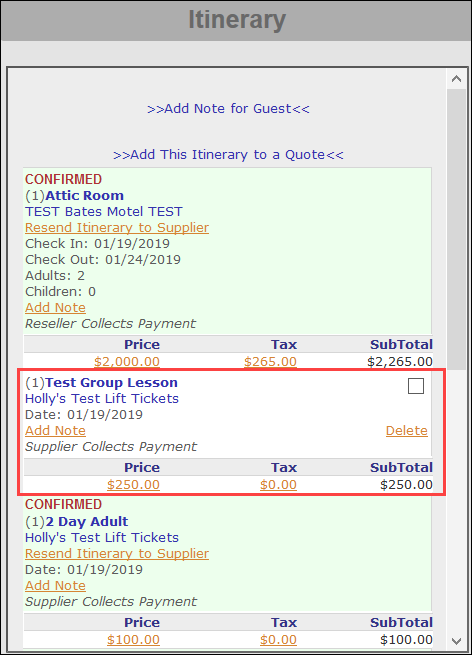
- When you have finished reviewing the product, click its corresponding Select link. The new product is highlighted and added to the original itinerary in the Itinerary window. The new product appears on a white background because it has not yet been confirmed.
At this stage of the process, you can still remove the product from the itinerary by clicking its corresponding Delete link.
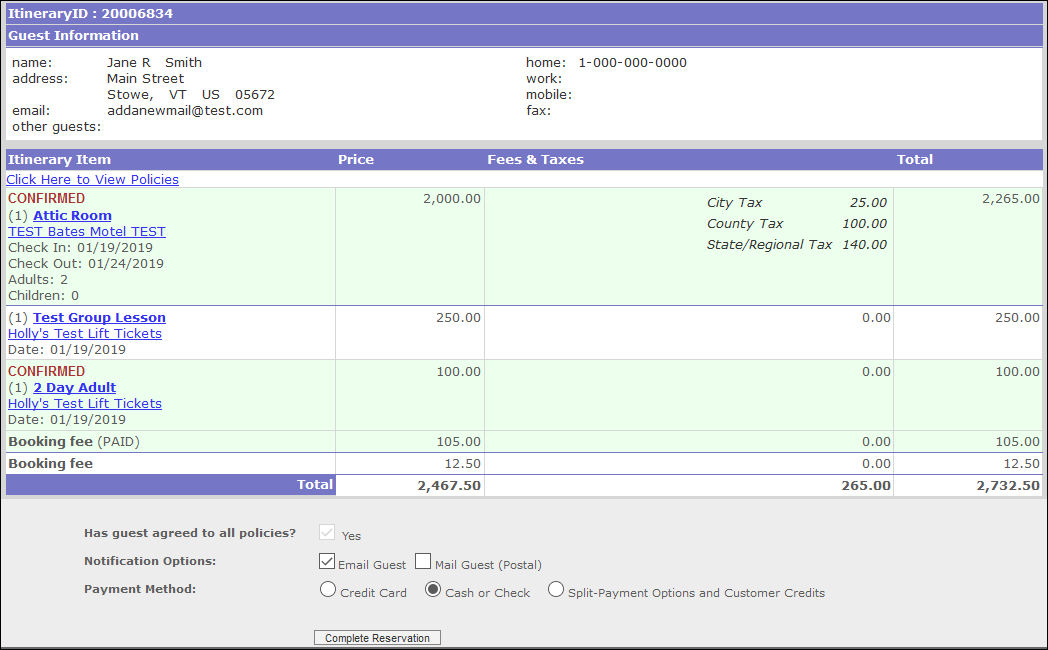
- To confirm the new product, click Reserve in the Itinerary window. The Reserved Itinerary appears.
- Review all policies for the new item with the guest.
- Check the Yes box next to the “Has guest been informed of all policies?” option.
- Choose the Notification Options for sending the confirmation notice.
- Select the Payment Method.
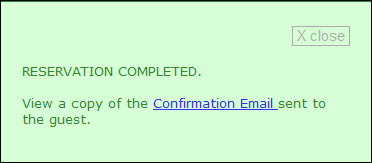
- Click Complete Reservation. The itinerary is refreshed to indicate that the products are confirmed (by displaying them on a green background) and the Reservation Confirmation pop-up window appears.
The newly added item also appears in the Itinerary window as a confirmed product (also on a green background).
Use the Modify feature to change a guest's arrival or departure date, the number of guests on a reserved itinerary, the quantity of a product, or the product itself.
- Log into your Inntopia CRS account and from the CRS home page, click New Session and log a marketing source. To open the session in a new window, check the Open in new window box. Otherwise, leave this box unchecked.
- Search for and open the reserved itinerary you want to modify.
- When the itinerary is open (the Customer Information and Itinerary windows are both populated), click Modify on the Itinerary window.
The itemized reserved itinerary appears with Modify, Cancel, and No Show links.Note: If there is no Modify button in the Itinerary window, that means you are working with a saved itinerary rather than a reserved itinerary.
- Find the product you want to modify and click its corresponding Modify link. An editable version of the product information appears directly under the original product listing.
- Make the changes to the itinerary item and click Reprice. The itinerary appears with the following changes:
- The original product is crossed out with the modified product appearing directly beneath in green.
- A Discard Changes button appears in the Status column of the modified product.
- The new rate, if applicable, appears in the Amount and Taxes/Fees columns.
- If applicable, the amount shown in the New Total fields have changed.
- If applicable, an amount appears in the Difference fields.
- Notification and payment options appear beneath the itinerary.
- The Commit Changes button appears at the bottom of the itinerary.
- A Pending Modification appears in the Itinerary window.
- If, after repricing the product, neither you nor the customer wants to continue the modification process, discard the changes by clicking on the product’s corresponding Discard Changes button. When changes are discarded, the original itinerary appears (both detailed and on the Itinerary window) with no changes.
- Review all policies for the modified item with the guest.
- Check the Yes box next to the “Has guest been informed of all policies?” option. The Commit Changes button appears at the bottom of the screen.
- Choose the Notification Options for sending the confirmation notice.
- Select the Payment Method.
- Click Commit Changes. The itinerary is refreshed to indicate that the changes are confirmed (by displaying them on a green background) and the Reservation Confirmation pop-up window appears.
The modified item also appears in the Itinerary window as a confirmed product (also on a green background).
Unlike saved itineraries, you must use the Modify feature to remove products from a reserved itinerary. Cancelling a product from a reserved itinerary differs in that funds have been collected (or are scheduled to be collected) for the reservation, the supplier’s inventory has decreased, and there are payments scheduled to be made to the CRS and the supplier for their part in the transaction.
When you make a cancellation, the accounting system is notified and closes out and balances the payment schedules appropriately, allowing supervisors to manage cancellation fees and other associated charges, as well as distribute funds that are due for the cancellation.
You can cancel individual products on an itinerary (line-item cancellations) using each product’s corresponding Cancel link, or you can cancel all of the products on an itinerary at once using the Cancel All button.
Note: Cancel-Restricted items associated with a product that are listed as separate line items, such as booking fees and travel insurance, are not automatically cancelled when the associated product is cancelled. Those items can be cancelled separately.
- Log into your Inntopia CRS account and from the CRS home page, click New Session and log a marketing source. To open the session in a new window, check the Open in new window box. Otherwise, leave this box unchecked.
- Search for and open the reserved itinerary for which you want to cancel an item.
- When the itinerary is open (the Customer Information and Itinerary windows are both populated), click Modify on the Itinerary window. The itemized reserved itinerary appears with Modify, Cancel, and No Show links.
Note: If there is no Modify button in the Itinerary window, that means you are working with a saved itinerary rather than a reserved itinerary.
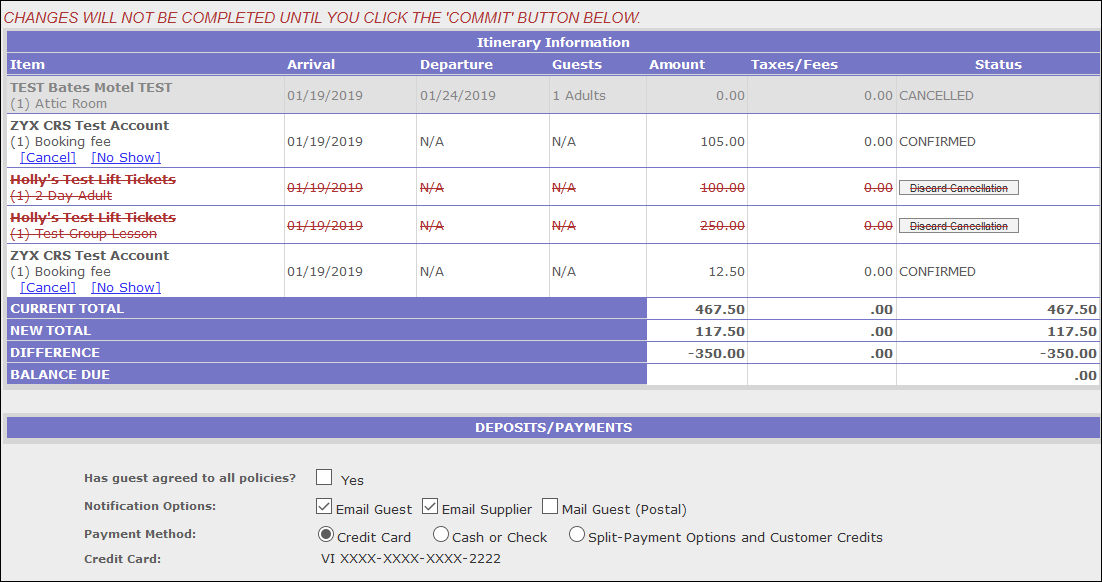
- Find the product you want to cancel and click its corresponding Cancel link. The cancelled product appears crossed out with the Discard Cancellation button appearing on the right.
- If you or the customer do not want to continue the cancellation process, you can stop the cancellation now by clicking on the product’s corresponding Discard Cancellation button. When cancellations are discarded, the original itinerary appears (both detailed and on the Itinerary window) with no changes.
- To continue with the cancellation, review all policies with the guest and check the Yes box next to the “Has guest been informed of all policies?” option. The Commit Changes button appears at the bottom of the screen.
- Confirm the Notification and Payment Options at the bottom of the screen and click Commit Changes. The cancelled product appears in grey, confirming its new status.
If a customer decides to cancel an entire itinerary, it can be more convenient to remove all the products simultaneously using the Cancel All button rather than removing each individual product.
Despite its name, the Cancel All button does not always cancel all of the products on an itinerary. In some cases, such as travel insurance or booking fees, which are not meant to be cancelled at all, Cancel All overlooks a product and keeps it active on the itinerary. These are referred to as "Cancel-Restricted products." You must delete each Cancel-Restricted product associated with a cancelled product in a separate modification step.
- Log into your Inntopia CRS account and from the CRS home page, click New Session and log a marketing source. To open the session in a new window, check the Open in new window box. Otherwise, leave this box unchecked.
- Search for and open the reserved itinerary you want to cancel.
- When the itinerary is open (the Customer Information and Itinerary windows are both populated), click Modify on the Itinerary window. The itemized reserved itinerary appears with Modify, Cancel, and No Show links and a Cancel All button on the bottom left of the screen.
Note: If there is no Modify button in the Itinerary window, that means you are working with a saved itinerary rather than a reserved itinerary.
- Review the itinerary with the guest to make sure it is the correct one that you want to cancel.
- Click Cancel All. Each product on the itinerary that is not Cancel-Restricted appears crossed out in red and has a corresponding Discard Cancellation button.
- If you or the customer does not want to continue the cancellation process, you can stop the cancellation now by clicking on each product’s corresponding Discard Cancellation button. When cancellations are discarded, the original itinerary appears (both detailed and on the Itinerary window) with no changes.
- To continue with the cancellation, review all policies with the guest and check the Yes box next to the “Has guest been informed of all policies?” option. The Commit Changes button appears at the bottom of the screen.
- Confirm the Notification and Payment Options at the bottom of the screen and click Commit Changes. The cancelled products appear in grey. Any Cancel-Restricted products (such as booking fee or travel insurance) remains active on the itinerary on the default white background. These items can be cancelled separately if desired.
A "no-show" is when a customer fails to arrive for a reservation. In such cases, most supplier policies call for the full price of the product to be paid and, in some cases, penalties to be added to the itinerary. Since the full price of the product is due to be paid and the product was held out of inventory for the customer, in the case of a no-show, the products on the itinerary should be kept active.
Since most CRS providers don’t learn about a no-show until after the fact, this feature is usually used in the days following a scheduled arrival date; however, it can also be used prior to an arrival.
You can use the No-Show feature to “flag” a product as a no-show, but not cancel it. Therefore, the supplier and CRS can both recognize the no-show and add appropriate charges to the itinerary without inaccurately placing the product in inventory.
- Log into your Inntopia CRS account and from the CRS home page, click New Session and log a marketing source. To open the session in a new window, check the Open in new window box. Otherwise, leave this box unchecked.
- Search for and open the reserved itinerary you want to cancel.
- When the itinerary is open (the Customer and Itinerary windows are both populated), click Modify on the Itinerary window.
The itemized reserved itinerary appears with Modify, Cancel, and No Show links.
Note: If there is no Modify button in the Itinerary window, that means you are working with a saved itinerary rather than a reserved itinerary.
- Find the product or products you want to flag as a no-show (including booking fees and travel insurance products) and click each corresponding No Show button. The flagged products appear crossed out with the Discard No-Show button appearing on the right. Depending on the cancellation policy in place for the no-show product, additional charges may appear on the itinerary such as a Non-Refundable Deposit.
- To discontinue the no-show flagging process, click the product’s corresponding Discard No-Show button. When cancellations are discarded, the original itinerary appears (both detailed and on the Itinerary window) with no changes.
- To continue with the no-show flagging process, check the Yes box next to the “Has guest been informed of all policies?” option. The Commit Changes button appears at the bottom of the screen.
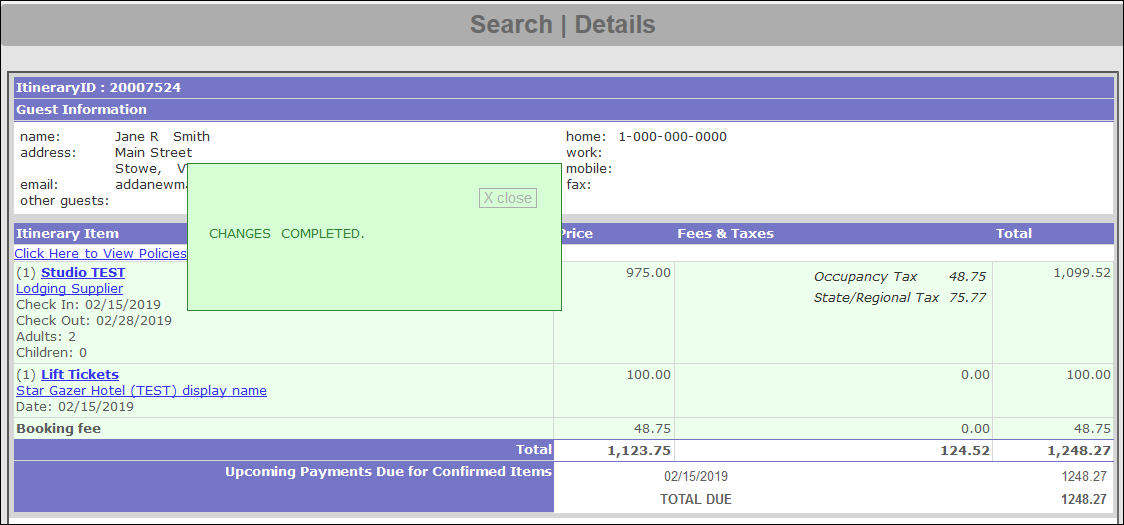
- Confirm the Notification and Payment Options at the bottom of the screen and click Commit Changes. A message appears confirming the changes to the itinerary were successfully completed.

