Create an Itinerary
When a customer is interested in purchasing a product, you can select one or multiple products to create an itinerary. Itineraries can either be reserved once a customer is ready to commit to a product purchase or saved for use at a later time.
Products saved on an itinerary remain in the supplier’s inventory within the Inntopia system and are still available for purchase by other customers. Products on a reserved, or booked, itinerary are removed from the supplier’s inventory and can no longer be sold to other customers.
When a customer has built an itinerary, but is not ready to commit to reserving it, you can save the itinerary in the system for later.
The benefits a customer receives by saving an itinerary include an email of the itinerary, a record of the potential costs of their stay, and a record of the product(s) in which they are most interested. The benefit to a CRS agent is that the customer is aware of the saved itinerary, which encourages the customer to reserve the itinerary. A permanent record is kept of every saved itinerary created.
Once a customer is ready to commit to a product purchase, you can reserve an itinerary for them. A reserved itinerary is created when you tell the system to take a product out of inventory and either collect or schedule payment for the product(s) on the itinerary. When a customer reserves an itinerary, the supplier of the product receives an email notification and the product is automatically removed from their inventory in the Inntopia system so that no other customers can purchase it.
A reservation transaction is governed by the policies and deposit schedule associated with the product(s). Individual products can have policies and deposit schedules that are specific only to that product. "Policies" and "Deposit Schedule" are defined below:
- Policies – Policies are the rules set up by the supplier of a product that must be followed for a customer to transact business with that supplier. Breaking policies can result in penalties or refusal of service. Some polices are simple (check-in and check-out times) and some are more complicated (cancellation policies and their resulting fees, “Children Stay Free," or early departure policies).
- Deposit Schedule – A structured payment schedule that a customer or CRS agent must follow to process payment for reservations. Deposit Schedules are defined by either the CRS or the supplier when an account or product is set up in the Inntopia system, often dependent upon who is collecting payment for the product.
- Sample Deposit Schedule #1 – 50% payment due at the time of booking, with the balance due five days prior to arrival.
- Sample Deposit Schedule #2 – 10% payment due at the time of booking, 40% due 14 days prior to arrival, balance due seven days prior to arrival.
- Log into your Inntopia CRS account and from the CRS home page, click New Session and log a marketing source. To open the session in a new window, check the Open in new window box. Otherwise, leave this box unchecked.
- Associate a customer profile with the itinerary:
- If the customer has an existing profile in the Inntopia system, use the fields in the Customer window to search for and select the customer profile.
- If the customer does not already have a profile in the Inntopia system, add and save the customer profile information at this time. The customer profile information appears in the Customer window and is associated with the itinerary.
- Conduct a lodging search or other product search for what your customer is requesting.
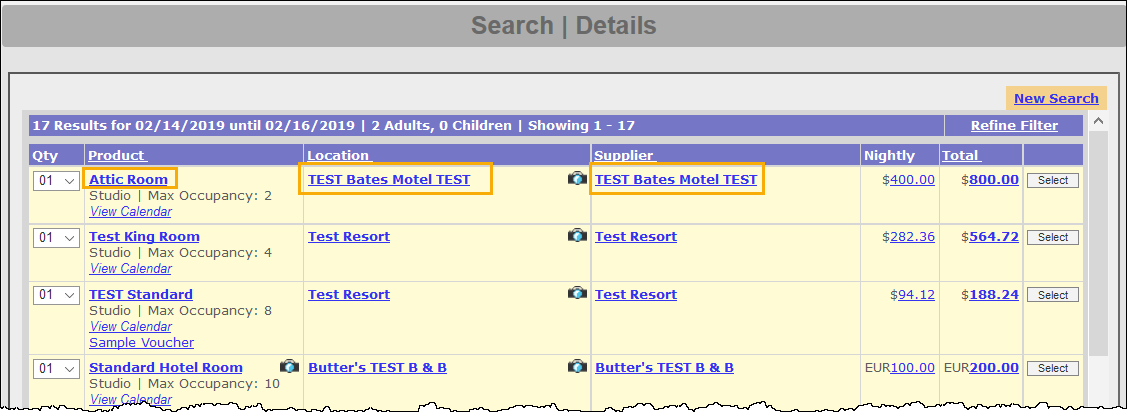
- Look through the search results and find a product to offer your customer.
- To review a product's details, click its corresponding Product, Location, and Supplier links to view their respective Description, Features, and Policies windows.
- To view the images (if any) that the supplier has associated with the product you found, click its corresponding camera icon
 .
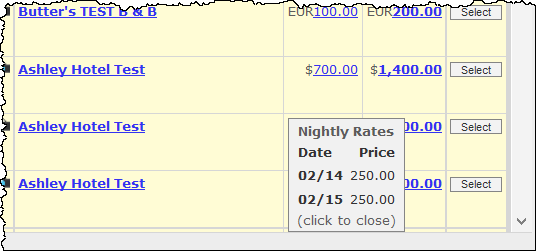
. - To check the nightly rate of the product, in the Nightly column, click on the dollar amount listed. A pop-up box displays the nightly rate for each date in the product.
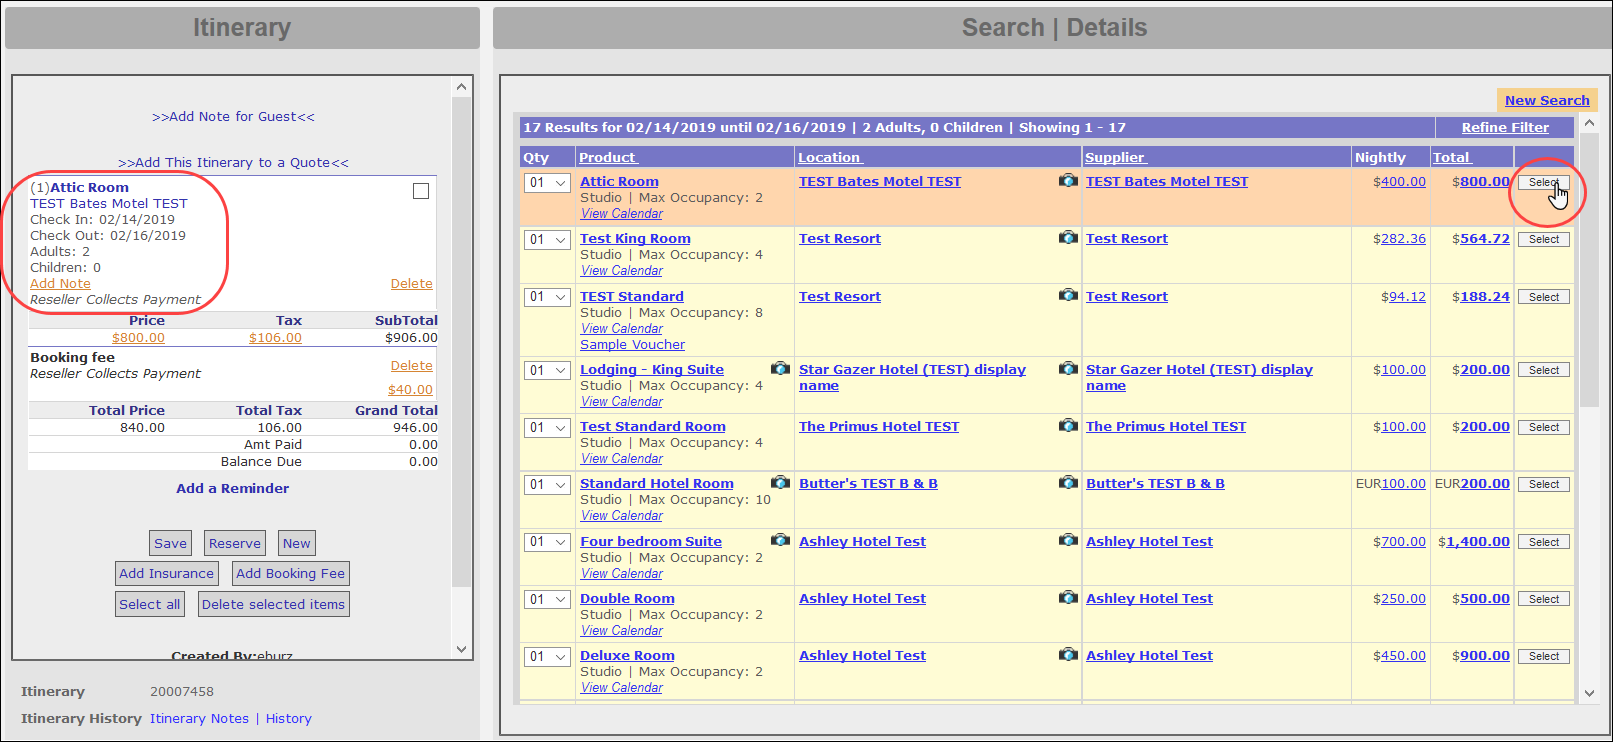
- When the customer decides on a particular product, click the product's corresponding Select button. The product you selected is highlighted and the product’s information appears in the Itinerary window.
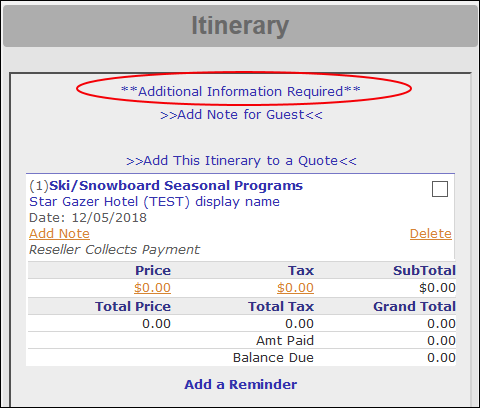
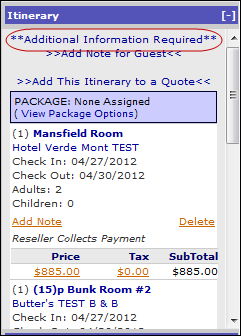
- If additional information (customer requirements) is required for reserving a product on the itinerary, an Additional Information Required link appears at the top of the Itinerary window.
 Enter Customer Requirements
When a Customer Requirement is added to a product, a link to enter the requested information into the itinerary is included on the Itinerary window.
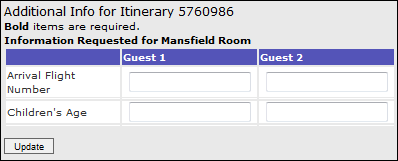
- To enter the additional information for the itinerary, click the link on the Itinerary window. An Additional Info for Itinerary <itinerary number> window to enter the additional information appears. Required items appear in bold.
- Enter the information in the fields and click Update. The information is added to the itinerary and the link changes to Edit Additional Information.
- To make changes to the Additional Information, click the Edit Additional Information link, make the changes, and click Update.Notes:
- By default, Inntopia.CRS does not require agents to enter customer requirements to complete a reservation. To force agents to collect customer requirements prior to completing a reservation, you can submit an INNTERACT request to have Inntopia staff turn off the Bypass Customer Requirements system setting. This will prohibit an agent from completing a reservation without entering customer requirements.
- Customer requirements are included within the guest confirmation email. No setup is required.
- If available, offer the guest a guaranteed reimbursement for inclement weather from Sensible Weather™:
 Offer Weather Guarantee
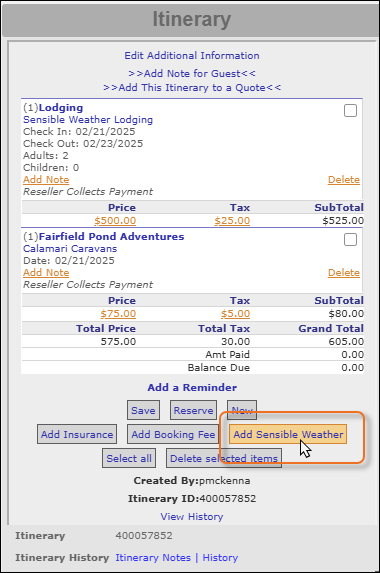
- On the Itinerary Window, click the Add Sensible Weather button.
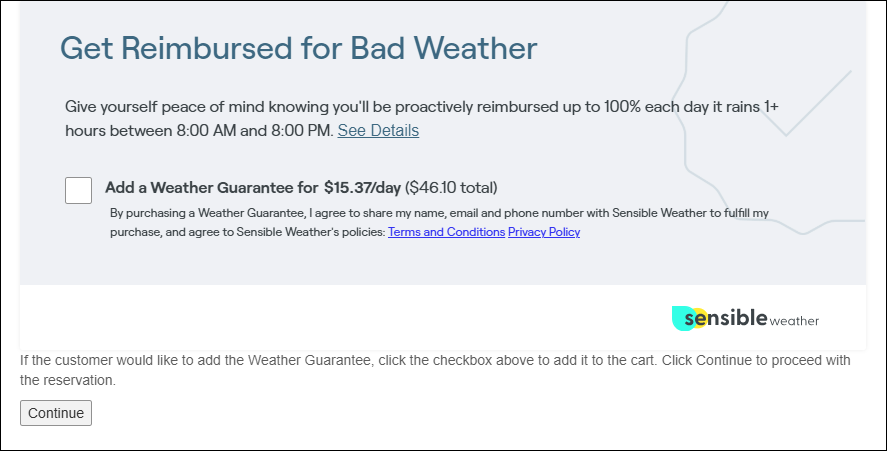
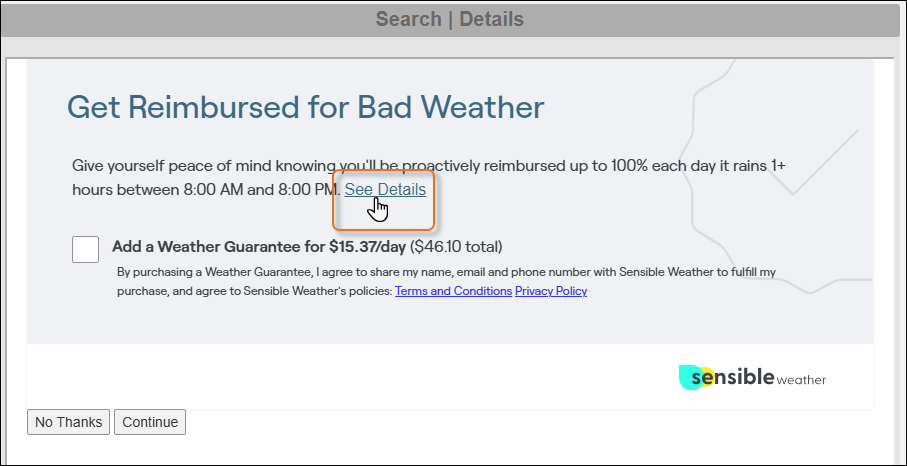
The Sensible Weather pop-up screen appears showing either the cost of a weather guarantee for the itinerary or a message stating the itinerary doesn't qualify for a weather guarantee.
- If the itinerary qualifies for a weather guarantee, read the offer to the guest according to the script provided by Sensible Weather.
- To view detailed information about the offer, click the See Details link.
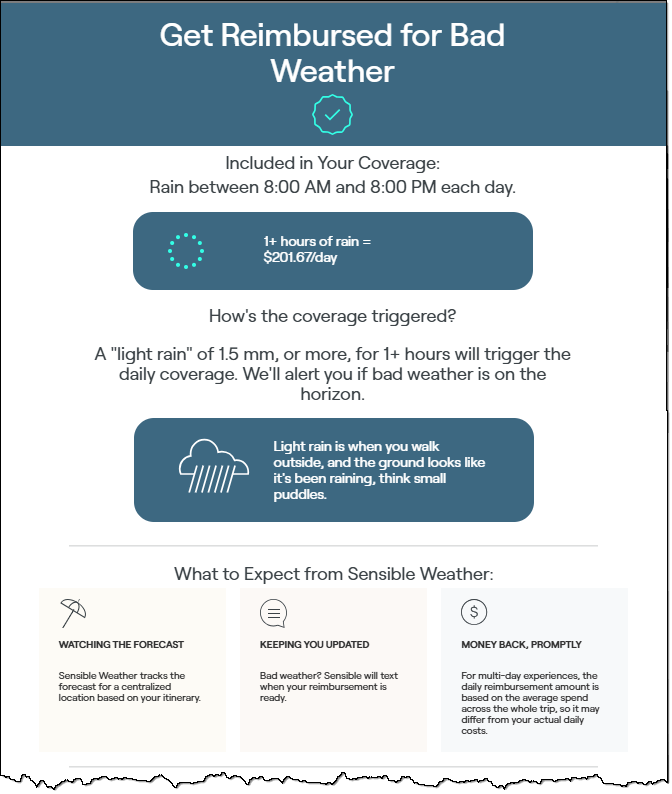
The weather guarantee offer details appear.
Read the information to the guest according to the script provided by Sensible Weather. If you have questions, consult your call center manager.
- If the guest declines the weather guarantee offer or if the itinerary is ineligible for a weather guarantee, click the Continue button. The Sensible Weather pop-up window disappears and no guarantee is added.
- If the guest accepts the weather guarantee offer, click the Add a Weather Guarantee checkbox and click Continue.
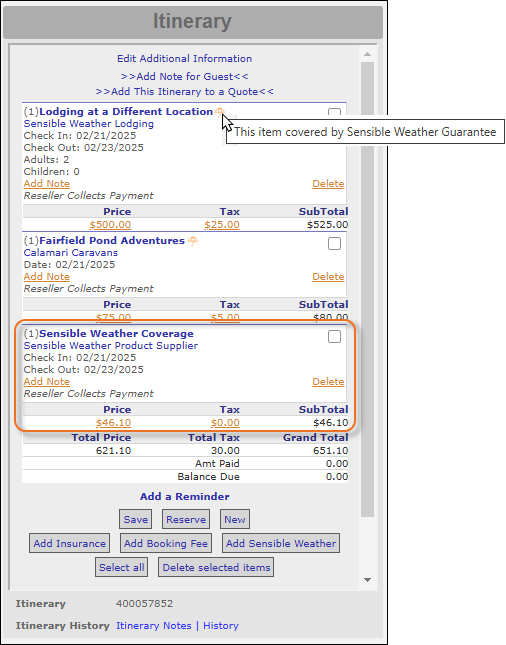
The Sensible Weather guarantee is added to the itinerary. Covered items are indicated by a corresponding umbrella icon. Hovering the mouse pointer over the icon reveals text indicating the item is covered by Sensible Weather.
- On the Itinerary Window, click the Add Sensible Weather button.
- If your company is integrated with Vertical Insure, check to see if any insurance coverage offerings are available for the itinerary:
 Offer Vertical Insure Coverage
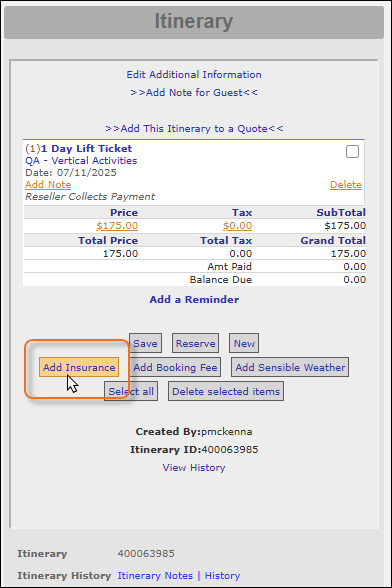
- On the itinerary window, click Add Insurance.
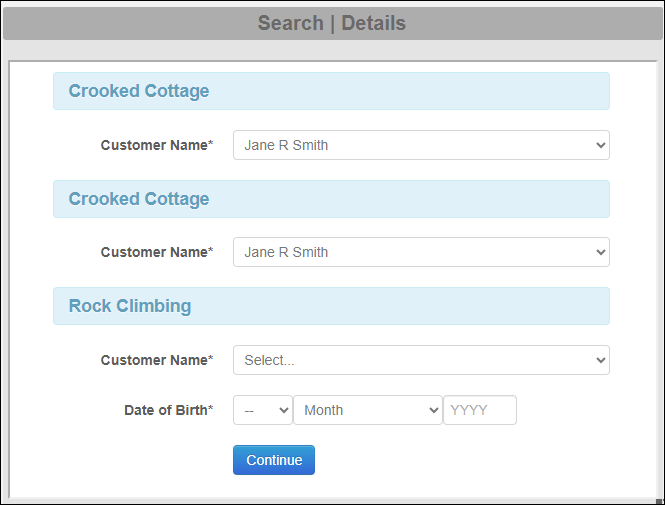
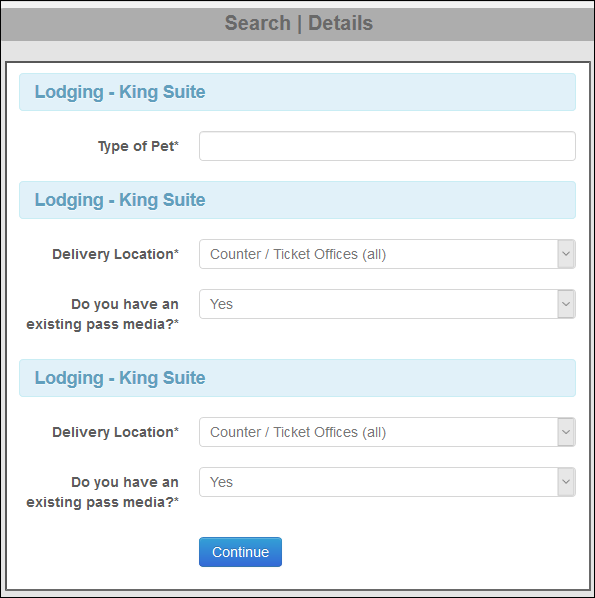
Customer Requirements associated with the selected itinerary items appear in the Search | Details window.
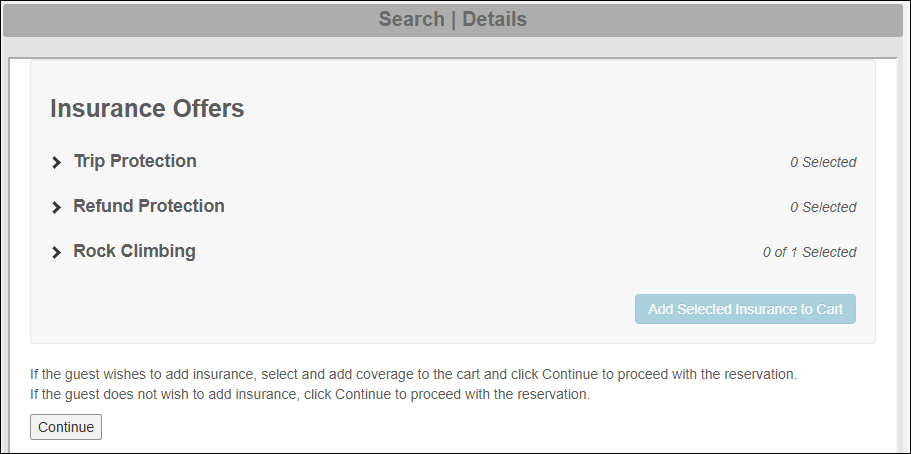
- Fill out the Customer Requirements that appear in the Search | Details window and click Continue. The insurance offerings appear in the Search | Details window.
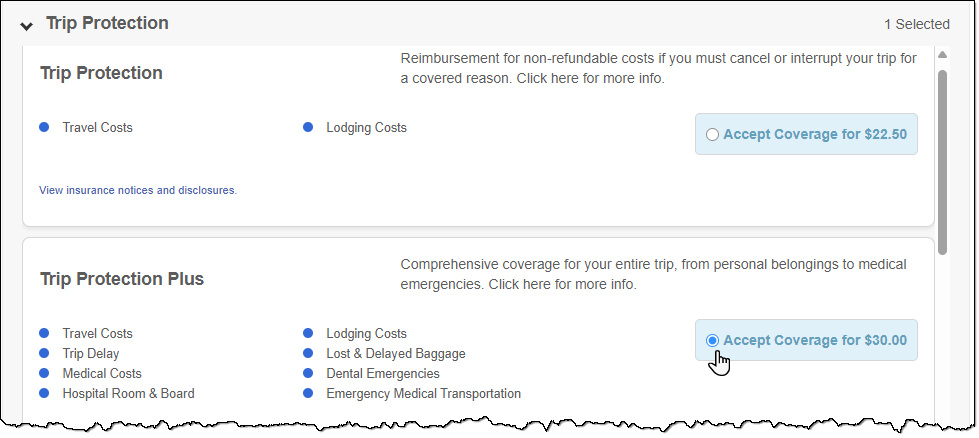
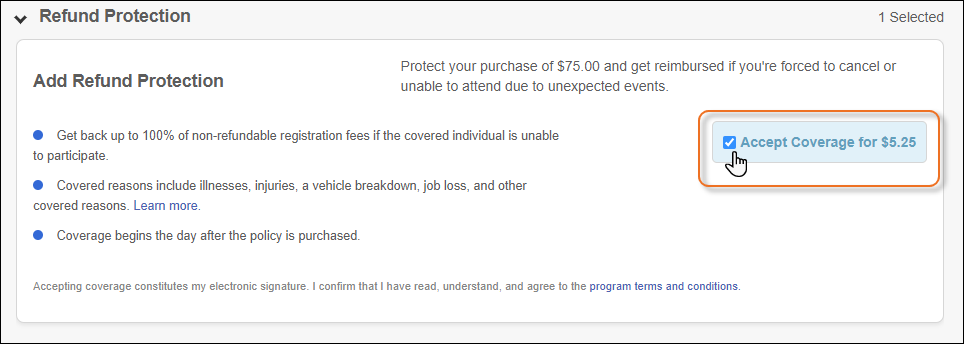
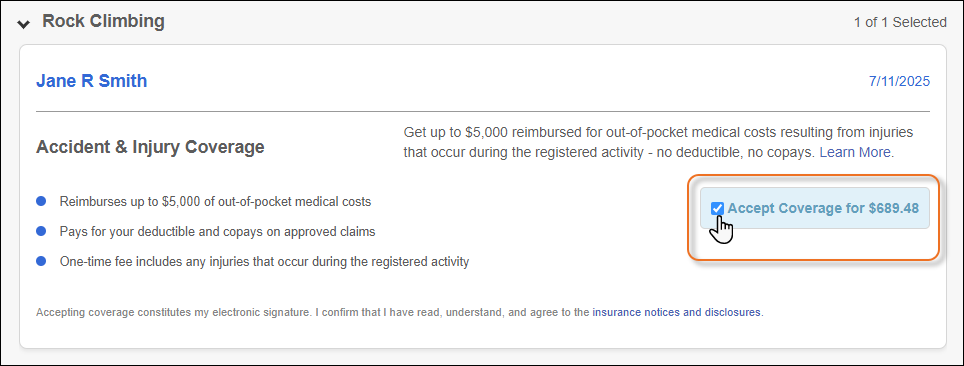
- Open and review each insurance offer with the guest:
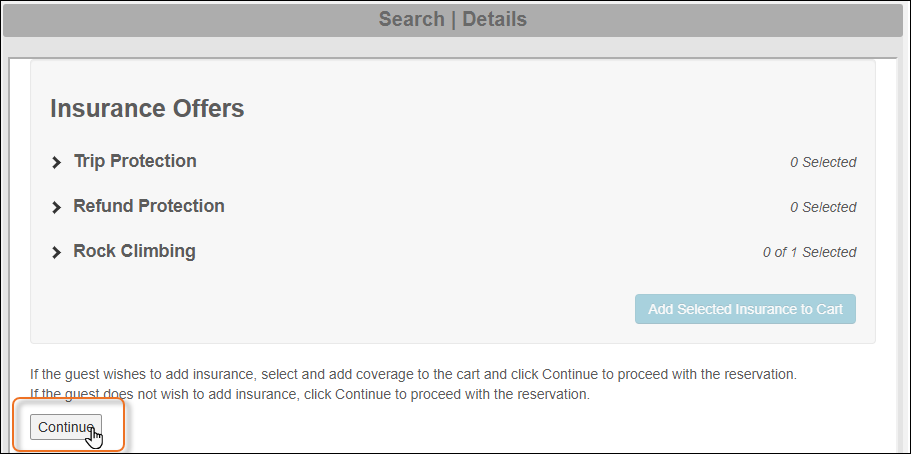
- If the guest declines all insurance coverage offers, click Continue.
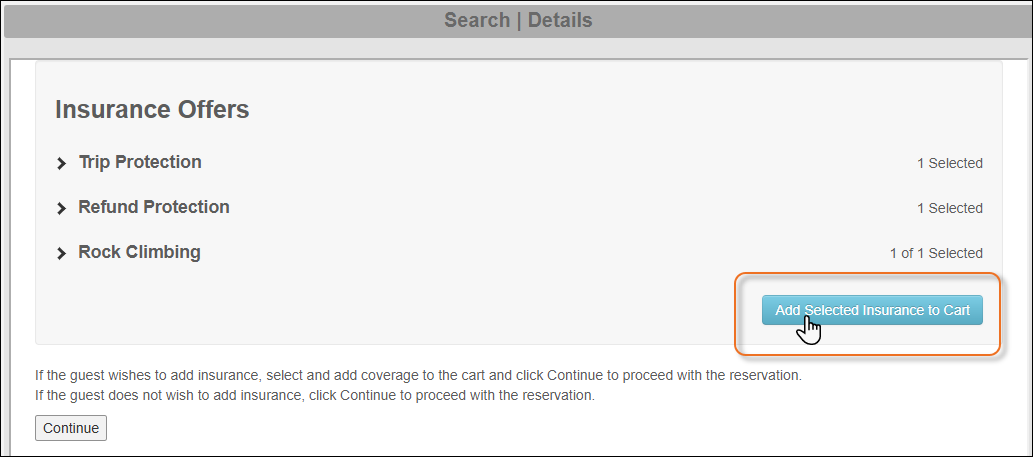
- If the guest has accepted any of the insurance offers, click Add Accepted Insurance to Cart.
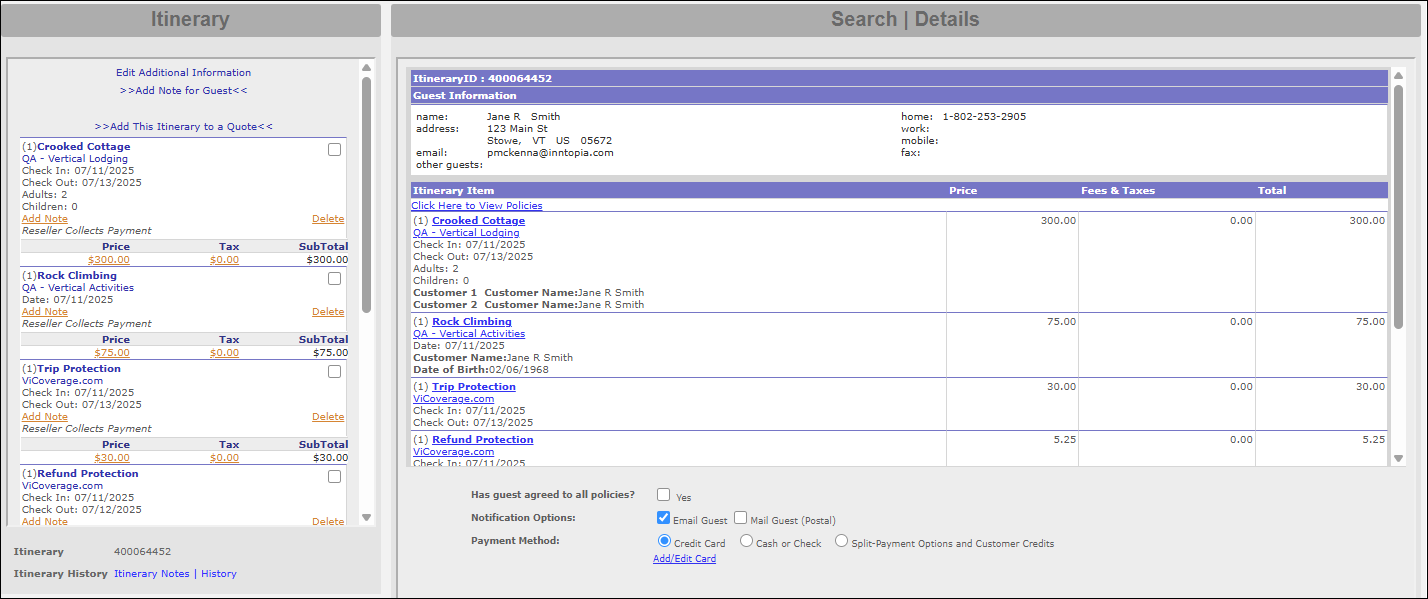
- When prompted, click Continue. The itinerary appears in the Itinerary and Search | Details windows with the accepted insurance products included.
- On the itinerary window, click Add Insurance.
- Review the itinerary with the guest and make adjustments as needed.
- If your customer is not quite ready to commit to confirming the itinerary, continue to Save Itinerary below.
If your customer is ready to reserve and pay for the itinerary, continue to Reserve Itinerary below.
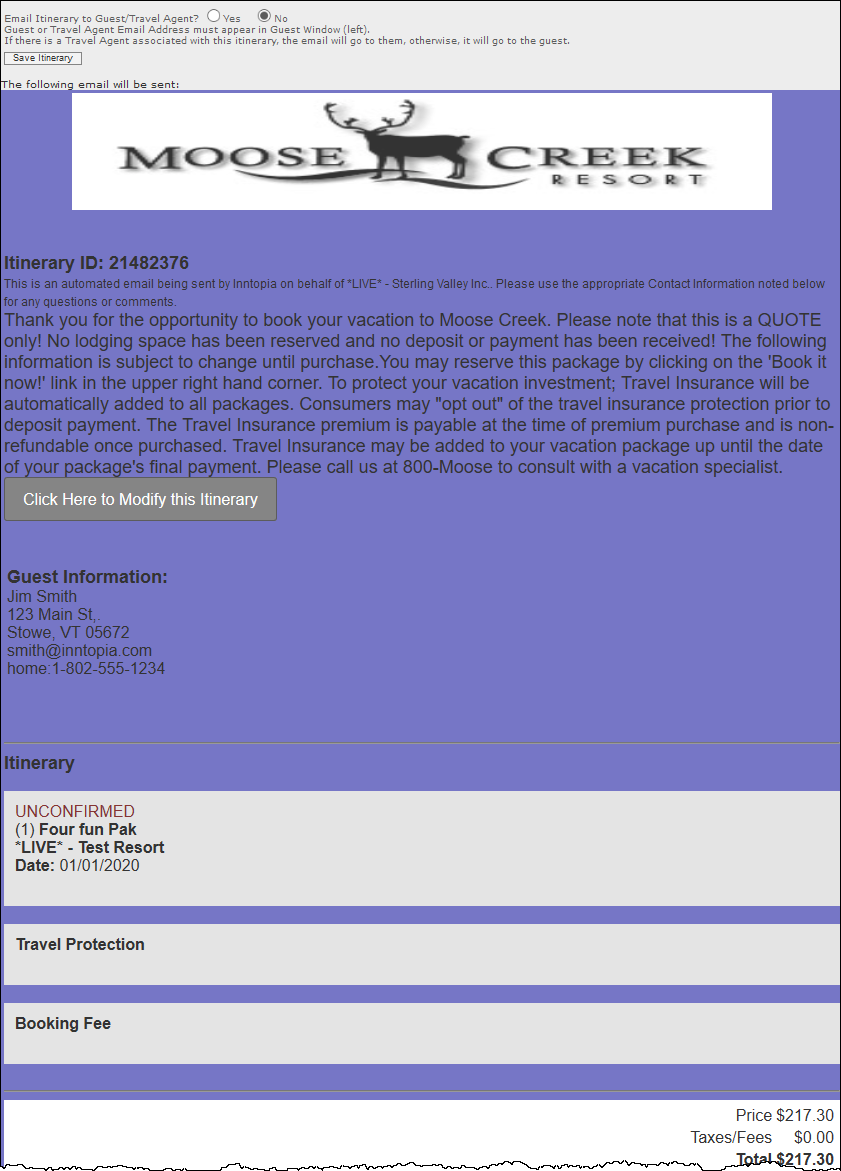
- On the Itinerary window showing the itinerary you built, click Save. The saved itinerary appears.
- At the top of the page, next to the Email Itinerary to Guest/Travel Agent option, choose one of the following:
- Yes – A box appears for you to enter a personalized message to be included in the email sent to the customer or travel agent.
- No – No email will be sent to the guest or travel agent regarding the saved itinerary.
- When you have finished reviewing the itinerary for accuracy, at the top of the page, click Save Itinerary.
- For instructions on retrieving a saved itinerary at a later time, click here.
- On the Itinerary window, click Reserve.
If additional information is required, the fields for entering required information appear in the Search | Details window.
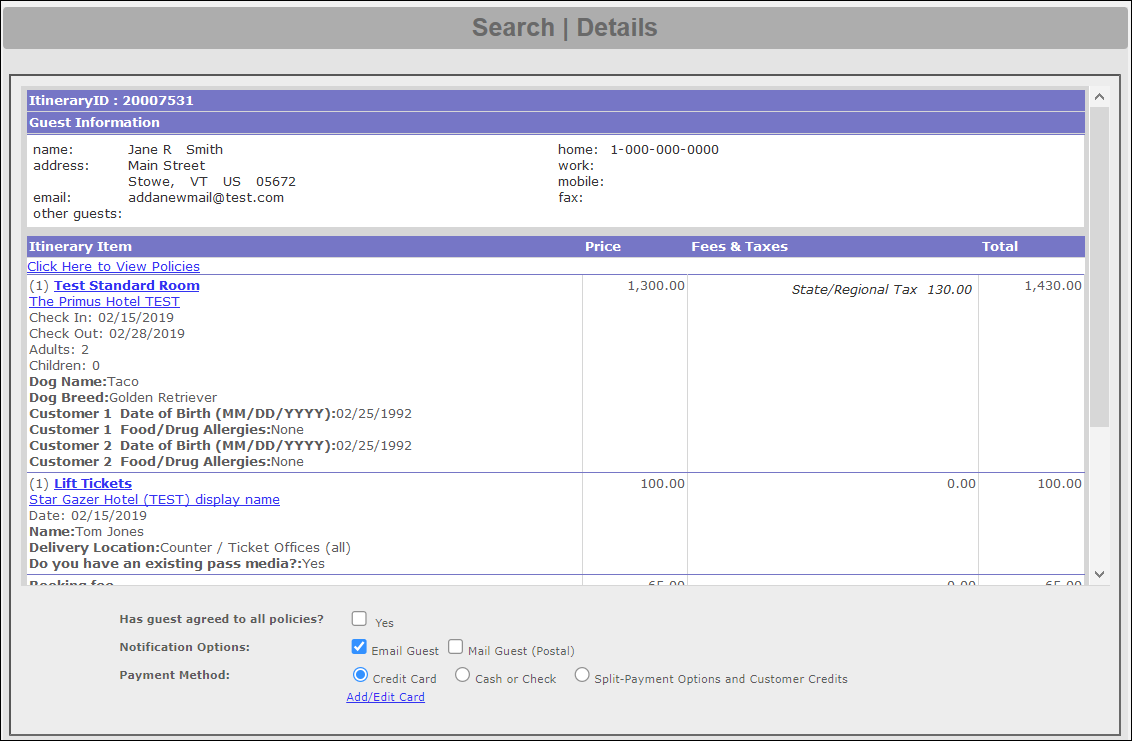
Enter the required information in the fields that appear and click Continue. The itinerary appears in the Search | Details window.
The information included on the reserved itinerary includes the Itinerary ID, Guest Information, Itinerary Item details (with links to view specific details such as policies and supplier details), any additional fees, itinerary totals, and the Schedule of Deposits Due. Additional options necessary for completing the reservation also appear at the bottom of the screen.
- To review the policies associated with each product, click the Click Here to View Policies link.
Read the policies to your customer to ensure they understand all the policies to which they are about to agree.
Note: Suppliers that don't have any policies set up for a product that is included on an itinerary are not listed on the policies display for that itinerary.
- After you have reviewed all the policies for each product with your customer, check the corresponding Yes box for the Has guest agreed to all policies? option. The Complete Reservation button appears at the bottom of the screen.
- Choose Notification Options from the following:
- Email Guest – Send notification via email.
- Mail Guest (Postal) – Send notification via U.S. Postal Service. This type of notification can be sent in addition to an email notification.
- Choose a payment method from the following options:
- Credit Card – Credit card information must have been entered in the Customer Profile information. If you choose Credit Card but haven’t entered the information in the Customer Profile, a message appears alerting you the credit card information is not in the system.
- Check/Cash – Payment will be mailed to you or be delivered in person.
- Split-Payment Options and Customer Credits – When you choose this payment option, and click Complete Reservation, a message appears stating that the transaction is complete but that special payment processing is required. The message contains a link to the Process Split Payment screen.
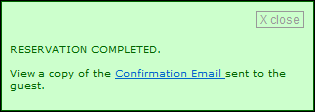
- When you have finished selecting reservation options, click Complete Reservation. If all required information was entered into the System as you created and reserved the itinerary, a message appears telling you the reservation was completed successfully, which includes a link to view the Confirmation Email sent to the travel agent. If no travel agent is associated, the message includes a link to view the email sent to the customer.
If any information required by the Inntopia system is missing (e.g. a credit card CVV number), a message appears informing you of what additional information is required to complete the reservation along with a link to edit that information.
Click on the link, enter the required information, and try reserving the itinerary again.
Once your itinerary has been reserved, notice the following changes on the Reserved Itinerary window and the Itinerary window:
- On the Reserved Itinerary window, the word “Confirmed” appears above each product listed in the Itinerary Item section.
- On the Itinerary window:
- The products on the Itinerary now appear on a different color background. A green background indicates that the product is reserved and confirmed.
- A Resend Itinerary to Supplier link appears beneath the supplier name.
- Three additional buttons appear below the itinerary:
- Modify – Use Modify to make changes to a reserved itinerary (changing dates, cancelling or adding additional products, etc.).
- Resend Itinerary – Sends an additional copy of the confirmation email to the guest.
- Print – Prints a copy of the itinerary.
Note: The ability to complete reservations with a declined credit card is available in Inntopia CRS upon request. To have this feature activated for your account, contact your account manager.
